

Showing all posts tagged "Cb Homepreps Homesteading"
How to Set Up the Ultimate Personal Google Maps
Log In to the Your Google AccountP
First things first, you can't really personalize Google Maps without a Google account. It sounds self-explanatory, but the more you set up on your account, including contacts, email, and your Google+ profile, the better Maps works. This is self-explanatory on the browser , but make sure you log in on your mobile devices as well. On Android or iPhone, click the person icon in Google Maps, and login from there. Now everything you do in Google Maps is synced between your smartphone and the desktop app.P
Set Up Your Home and Work AddressP
Once you're logged in, the next step is setting up your work and home address. This is pretty easy to do, and once you do it makes it so Google Maps can provide better information to you based on where you (probably) spend the most time.P
On your computer:P
Click the search box.
In the dropdown menu, select "Get directions."
In the next dropdown, select Home or Work to edit them.
Type in the address and hit enter.
On Android/iOS:P
Tap the person icon on the home screen.
Touch "Enter home address" or "Enter work address"
Enter your address.
Home and work are handy to have because it makes it easy to always get directions from the places you spend your time. You'll also see your home and work on the map when you're searching for other addresses, so you'll always have a good idea of how far everything is from you.P
Integrate Your Contacts into Google MapsP
Chances are you don't remember every single one of your friend's addresses. Thankfully, you don't have to if you use Google Contacts .P
If you're on Android, you're likely already invested in the Google ecosystem, which includes Google Contacts. If your friend's address is in your phone, it's already in Google Maps too. If they're not, then you'll have to do a little bit of work to get things working properly. First off, you might need to import your old address book into Google:P
Export your contacts from your existing address book (usually File > Export > Export vCard in an app like Outlook or Mac Address Book).
Sign into Gmail.
Click the Gmail icon in the top left corner, and select Contact.
Click "More actions" and select import.
Click "Choose File" and select the vCard files you just created to upload.
Once that's all set up, you can search for a friend's address by name in Google Maps. If you're an iOS user who doesn't want to mess around with two address books, you can also sync your contacts to your Google account instead of iCloud to keep those up to date .P
Use Stars and History to Find What You're Looking For (and Where You've Been)P
Now that all the basics are out of the way, it's time to really dig into getting more out Google Maps. This means using two big features you might not really bother with: stars and history.P
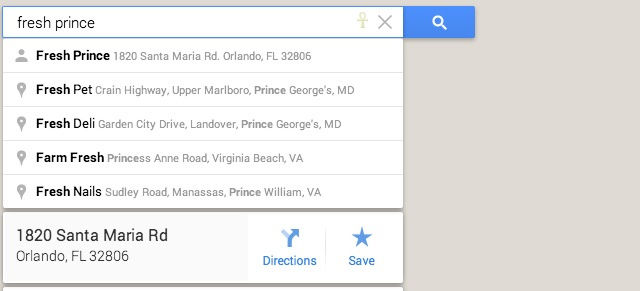
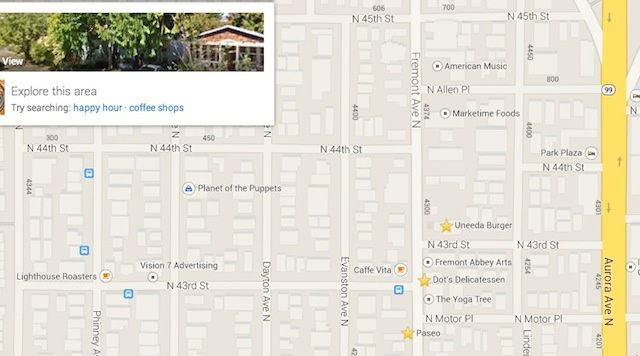
Stars are simple enough. When you search for an address on the desktop or mobile version of Google Maps, you can add a star to save it. These stars then appear on the map. This is useful for all kinds of things, including remembering restaurants you want to go to, shops you want to visit, or landmarks. Why's this helpful? It means that you can glance at your map and instantly see if you're in a part of town with something you've always wanted to visit.P
Stars aren't the only way to figure out where you want to go. Google Maps also keeps a complete history of everything you search for (it can also keep track of every place you go, if you want ). On the desktop, just click the gear icon, then "My Places" to view everywhere you've starred and every place you've searched for in Google Maps. On mobile, tap the side bar icon > Settings > Map History. If you like, you can go through and delete items you don't want anyone else seeing, but it's handy to go searching through to find addresses you've been to or places you've searched for. As with most Google products, those saved searches have an effect on any other search you do in the future.P
Leave Reviews and Ratings to Improve RecommendationsP

Google+ might not have been exactly a Facebook killer, but it does have some great little features. The best is Local , where you can see your friend's reviews of restaurants as well as post your own. When you review a restaurant (even with just star rating) in Google Maps, that information is shared with all your Google+ friends. The more reviews you and your friends do, the better Google can be at recommending things you like.P
The nice thing about Local is that you don't have to write a review, a starred rating works just as well. Just put in your rating out of five stars and your friends will see that. If you have a tight knit group of Google+ friends, it's actually incredibly helpful to have all this information right in Google Maps.P
Use Search to View Your Upcoming PlansP
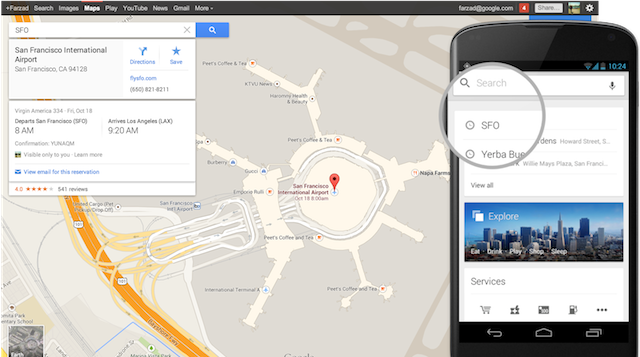
Google recently rolled out an update that added integration with your Gmail account for reservations. This is pretty simple: when you buy tickets using a service that sends a receipt to your Gmail account, that information will be added to Google Maps. So, if you search for an airport, Google Maps displays your upcoming flights that go out of that airport. The feature just supports flights, hotels, and restaurant reservations right now, but chances are more services and events will be integrated into Google Maps in the future.P
Make Your Own MapsP
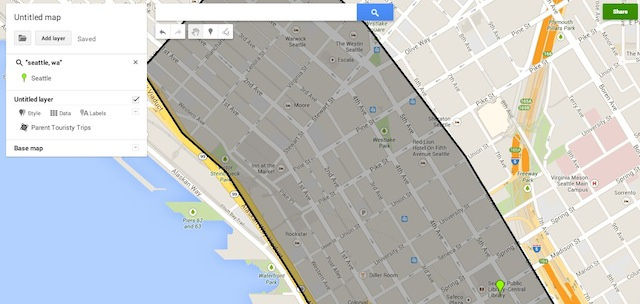
We've talked quite a bit about making your own maps with Google Maps , but it's still one of those features that few people know about. With a custom Google map, you can plan out a trip itinerary for a vacation, map out a list of restaurants you've always wanted to visit, or just create a guide of where you take visitors when they're in town. When you create a custom map, you can view it on mobile or desktop.P
The more you use Google Maps, the better it gets. While it might not seem all that smart when you first start using it, the more places you review, ratings you give, and places you star, the smarter it gets. Over time, Google Maps will give you a much better slice of information that you might expect.P
Photos by Harry Wood and bnycastro .P
Posted on October 16th, 2013
How to Build a Better Sawhorse | The Art of Manliness


Strong, Durable, Collapsible, and Versatile: How to Build a Better Sawhorse
by A Manly Guest Contributor on August 16, 2012 · 22 comments
Editors Note: This is a guest post by Ethan Hagan from One Project Closer. Check out some of his other manly contributions to AoM like repairing drywall and building a workbench.
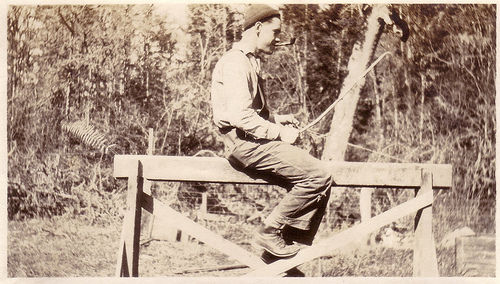
As I continue to expand my workshop, I quickly discovered the need for some good sawhorses. Sawhorses are great for setting up a temporary workspace, out-feed (on my table saw), and more. Now you can slap some sawhorses together pretty quickly and they’ll work just fine; Brett shared a fast and easy sawhorse design awhile back if you’re looking for something nice and simple. But I didn’t want to compromise on features. So I scoured the internet for ideas, and eventually decided on this design called the Shopdog.

These are not the easiest sawhorses to build. However, they are extremely strong, durable, collapsible and versatile. The versatility comes from the fact that the cross member can be modified depending on the application. For instance, cutting V notches into the top makes it easy to support round pipe. Stapling carpet over the top is perfect for protecting woodworking projects. Best of all, if the cross member gets messed up, all you have to do is swap in a new piece of 2×4. I’m confident that you won’t find a better workshop sawhorse anywhere else. Now here’s how to build ‘em.
Tools & Materials List
These are the tools and materials I used to build the sawhorses. The total cost for each sawhorse is less than $20, and a big chunk of that is for the locking tie-down. If you can find a suitable alternative, I’ll bet you can get the price tag under $15 which is cheaper than most of what you’ll find at the Big Box stores!
The Shopping List
- (3) 8 foot 2×4′s
- (2) 3/8″ x 3-1/2″ carriage bolts
- (6) 3/8″ washers
- (2) 3/8″ nuts
- (10) 2-1/2″ wood screws
- (1) 6′ locking tie-down
Tools
- Compound miter saw (must be capable of bevel and miter cuts)
- Jigsaw (or handsaw)
- Drill/driver
- Square
Step 1: Cut the Lumber for Individual Components
To keep these instructions as clear as possible, I’ve labeled a couple of pictures and listed the necessary cuts. Remember that you’ll need to cut miter and bevel angles on the top and bottom of each piece while maintaining a consistent length. All my legs measure 40″ long, but you can change that to whatever length you prefer.
The cuts I list below assume the work piece is on the right-hand side of the miter saw, same-side up.
- Leg 1 & 3 Top: 25° miter right, 10° bevel right
- Leg 1 & 3 Bottom: 25° miter right, 10° bevel left
- Leg 2 & 4 Top: 25° miter left, 10° bevel right
- Leg 2 & 4 Bottom: 25° miter left, 10° bevel left
- Lower Supports: 32″ and 28″ long with 10° miter cuts on both sides
- Upper Support: 24-1/2″ long with 10° miter cuts on both sides
- Cross Member: 36″ long, straight cut on both sides.
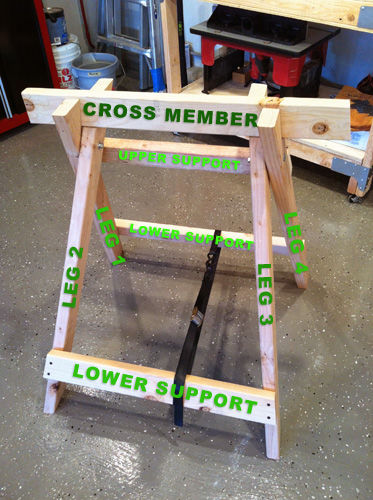


Once the legs are cut, they should look like this.
Step 2: Cut the Notch
The cross-member needs to sit parallel to the ground (for optimal support), and that requires making a compound cut to notch each leg. Unfortunately, you can’t complete the notch with just a miter saw, and here’s where the jigsaw come into play. If you’re looking closely, you’ll notice the cross member sits proud (higher than the legs) and this is because that little extra space helps protect the legs from saw blades.

First, mark your cut on the “inside" of each leg. The first line will be straight down and perpendicular to the top edge. Mark the line by setting your square on the top of the leg and scribe a line starting at the corner. This line should measure 3-1/8″ (just shy of the actual height of a 2×4).
The next line is perpendicular and will continue all the way to the edge of the 2×4. It should measure 1-1/2″ long.
Flip the leg over and repeat the process.
Next, turn the 2×4 on end and draw a straight line between the two sets of markings. It’ll be angled at 10° which matches the top.
You can make the first cut with your miter saw set to a 25° bevel and 10° miter. Be careful as the depth of this cut is different on each side and you don’t want to cut too deep.
The second cut needs to be done with a jigsaw, and I used some scrap for additional support. Again, be careful because the depth is different on either side, and you’ll need to angle the saw to complete the cut.
Notch all four legs on their inside edge using the same technique.
Step 3: Drill Bolt Holes
Next, you need to drill a hole for the carriage bolt which acts as a hinge to collapse the sawhorse. Drill the hole 6″ down, centered on the 2×4. I found it easiest to drill through both legs at the same time. In order to position the legs correctly, put a piece of scrap 2×4 in the notch.
Step 4: Insert the Carriage Bolts and Washers
Slide the carriage bolts through with two washers in-between the legs to allow them swing. Put on a third washer next to the nut, and tighten it (but not too tight).
Step 5: Attach Cross Supports Using Wood Screws
Now it’s time to attach the three support pieces. I suggest drilling pilot holes to avoid splitting the wood since the screws are so close to the end grain. I placed the lower support 6″ up the leg and the upper support about the same distance down from the top.
Step 6: Install the Strap
To firmly sandwich the cross member between the legs, use a locking strap (or ratcheting strap) to pull the legs tight.
Final Thoughts and Pictures
I’ve been using these sawhorses since January, and I love ‘em! Like I said, they’re not the easiest to build, but they’re worth it.
____________________________
Ethan Hagan is the primary editor at One Project Closer. Ethan spends most of his days shadowing real contractors on actual job sites and most of his nights writing about the experience. To see what I mean, check out their expert guides like How to Build a Shed Ramp and How to Solder Copper Pipe. If learning and interacting with pro contractors sounds like something you’d enjoy, sign up for OPC email updates.


{ 22 comments… read them below or add one }
- 1Patrick HAugust 16, 2012 at 3:10 pm
This is a superb idea. Literally one of the most ingenious ideas I’ve seen on AOM or anywhere. Keep up the great work!
- 2CraigAugust 16, 2012 at 4:30 pm
Does the 10° bevel really help? It seems like it’s decorative instead of functional.
I don’t have a miter saw capable of beveling, but I like the look of these sawhorses.
- 3PaulAugust 16, 2012 at 4:35 pm
This looks like what I have been wanting but have not had the time to search for it or think it out myself. I have wanted something that folds or comes apart easily for storage. I wanted something strong since I currently have plastic saw horses. I have also been thinking of a way to extend the cross member and basically make the sawhorse wider and this design would make that very simple. Instead of a strap I am thinking of something attached to the inside of each leg that when lined up I can slide a bolt or a pole thru to keep them standing.
- 4GregAugust 17, 2012 at 7:27 am
I like the folding nature for compact storage. I plan on making some for myself and for my two sons who now have a place of their own and will find then useful. Thanks AofM
- 5EricAugust 17, 2012 at 7:40 am
Nice design for a sawhorse. Simple, strong, folding. I think I found the sawhorse design for the horses I want to build.
@Craig: I don’t *THINK* you’d need the 10 degree bevel. I suspect it makes the saw horses slightly more stable, but as long as you’re not racking them from side to side a lot, you’d probably be OK. I’m planning on making some of these without that bevel myself.
@Paul: I would think if you could find some tow strap hooks (like the ones here: http://tinyurl.com/94becvo) you could use some rope to make something cheaper than the locking tie down. Plus you’d still have a way to store the top cross member when the horse is collapsed.
You’d just tie one end of the rope to one hook, and then with the horse setup and ready to use, you could use a couple of half hitch knots on a second hook to get the rope to the right size. It wouldn’t have to be expensive rope, just some that doesn’t stretch much. Worst case, if it stretches, untie the knot and shorten it up a little.
But very nice horses. And $20 a pop for good sawhorses isn’t that expensive. The cheap plastic ones at the big-box home stores aren’t that much cheaper and they aren’t as nice.
- 6EricAugust 17, 2012 at 8:02 am
I think I’ve found the design I want for my sawhorses. Solid, strong, simple, collapsible. Very nice.
@Craig: I don’t *THINK* you’d need the 10 degree bevel. From the looks of things, that helps with stability. But as long as you’re not doing a lot of racking of the horses from side to side, you should be OK without the bevel. For what it’s worth, when I build these, it will be without the bevel.
As for a cheaper version of the locking tie down straps – if you can find similar hooks at a local hardware store, you could use some inexpensive rope to make something similar.
Basically, you’d make a rope version of the tie down that isn’t as easily adjusted. To adjust it, you’d need to untie knots. But assuming you can get rope and hooks for a reasonable price, it would be less than the locking tie down straps. That’s probably what I’ll do when I build them.
- 7NoWayAugust 17, 2012 at 8:30 am
Flippin’ awesome. A folding arm on the inside of each leg that notches onto the opposite lower support would keep a nice sturdy base instead of the strap. Strap’s easier though.
- 8EmilyAugust 17, 2012 at 1:06 pm
I just made some sawhorses as my first-ever woodworking project but I wish I’d seen this first — stackable?!? Boggles the mind with how much sense it makes.
- 9MichaelAugust 20, 2012 at 2:31 pm
To those looking at the straps as a major expense, I present to you
http://www.harborfreight.com/set-of-2-1-inch-x-12-ft-lashing-straps-67386.html
Bah-dah-bing!
- 10JeffAugust 20, 2012 at 3:41 pm
What is the finished height when using 40″ legs.
- 11IanAugust 25, 2012 at 1:53 am
A piece of rope would is a simple substitution for the locking tie-down. I recommend a trucker’s hitch or an alpine butterfly + taut-line hitch.
- 12BradleyAugust 26, 2012 at 11:04 pm
I recently built my first set of saw horses using a design I found in a woodworking book, and I am really not happy with them. These saw horses look great! I’m definitely going to have to make a set! My dad is a contractor, so I’ve seen some well built horses, but I’ve never seen anything collapsible that’s as well built as these.
- 13AndrewSeptember 20, 2012 at 9:46 am
Easiest way to replace the tie-down. Drill a ~3/8″ hole in the center of each lower support; thread an appropriate length of 1/4″ rope between the two holes; knot each end; voila!
- 14PatrickOctober 28, 2012 at 10:51 am
I was a framer and sider for many years and sawhorses where a problem. Our solution was to make a very simplified version that didn’t require any bevels and took about 5 minutes to make. Then we just left them on the scrap pile rather than haul. But these are worth hauling around!
- 15WesNovember 20, 2012 at 8:37 am
These are nice and the guy that designed them sells the plans which are very good for about $5 dollars. They aren’t difficult to figure out but the plans help tremendously and even have a nice set of templates with the plans these can be put together rather quickly. Search the lumberjocks website for shopdogs. That’s what he calls them and again it’s always nice to give credit to the person that designed them.
- 16Mr. NutterDecember 11, 2012 at 3:13 pm
Great design. I made a couple of these out of some scrap 2×4′s and some old rope. You need to make all of the exactly as instructed for it to work properly. For an added manly flair try a trucker’s hitch using a regular rope to bind the cross member.
- 17RobApril 7, 2013 at 9:54 am
I find them fairly stable but a bit unwieldy and take a lot of room in my van. I may cut the legs down a bit. If you really want compact horses the folding metal ones are your best bet. For at home use these are great.
- 18BrewDogApril 23, 2013 at 1:25 am
From my calculations the finished height would be 39.765″ or roughly 39 3/4″ tall
This is based on the fact that a 2×4 is 3.5″ tall and the notch is only (3 1/8″) 3.125″. So it sits 0.375 (3/8″) proud, or above the support height. The support height is based on trigonometry, calculated by the website below. If you are desiring a certain height use the website and enter your desired height – .375″ and you’ll be golden.
- 19PaulOJuly 9, 2013 at 8:21 am
Just built some last night..The 10 degrees did complicate things a little but it does provide a nice sturdy base..Throw the rope ideas out the window the tension on the strap REALLY provides the horses stability and I think you would be hard pressed to achieve the same tension with a taunt rope…You don’t need the plans but I did have one measurement that was slightly off… the bottom support ended up being 28 3/4 which made sense to me because after you deduct for the width of the 2-2X4s(3″) and the 4 washers(1/4″) seemed right…Anyway that’s my 2 cents…Thanks a bunch for the measurement I love them.
- 20shaardulaJuly 17, 2013 at 7:27 pm
craig, 10 deg bevel prevents the SH from rocking along the length of the crossmember.
Without 10 deg it looks like an H from front. With a 10 deg bevel it looks like an A.
Intuitively if we poke H on the top of its left leg it will tip over. With A, the angle on the right leg will resist tipping.
- 21shaardulaJuly 17, 2013 at 7:45 pm
also 10 deg sounds about right.
too much bevel will reduce the effective length of the cross member.
i’m guessing to prevent the table from tilting under direct verticle load, the end of the cross member must not extend beyond the ground part of the leg. otherwise we have a fulcrum.- 22DonJuly 28, 2013 at 10:09 pm
When drilling the holes, placing scrap of 2×4 under the “upper" leg keeps them both on the same plane under a drill press, but should an additional prop be placed under the bottoms of both legs so the hole is 10 degrees from perpendicular and thus parallels the floor and beam, or doesn’t it matter?
And, when making the miter cut of the notch bases, you state the depth is different on each side. I thought they are both 1 1/2″. I don’t understand.
Leave a Comment
Name *
E-mail *
Website
Previous post: Be Your Own Boss: 37 Side Hustle Ideas
Next post: Heading Out on Your Own — Day 16: Create a Budget


Posted on October 16th, 2013
How to Fix Common Windshield Wiper Problems | The Art of Manliness


Troubleshooting Your Windshield Wipers: How to Fix 5 Common Problems
by Brett & Kate McKay on August 23, 2012 · 29 comments
in Cars, Manly Skills

| This post is brought to you by NEW Armor All Extreme Shield Wax. Help keep your car looking as good as the day you bought it with Armor All. Go to Facebook.com/ArmorAll for a $10 rebate. |
We typically give little thought to our vehicle’s windshield wipers until we actually need them and they don’t properly work. I’ve had a few experiences where I was essentially driving blind through the torrential rain of an Oklahoma thunderstorm because my wiper blades were shot and simply smeared the sheets of water across my windshield. Man, those were some scary drives. Even when I’ve had brand spanking new blades, I’ve experienced a few drives where it seemed like no matter what I did, my windshield was a blurry mess.
Today we take a look at the most common windshield wiper problems and offer some solutions that will give you a clear view of the road ahead in even the worst weather. It’s a good addendum to this week’s post on maintaining your car.
Smearing in Both Directions

If your wipers smear water in both directions, you may have one of the following problems:
- worn blades
- a dirty windshield and/or wiper blade
- sub-par windshield wiper fluid
Try using new wiper fluid and cleaning the windshield and wiper blades before you replace the blades. To clean your wiper blades, simply wipe them with a clean rag dipped in hot, soapy water. After you clean off the soap, wipe the edge of the blade with rubbing alcohol. That can help with reducing streaks on your windshield.
Water Smearing in Only One Direction

Water smearing in only one direction is common in cold weather, so there’s not much you can do about that. If you notice the smearing in one direction even when it’s not cold, it means your wiper blades are either, 1) old and hard or 2) the wrong size. Either way, you’ll need to buy new wiper blades.
Water Beads That Won’t Wipe Away

Boy, is this annoying. Water beads are actually supposed to be easy to wipe away. In fact, many of the windshield treatments that help keep your windshield clear cause water to bead and run off. But in certain conditions, beads won’t wipe or run off your windshield. Instead they’ll remain stuck dancing hypnotically on the glass, obscuring your vision.
This problem usually occurs in areas with high pollution. The residue and grime that builds up on your windshield causes water beads to stick. Before you treat your windshield with a product that repels water, give it a thorough cleaning to remove any residue that may have built up. If using a strong glass cleaner doesn’t do the trick, you might consider using a wax remover on your windshield. Watch out for the paint, though!
Chattering
The sound of your wipers chattering away on your windshield isn’t just grating, it also means the water isn’t getting wiped away efficiently; you’ll often see streak marks in the path of a chattering blade. There are a few possible causes of this problem. It’s often the result of a buildup of wax, oil, or grease which prevents the blade from cleanly wiping the water away. Give your windshield a nice, thorough scrubbing. Give the blades a good cleaning too, for good measure.

If that doesn’t fix the chattering, the problem may be a bent wiper arm. To make this diagnosis, bring the wiper up to mid-stroke on the windshield and examine the blade assembly. The blades should be making full contact on the windshield and the blade arms should be parallel to the glass. If the arm is bent, use some pliers to carefully twist it until it is parallel with the glass again.
A final reason that a wiper blade might chatter over the glass is because it is frozen. Give it some time to warm up with the defroster and you should be back in business.
Ensure Crystal Clear Vision by Regularly Changing Your Wiper Blades & Treating Your Windshield with a Water Repellant
Most of the problems above can be prevented by doing two simple tasks: changing your wiper blades regularly and treating your windshield with a water repellent.
Replace wiper blades regularly. Don’t wait until you find yourself in a downpour to realize it’s time to replace your wiper blades. They should be in top condition before you need them. The recommended wiper replacement schedule is once a year. Even if you don’t use your blades all that often, it’s still a good idea to replace them at this frequency. The hot sun beating down on an unused wiper blade can cause just as much damage as regular use in the rain.
A good time to replace your blades is at the tail end of winter. They’ll likely have just finished their harshest tour of duty clearing away all that snow and ice. A fresh set of wiper blades in March will ensure that you’re ready for the coming spring rains.
Treat your windshield with water repellent. There are a few products out on the market that, when applied to your windshield, repel water and make it easier for your blades to wipe it away. You have to apply it when your windshield is dry; so don’t try waiting until it starts to rain. Treatments typically last a few months, so you’ll need to reapply it regularly.
Windshield Washer Fluid Troubleshooting
You’re cruising down the freeway at 75 MPH when you come upon a dump truck full of gravel and dirt spewing dust behind it. Your windshield becomes caked in dust and visibility is quickly diminishing. Your hand automatically reaches to your windshield wiper handle, turns to activate the washer fluid spray, and…. nothing happens. Ah, crap.
Windshield wiper fluid is one of those things you don’t use too often, but it’s pretty annoying (and sometimes unsafe) when you need it and the sprayers don’t deliver. Here’s a quick troubleshooting guide to help you figure out your windshield washer fluid woes so you can have clear driving no matter what you encounter along the road.
Check the washer fluid pump. Even if you have a full tank of fluid, if the pump doesn’t work, your windshield can’t get sprayed. To find out if a faulty pump is the problem, do the following:
Pop open the hood and find the washer fluid pump. It’s pretty easy to locate. Just follow the tubing from the washer sprayers until you run into the pump. Have a friend get in the driver’s seat and activate the washer fluid switch. If the pump is working, it should make some noise. If your pump is silent, you’ll need to replace it. I’ve never done this job before, but it’s supposedly not too difficult. If you’re comfortable with tinkering, have at it. If not, take it to a mechanic and have them replace it.
Check for leaks in the washer fluid tank and tubes. It doesn’t matter how much washer fluid you dump down the tank, if you have a leak somewhere in your system, you’ll always come up short on the blue stuff when you need it most. Check the washer fluid tank for cracks. If you find any, chuck it and replace it with a new one.
If there aren’t any cracks in the tank, check the tubes leading to the spray nozzles for splits. If none are visible, run your fingers along the line. If you feel something wet, you found your leak. Replace as needed.
Check for clogged spray nozzles. If all the above checks out and you’re still not getting any spray, you might have a clogged spray nozzle. Stick a pin or a toothpick in the nozzle and dislodge any gunk that may be clogging it.

Any other advice on solving common windshield wiper problems? Share it with us in the comments.


{ 29 comments… read them below or add one }
- 1JoshAugust 23, 2012 at 1:26 pm
Tip: Do NOT buy the cheapest wiper blades you can find. Those $3 blades absolutely suck, and you’ll be stuck with a smearing pair of blades until you buy new ones. Sure, you may get lucky, but probably won’t. Also, ridiculously expensive blades are overkill; they don’t provide any additional benefit. Find a blade priced somewhere in the middle, and both your wallet and your windshield will stay happy.
- 2BoomerAugust 23, 2012 at 1:27 pm
Never ever put anything on your windshield. Water repellents (read: RainX) only cause a haze on the windshield when the wipers wipe across it. It can be deadly at night. Put the repellent on your side and rear window if you must. Leave the front clean. You know it’s clean when water sheets on it. Clean it till that happens.
- 3JRThomAugust 23, 2012 at 3:01 pm
A vast majority of the time the problem is a dirty windshield. If the water does not bead into perfect hemispheres on your windshield then your windshield is dirty.
If it looks like picture 3 what has happened is rubber from the wiper blades rubbed onto the windshield which breaks the waters surface tension thus preventing it from beading. The most common cause of this is using your wipers when it isn’t raining or raining enough. You may or may not have to replace your wiper blades depending on how badly worn they are.
Picture 4 is cause by a plain old dirty windshield. The dirt on the windshield breaks the waters surface tension and thus its ability to bead.
- 4lolwutAugust 23, 2012 at 3:53 pm
@Boomer I disagree. I’ve used RainX for years, and when applied properly there is no haze left behind at night or during the day. It’s kinda like car wax: the first pass leaves a haze, and you wipe clean on the second, maybe third pass.
It’s works well enough that at highway speeds, i often find it clearer to not even use the wipers.
- 5ajaxAugust 23, 2012 at 4:03 pm
If RainX causes a haze then you haven’t applied it correctly. I’ve been using it for almost 20 years and it’s better in the rain than any wiper brand or speed setting. I like to keep a few alcohol swabs (like the kind hospitals use) in my glove compartment to clean the blades of the wipers periodically. In a pinch, wiper fluid will work. Just take a paper towel, wet it with wiper fluid, and wipe the blade while pinching it with the towel. You’ll be amazed at how much crap you’ll get off the blade and how much it improves the sweep.
Another tip that the article missed was for winter drivers. If you’ve ever had to use your wipers after a frost or ice storm and one or both of them seem to have “broken" or stopped sweeeping because they were frozen to the windshield or blocked by a pile of snow (I know you’re out there), this is actually a very easy and simple fix. reset the wipers to the “rest" or off position. There is a cap on the bottom of the arm that should pop off with little more than a flat screwdriver blade. Re-tighten the bolt under that cap with the appropriate size wrench or ratchet socket (usually 1/2″ if memory serves) and replace the cap. Turn on the wipers and revel in the satisfaction of car repair.
- 6AlAugust 23, 2012 at 8:28 pm
90% of all wiper problems can be solved by pouring rubbing alcohol on a paper towel and rubbing your wipers with it, hence, cleaning them off. It also treats them, preventing most of the issues above.
Rain X does not haze if applied per directions. It is a near perfect product, and can save your life is a truck splashes your windshield when you’re going 70 in heavy traffic.
- 7CharlieAugust 24, 2012 at 3:10 am
One situation I have run into before is ice blocking the nozzles. Driving in frozen sleet is bad enough without having to deal with an obscured windshield. When ice keeps building up and freezing over the nozzles, keep a thermos/bottle/coffee cup of hot water in the car, then whenever the nozzles freeze over, pull over, hop out, and pour some hot water on the nozzles. Gets rid of the ice quickly and you risk damaging them like you would if you were to try to chip it off.
- 8Jason reedAugust 24, 2012 at 10:50 pm
Man,I left law few years ao and had no direction, except. i ioved the law and was finishing school. Practiced until I could have no more of the crap. Your website is awesome. I read it everyday. Keep up the excellent work – jason
- 9Native SonAugust 24, 2012 at 11:23 pm
Years ago, we used rubbing alocohol on a towel to clean wiper blades on the company vehicles. It still works to clean dirt, soot, wax, etc from wiper blades. It’s not a substitute for replacing worn out blades, but it will keep things working when dirty blades are the problem.
- 10joshAugust 27, 2012 at 10:59 pm
i would highly recommend either rain x latitude or bosch icon wiperblades they are a one pressure point design blade and offer excellent contact on the window.
(UTI STUDENT)
- 11BobAugust 29, 2012 at 5:57 pm
If you have bad performing wipers, and
cannot replace them immediately try
this. Place a sheet of sandpaper on
a flat surface, then hold the blade
vertically on the sandpaper and make
3 or 4 back-forth strokes. This restores
the edge of the blade. Won’t work like
a new one but can help vision a lot.- 12GardenStaterSeptember 3, 2012 at 6:47 am
I agree with the others that Rain-X is great stuff. There’s also a product called Invisible Glass that you can get with a Rain-X type repellant. I’ve used both products for years, and never had an issue with hazing. But it’s important to follow the directions: Rain-X tells you not to spray the product on the windshield, but onto a soft cloth. Maybe that’s the problem. Anyway, It keeps my windshield spotless and safe.
- 13PJB863September 4, 2012 at 12:10 am
When I lived in FL, Rain-X was a necessity in the summer rainy season. It just rains way too hard for the wipers to even keep up.
- 14Daniel ButlerSeptember 4, 2012 at 1:27 am
Related to Bob’s post above: My sister (of all people!) heard that you can use a lady’s emery board, one of those flexible nail files, instead of sandpaper. I have used my wife’s many times and have not had to replace wiper blades for a long time. And I do not have to remove the blades. I experimented on the back window wiper first (because I had little faith) and I was very pleased with the results.
- 15davidSeptember 8, 2012 at 6:26 am
one thing not covered in article. over a period of years, windshields will develope a spotty, almost film like “stain " that cant be cleaned off ,wiper fluid wont clear it and alcohol seems to fail too. it is most noticable when using low speed on wiper switch. this is caused by polution, be it automotive, or other modern items. auto makers have actually sent out service bulletins on this very problem,with a notation that it is not a warranty issue.
If you notice a “film" on glass ,even when using new blades, go to nearest auto parts store and buy a product called body clay, it is meant to remove micro swirl marks in clear coat and laquer finishes- with out removing massive amounts of the finish.
wet windshield with a light mist of windex, or plain water, gently rub the clay bar in small,circles until the clay drags on surface, then re-wet and do it again. continue over entire surface of windshield, repeat once per year. i have been doing this to my cars, my motorcycles, and customer cars for 15 years with never a complaint over the results. Once you have got the glass clean using the clay bar, wash it down with a genlte soap and water mix . one last note- dont wash your car with dish-soap -it will not rinse clean and will ruin paint,wax and glass surfaces.
ever wonder why soap companies sell “rinsing agents" for dishwashers?- 16EdohausSeptember 12, 2012 at 3:27 am
Wipers deteriorate due to one major factor, the sun. If you can park your car in the shade, do so.
Another thing is, if you get hit by an egg on your windscreen, don’t use your wipers to remove it. It’ll cause your windscreen be blurred.
- 17John BorgesSeptember 12, 2012 at 5:11 am
For cleaning windshields, the best thing to use is a mild scouring powder like Bon Ami. It works like the body clay mentioned in the previous comment but it sound easier to work with.
Try this before you replace your blades and save some money.- 18AdamSeptember 12, 2012 at 9:46 am
Any ideas about this? My wipers do not come in contact with a ~6″ diameter spot smack in the middle of the windshield. They wipe all around it, but not that particular spot. This is on a 2004 Accord and I’m using fairly decent ($20 each) wipers. Have tried several brands.
- 19davidSeptember 12, 2012 at 8:40 pm
Adam,
I did a search of Honda tech bulletins for you, no information there. I have found, on some imports,( Honda ,Kia, and Hyundai )
that some windshields have a very slight indentation near center of the windshield that wipers just cant touch. Unfortunately, the only remedy is to replace the windshield.
Check with your insurance provider, you may be able to get it replaced for free with no deductable or penalties(we have that in South Carolina)- 20meganSeptember 25, 2012 at 6:30 pm
I have a 2000 ford taurus. my windshield wipers dont work in te morning when I get ready to go to school, but when I come home in the afternoon work perfectly fine. Does anyone know what could cause this?
- 21RobOctober 15, 2012 at 1:47 am
My wipers work great except for when I try to use the wiper fluid. I make sure my wiper-fluid resevoir is not empty, but my passenger wiper jet does not spray the wiper fluid when I press the button, and the left wiper jet has recently started to not spray a decent stream. Is it due to a faulty pump, or bad jets? The wiper-fluid reseviour is on the driver side, and I have a feeling it is the pump, for it takes greater pressure to push the fluid all the way through the lines to make it to the passenger side, so it makes sence that that particular wiper-jet ceased to work first. Any idea how to fix it? It is a 2003 pontiac grand am. Thank you.
- 22DanielleOctober 20, 2012 at 6:33 pm
MY husbands car, the windows dont work, the windshield wipers dont work and neither does the heat. We have check all fuses and relays and still nothing. a few people have checks the motors for them and they are fine, any ideas?
- 23rickyFebruary 20, 2013 at 8:54 am
My blade set upwards instead of resting down
- 24RobertMarch 1, 2013 at 3:24 pm
I find that using an old guitar A string is good at clearing a clogged sprayer.
Just unclasp the hose from under the hood and feed the string through.- 25WillMarch 24, 2013 at 10:27 am
When you’re at the gas station cleaning the windows, flip the wiper blades over and clean the rubber with the foam/cloth part of the winshield cleaner- usually works great to get the wipers going well again.
Also if you live anywhere with regular snowfall where they put Mag-Chloride of salts on the road a haze will build up on the winshield and lights that’s a real PIA to deal with. There are fancy tablets and additives that cost as much as the wiper fluid- instead add 1/2 a pint of the cheapest rubbing alcohol (isopropanol) you can find. Does great at cutting through the scum, and also keeps the junk cleaned out of the jets.
Will have to try the sandpaper trick to refurb the edges of my older wipers.
- 26bobApril 16, 2013 at 2:28 pm
People think that cheap windsheild wiper blades are ok for there car . Now we know that cheap wiper blades and other product are not good for your windsheild
- 27stephenJune 14, 2013 at 11:07 pm
when i use my wipers they swing back and forth very hard, they will slam down on the hood of the truck and when they swing up they at times almost swing past the edge of the windshield, any suggestions?
- 28MattAugust 12, 2013 at 4:43 pm
Stephen,
I have the same issue. The driver’s side wiper hits the edge of the windshield on every stroke. I’m going to try bending it today but was hoping to find suggestions online of how to limit the travel of the wiper motor or something similar.
- 29KenOctober 10, 2013 at 3:59 pm
To remove wiper arm, bend back against spring pressure then pull up or remove nut from spindle. Lubricate the spindle with one or two drops of automatic transmission fluid, don’t use ordinary oil as this can affect rubber parts.
Leave a Comment
Name *
E-mail *
Website


Posted on October 16th, 2013
Unarmed Self-Defense from the Mad Men Era


Don Draper Judo: Unarmed Self-Defense from the Mad Men Era
by Brett & Kate McKay on March 14, 2013 · 63 comments
in Manly Skills, Survival

As I was browsing through some old magazines the other day, I came across a fantastic issue of Popular Science from 1962 that contained a feature on unarmed self-defense. The article was adapted from a book entitled Modern Judo and Self-Defense by Harry Ewen, a “police judo" expert. The best part of the multi-page article are the fantastic mid-century illustrations by Dana Rasmussen, featuring a well-dressed judo expert who looks like he might work with Don Draper when he isn’t throwing ruffians over his shoulder. Even the “thug" in the article is pretty dapper, proving once again that everything was just swankier back in the day — even the bad guys.
Below you’ll find step-by-step illustrated instructions on how to defend yourself from chokes, bear hugs, kicks, and knife attacks when you’re unarmed, all while still looking incredibly handsome. Enjoy.
Three Ways to Defend Yourself from Chokes from the Front
Finger Lock

Grab the thug’s little fingers, with your thumbs under the tips (fig. 1). The knuckles of your index fingers should be over the the second joints of his little fingers (fig. 2). Move your wrists in a circular motion down toward your hips. Applied pressure will force the thug to his knees to avoid broken fingers. As he goes down, strike him in the face or jaw with your knee (fig. 3).
Nose Break

First, clasp your hands (fig. 1). Then, with fingers locked and elbows bent, swing hard from the waist and strike the thug’s forearms with the bony parts of your arms. Follow through until your clenched hands are above your assailant’s head and the choke is broken (fig 2). Finish by bringing down your still-clenched hands, with all the force you can muster, on the bridge of his nose (fig. 3). Stop short of this, naturally, while practicing this move.
Basic Arm Lock

Grasp the thug’s right forearm with both your hands (fig. 1). Holding his right wrist firmly with your left hand, slip your right thumb under his right palm and pull his arm toward you to ensure that it is straight (fig. 2).

Keep on turning until you are almost at your assailant’s side (fig. 3). Keep his hand elevated above the level of the rest of your arm (fig. 4). Now put all the weight of your body behind your left upper arm and elbow, pushing down on his right arm just above the elbow (fig. 5). Unless he submits, he will end up with a dislocated shoulder.
How to Break a Grip from the Front That Pins Your Arms

Force the thug to move back by giving him a couple of sharp jabs in the groin with your thumbs (fig. 1). As he draws his hips back, pivot on your left foot and move your right foot across in front of him (fig. 2). You should now be facing the same way he is. As you turn, slip your right arm behind his back and grasp his right sleeve with your left hand to keep his body close to yours (fig. 3)

Keep your knees bent slightly, maintain a steady pull on the attacker’s sleeve, and keep your right hand in the small of his back (fig. 4). Straightening your legs will now raise his feet off the ground (fig. 5). Your opponent is now balanced on your right hip, and you can toss him by turning him over as you continue to pull on his right sleeve (fig. 6).
How to Break a Bear Hug from the Rear

This defense works as well against an overarm grip as against an underarm one (fig. 1). With your feet apart, bend your knees, stoop down, and grab your assailant’s right ankle with both hands (fig. 2). Pull his ankle forward and upward to throw him on his rump (fig. 3).
Defense Against Kick Aimed at Face or Stomach

Trap the thug’s foot by bending your knees and crossing your hands in front of you (fig. 1). As the kicker’s shin contacts your wrists, turn your left hand (fig. 2) so that you have a firm hold around his calf. Assuming that the kicker uses his right leg, spin around to your right, throwing him forward on his face (fig. 3). Once he’s thrown, follow up by going down on the ground with him. In the final position (fig. 4), your left forearm is behind his calf, your left hand is on your own right bicep, and your right hand is on top of his foot. Use care when practicing this lock: doing it jerkily could dislocate the leg.
Three Ways to Subdue a Thug Who Tries to Choke You From Behind
Arm Lock

Grab the choking forearm at the wrist with your left hand and place your right hand under the assailant’s elbow (fig. 1). Pull down with your left hand and push up with your right, turning and bending your body as you do so. This should give you enough space to extricate your head from between your attacker’s elbow and body. Bring your left foot back as you turn, so you are at his side (fig. 2). Twist his right arm behind his back (fig. 3).

When his right arm is twisted almost as far back as it will go, slip your left hand under his right wrist (fig. 4). Slide your left arm across his back (fig. 5) until your left hand is trapped in the crook of your left elbow. To apply the pressure part of the lock, raise your left elbow in a forward circular motion while holding your assailant’s right elbow steady with your right hand.
Shoulder Throw

Grab the thug’s sleeve at the elbow with your left hand while your right grips his shoulder (or as high up on his sleeve as you are able to reach) (fig. 1). Bend your knees, but keep your torso upright. Bend your body forward. Pull down and to the left with your left hand, forward and slightly to the left with your right (fig. 2). Push your hips back against your attacker’s thighs as you pull, and he’ll be thrown over your shoulder. (fig. 3)
Shoulder Drop

This throw starts the same way as the shoulder throw. You first grab your opponent’s right sleeve at elbow and shoulder. All you have to do now is drop onto your left knee, stretching your right leg sideways as you do so (fig. 1). Pull down with your right hand and the thug is tossed over your shoulder (fig. 2). This and other throws that are shown on these pages should be practiced only on well-padded surfaces or on a soft lawn.
Dislodging a One-Hand Hair Grab

Grab the attacker’s wrist with your right hand. Hold his hand on your head (or throat) as you turn right and raise your left arm high (fig. 2). Bring that arm down upon your foe’s upper arm, placing your left foot in front of him (fig. 3). If you do this swiftly, you may well injure your assailant. Better go slow when you’re practicing, though.
Two Defenses Against a Boxer

As your opponent aims a blow, spin to your right with your full weight on your right leg. Bend your left knee and then straighten that leg right out at the attacker, catching him just above his right knee with the sole of your left foot, backed by the full force of your body. As your left leg kicks out, jerk your head right. This counter-balances the weight being pushed left. It also gets your head nicely out of the way of the aimed fist of your opponent (fig. 1). An alternate method is to deflect the blow with your right forearm and counterattack with a knee to the groin (fig. 2). Skip the knee jab, however, during practice sessions.
How to Protect Yourself from a Knife Wielder

As the knifer raises his blade (fig. 1), parry the blow by striking his forearm with the edge of your own left forearm (fig. 2). Quickly seize his clothing near his right shoulder with your right hand. Then with a strong, but smooth movement, pull his right shoulder toward you while also pushing his right (knife) hand upward and away from your body (fig. 3).

Grab his right wrist with your left hand as you push his knife up, while still holding on to his shoulder with your right hand (fig. 4). Now move your right hand from the knife-wielder’s shoulder to his right elbow. Pushing down on that elbow keeps his knife arm straight (fig. 5). Pulling his wrist toward you applies a very drastic shoulder lock. Unless your assailant drops his knife, you can easily dislocate his shoulder.


{ 63 comments… read them below or add one }
- 1CarterMarch 14, 2013 at 6:29 pm
This. Is awesome
- 2RichMarch 14, 2013 at 6:42 pm
Nice photos, but I want to make one amendment to the knife picture. I studied martial arts for 16 years and learned a bunch of live knife techniques. I WOULD NOT suggest stepping towards your opponent and turning your back to him as it shows in figure 2. You lose sight of the knife (always dangerous) and actually give a lot of your body to him to hit. I would suggest stepping back so that you’re facing his knife while using your left hand to slow his momentum. Then slide your right foot forward while doing the grab and continue as described from there.
- 3JohnMarch 14, 2013 at 6:44 pm
I can’t really say as I approve of the Captain Kirk Double Fist Strike of Shirt-Ripping.
Two main reasons:
1. It hurts. You. There’s a lot of compressibility in the “fist" that move creates, meaning that there’s a lot of skin taking up the space between your fingers, and when you strike something, all your fingers smash together and a lot of force is concentrated on your proximal phalanges bones of your little finger on both hands. Very painful. Ask me how I know.
2. It takes away one of the primary means by which you generate power with a strike; you twist your body. Especially if you’re a big guy, you’ve got the potential for a LOT of rotational momentum just by a small, sharp twist of your body that coincides with a one-handed strike. Furthermore, this twist is generated from your hips, by your legs, which, because you’re an AoM reader and do your squats, are pretty big and muscular (right?). Even if you’re a big, strong guy, your arms are relatively weak compared to your legs and core, which is where your strikes should come from, and which the Captain Kirk Fist Smash takes out of the power equation.
- 4TacMarch 14, 2013 at 7:40 pm
John, I agree that the double-fist is weaker and opens up a lot of potential problems, not only can you self-injure, you can also open yourself up to your hands being grabbed…..and now you lose both hands simultaneously. I’d suggest this variation:
Break the hold as shown…it’s not a bad break for a choke by the average punk. It’s also simple and relatively easy for someone without coordination to do. When your hands are up above your head (the choke is broken or nearly so), drive AT your enemy with side-by-side hammerfists. Think of it like chopping wood…a manly training exercise….the power isn’t from your triceps/shoulders, it’s from your core and from dropping your weight INTO the blow. The side-by side hammerfists will have the same effect of stunning your enemy, taking away his vision momentarily, and possibly breaking his nose or giving him a black eye. Once you hit, step back a pace forcefully (to finish breaking the choke if it’s not broken yet, by throwing him off balance) and then engage or do otherwise based on the circumstances.
On the ‘side kick to counter a punch’ one, I’d disagree. In the 60s, most people that knew how to throw dangerous straight punches were boxers and the like, and didn’t know squat about ground fighting/wrestling. Now, MMA is so popular that many fighters or wannabees know at least the rudiments of both. Show one of them a leg like that when they throw a punch, and you’re done. I don’t claim to be a great fighter, or even a good one. But if I throw a jab and you counter with that….I’m going to take you down and give you a reenactment of Lesner v. Mir….the rematch.
I also agree that there are lots of things with that knife defense that can be dangerous. However, I’m not going to go into detail here. Suffice to say that knives are incredibly dangerous in close quarters….more dangerous than guns IMHO. Successfully countering knives while unarmed is very difficult even with training. I don’t think that any advice online or a diagram can suffice to show you how to do it. And even if you do everything right….expect to get cut or stabbed at least once. The best defense for a knife is to create time/space/distance, preferably with a barrier between you and the subject.
- 5Ben CopeMarch 14, 2013 at 8:01 pm
The method for escaping a bear hug has two big flaws. 1) When you lower yourself, the attacker can easily slip his arms up and you’re now being choked. 2) When you lower yourself and start reaching for that leg, he can easily knee you in the balls.
Instead, reach up and grab both of his forearms, so he can’t choke you, then lower yourself and get one leg behind the guy. (your right behind his left, or your left behind his right.) Then, keeping both feet firmly on the ground, twist your body. Your thigh will trip him and he will end up on the ground on his back, while you should still be standing.
- 6MattMarch 14, 2013 at 8:03 pm
I’ve been doing a form of traditional Japanese Jujutsu (Hakko Denshyn Ryu Aiki Jujutsu) for almost a decade now and it’s funny to see many of the same or similar techniques being used here. A solid technique developed over 800 years ago is still a solid technique today.
- 7Robin - Of The WestMarch 14, 2013 at 8:14 pm
I’m not a big guy but I have studied a variety of martial arts over the years including: Jujitsu, Karate, Tai Chi and two forms of Aikido – a Sword Form and Fugagaki – the later being my favorite. One could look at Aikido as an ever-evolving relative of Judo – redirecting your opponents energy rather than trying to match or overcoming it – combining with timing with knowledge of how the human body reacts to balance and physical stress. In my opinion, there is physiological advantage when you put an attacker – who might be much bigger than you – on the ground and in a compromising position using his own energy and very little of your own. Peace.
- 8StuartMarch 14, 2013 at 8:19 pm
Seems like a few people have already covered some specific criticisms, so I’ll just keep my comments brief and broad:
First off, it’s awesome to see something like this on Art of Manliness, self-defense is pretty darn important. A lot of the listed techniques are both simple and quite practical. However, not all of them are, and many (especially the throws) can be incredibly dangerous to you- and the defender, of course, be it somebody you don’t worry about hurting, an angry drunk friend, or a practice partner- if you haven’t been properly trained in their execution. While these descriptions are good, they leave a lot to be desired. Nothing can replace actual martial arts training, of course, but I think that goes without saying. The important thing readers should know is that the throws (and that kick defense! Wow! That’s super dangerous and few people are dumb enough to throw a kick in a fight as is. If the attacker throws a kick that high there are dozens of simpler options that could work just as effectively.) are not that advisable to use unless they have to. The arm lock is particularly ridiculous to have instructions to, not only because it’s dangerous but because there is no explanation as to how somebody would get into that position. Most attackers do not just let you hold their hands and move their arms.Just taking a couple Jiu Jitsu classes can give somebody a similar level of self-defense knowledge without such a high possibility of misunderstandings or miscommunications. Oh, and Judo’s awesome but it was created as a sport version of Jiu Jitsu. These days Judo emphasizes more throws than Jiu Jitsu does, but Judo is just not as practical for self defense. Obviously people could argue this issue for days, and it really does come down to how the teacher teaches more than anything, but Jiu Jitsu, especially Brazilian Jiu Jitsu, from what I’ve found, has a much more initial goal of self defense with practical applications.
Wow I said I’d keep that short, but I didn’t. Oh well, hope this was helpful and not too negative sounding! :)
- 9StuartMarch 14, 2013 at 8:21 pm
An edit from my last post. I missed that the arm lock was from a front choke. Not a bad defense so long as that is the situation. Pulling off an arm lock from different positions can take some finesse or luck depending on the circumstances, and I was thinking it was that broad of a guide for some reason. My bad! XD
- 10johnMarch 14, 2013 at 8:40 pm
I was 10 in 1966, which is probably around the time of this article. James Bond and this stuff was HUGE! Everyone was into judo and Ju-Jitsu, which was new, and it was in books and magazines everywhere. My buddies and I practiced this stuff all the time and became quite adept. As I got older, I only remembered a few wrist twists, armlocks, and throws, but they served me well through my teens, the Marine Corps, and as a State Trooper. Even now as an older gent I would’nt shy from a chance to use them. I had forgotten about some of the good times of that era. Thank you!
- 11AndrewMarch 14, 2013 at 9:00 pm
Interesting read, though I’m weary of the knife counter attack. As much as possible one wants to stay on the outside of a knife attack rather than going inside. If you go on the inside, as described, and you fail to stop the knife, you will get stabbed in the back an awful lot… If you move to the outside and miss your opportunity to block the knife, the chances of getting stabbed are greatly reduced, and you are in more or less the same position to try again. Don’t forget that if you are attacked with a knife, expect to get stabbed.
The person who wins a knife fight is the guy that bleeds out last.
- 12GeraldMarch 14, 2013 at 9:19 pm
Old Skool Jiu Jitsu.
But the throws are the very basic throws in Judo also. O-Goshi, Ippon Sai o Nage, Seoi Otoshi…
" In the 60s, most people that knew how to throw dangerous straight punches were boxers and the like, and didn’t know squat about ground fighting/wrestling"
In the 60s there were boxers and wrestlers. And People dont knowing sh** about martial arts kicking your ass just from learning by doing. ;)
- 13BrianMarch 14, 2013 at 9:21 pm
This is kinda cool, but none of these are useful if you cant practice them until they become so. Self desfense should be less a decision, more a reflex, because the time it takes you to decide if its appropriate could easily get you deadified. Just saying.
- 14jerryMarch 14, 2013 at 10:22 pm
So many experts commenting while giving you their vitals. The first thing any real fighting trainer tells you is to keep it to yourself…same as carrying a weapon. But, I am old school old man. I never went to drama class.
- 15Don DraperMarch 14, 2013 at 11:08 pm
Don Draper agrees it is foolish to mess with a man named Don Draper…!
- 16JessMarch 15, 2013 at 12:12 am
Self defense is awesome. I wouldn’t mind seeing more of it on here actually, haha… but either way, still an awesome blog =)
- 17TacMarch 15, 2013 at 6:22 am
Gerald…..I was just noting that while that technique might have been reasonable to the person that was devising this article fifty years ago, it’s not something that would be advisable to try today. Of course there were people back then with very well-rounded knowledge bases. Now, however, even the morons have picked up on a few things.
- 18Stan R. MitchellMarch 15, 2013 at 6:27 am
These are some wonderful, basic moves, and you’re right: The illustrations are incredible.
But I can’t help but think about how much further hand-to-hand and martial arts have come since then. Almost all these “defenses" have been further refined, modified, and improved.
And I think most of the practitioners I know have taken every thing to such a higher level. For instance, I’d never be happy with just one style, so I practice three: Shaolin Kung Fu, Tae Kwon Do, and Muay Thai, and I even nabbed a belt in Kajukenbo, which is some really brutal stuff.
Additionally, I spend lots of time in the gym moving weights, just like most of the other practitioners I know.
I’m not sure why this is the case for most. Maybe we’re more paranoid. Maybe the MMA kick everyone is on teaches us we must be uber prepared. And maybe, we just have more access to knowledge through books, videos, etc. Probably back in the day, you just had one or two choices of dojos to train at.
Regardless, great article. Thanks so much for sharing it!
- 19EricMarch 15, 2013 at 6:30 am
Back in 5th grade I transferred school and had a problem with being bullied by larger guys. I’m 57, and at the time the only real martial art you could study was Judo, usually taught by soldiers who had served in Japan. After about 6 months, I had a few decent techniques down pretty well. One day on the playground, one of the larger guys who had been bugging me stepped up and grabbed the front of ny shirt. I threw him clean with O-soto gari and I still remember the sound he made when he hit the blacktop. The other kids thought it was magic and that I was some kind of kung-fu killer. No problems after that.
- 20CyranoMarch 15, 2013 at 7:40 am
I was a regular competitor in Judo for about 7 years before I gave it up for a family (time and pain requirement was too much). Much of the material is more Hapkido than Judo though the throws are definitely Judo. I would say there are a lot of fine points of not hurting yourself when executing these actions that are gained only through personal instruction. To improve your instruction of the shoulder throw… Placement of the feet slightly inside of your opponent and pulling the arm up and around your midsection as you rotate to complete the shoulder throw are key. Just as an example. For more visuals go to http://judoinfo.com/images/animations/blue/ogoshi.htm
- 21A.S FalconMarch 15, 2013 at 7:41 am
Nice article, in real life it`s a little different, you can study the techniques all day long, you would have to do this practically everday for it to be effective, it`s not everyday a person fights.
- 22CalebMarch 15, 2013 at 8:55 am
I did some real world self-defense some years ago, and while no master, I did learn a great deal.
Instead of the “Nose-Breaker" a very effective way to break the choke and disable the assailant is: as in the diagram, bring the hands up through the arms of the attacker, in slightly crossed manner (small X), then insted of forming a fist, work the arms outward and down. This allows you to take control of the assailants wrists as they come off of the neck. Finally, using the wrists as leverage, sharply pull down. This will draw the assailants nose into a headbutt to the center of the face. You can also aim for the temple of the attacker for a swift knock-out blow.
The other techniques are similar to the basic self-defense I learned. In regard to knives, get away if you can. If you can’t, you need to know you are going to get cut, your goal should be to minimize damage to yourself and to disarm or nullify the attacker. If you manage to rend the knife away, I recommend disposal. Get it as far away from the fight as possible, thne use hand-to-hand techniques to defend against the attack, if the coward doesn’t run.
- 23EmilyMarch 15, 2013 at 8:56 am
These tips would’ve come in very handy when I tried to “beat up" my sixth grade bully! But who knows, they could come to my rescue some time in the future. Thanks!
- 24JoshuaMarch 15, 2013 at 10:04 am
For the sake of your hands, please do not interlace your fingers on the nose break. You will likely break your fingers if you do that, especially if his head drops and you hit his forehead. Use one hammer fist or cover one fist with your other hand.
- 25RobMarch 15, 2013 at 10:08 am
Another great article. I do krav maga and I do really approve those techniques. There is a simpler and equal effective way for disarming a knife but that one works, too.
The biggest advice I can give is training! Do not think you can aply these techniques just by looking at pictures, videos or reading. You must practice. Get a buddy, explain him every move in detail so he is prepared and start doing it over and over and aply natural situations where an assault could happen. Unless you are sure you can act instinc ively you are better off running away which is almost everytime the best choice unless you have no other choice, not alone —maybe a walk with your significant other— or you are Bruce Lee. Be sure you can react without thinking otherwise you can get in serious trouble if you meet a nasty thug. Wannabes and less dangerous thugs are easily impressed and drived back. But you will never know for sure so be prepared!
- 26SteveMarch 15, 2013 at 10:29 am
I think that most of the above commenters are missing one important point:
These techniques, while not 100%, are a great ‘starting point’ for someone (99% of the population) that knows absolutely nothing about defending themselves.
I think that everyone should have some knowledge in some sort of fisticuffs – boxing, judo, muay thai, krav maga, sambo, etc.
That said – spend a couple of dollars and take a ‘self defense’ course. It’s amazing the difference practicing SD techniques in your mind and practicing them on someone else.
I’ve recently started attending a Sambo class once a week. I’m amazed at the different perspective I have now on my personal safety.
- 27Sartorial MadnessMarch 15, 2013 at 10:57 am
You’re all completely missing the point! The defender is appropriately dressed in a suit *and tie*, while the attacker sloppily skips the neckwear.
- 28Frost73March 15, 2013 at 11:44 am
Interesting… While cleaning out a late uncle’s apartment, I came across a U.S. Army field manual on hand-to-hand combat from the 1950s. As I was looking through the techniques and photographs, I couldn’t help but be fascinated at how H2H has evolved.
- 29JohnMarch 15, 2013 at 12:13 pm
It was okay until the last bit about knife defense. As a martial artist, if you are confronted knife vs no knife you should simply get the hell out. Regular training can never protect you from a realistic knife attack. Taking a knife attacker head on should be a last resort if you’re cornered. They can cover 7 paces in about a second.
Cheers.
- 30c.w.March 15, 2013 at 1:56 pm
you shouldn’t try to move away from someone that is pullin your hair, especially if it’s long enough for them to get a good grip. someone who is either strong enough, or escalated enough can scalp you.
It’s best to grab the rist of the hand that is holding the hair with your hand(s), and then step into your attacker to put them off balance. Hopefully at this as they fell like they are falling they let go.
- 31JohnMarch 15, 2013 at 2:04 pm
Aw c’mon fellas! This was a fun and helpfull article written fifty-years ago. What’s with all the critiques and shudda’s, cudda’s? Some of you “boys" take yourselves a little too seriously!
- 32OzoneMarch 15, 2013 at 4:08 pm
… of course hand-to-hand has evolved. Modern techniques involve the liberal use of sound effects and “bullet time"! ;-)
- 33Steven PMarch 15, 2013 at 4:12 pm
Some of these are a bit too complicated, and some of them are just plain awesome. Dig this article though.
- 34Phil QuimMarch 15, 2013 at 6:00 pm
If someone pulls my hair, what is wrong with me throwing a right cross to his face? I am not interested in dancing with him.
- 35RodrickMarch 15, 2013 at 7:08 pm
Krav Maga is easier and faster with better results…
If no one knows is that one used by the Israel Army.
http://en.wikipedia.org/wiki/Krav_Maga- 36Jared OMarch 15, 2013 at 7:48 pm
When you face a knife(and compliance is not an option) there are two things you should consider before anything else:
1.) Run. If escape is a viable option do so. Nothing is uglier than a knife fight. And it depends on luck much more than other types of combat.
2.) Grab something longer. A knife doesn’t have much chance against lets say a mop or a handy tree branch or a shovel. You might consider carrying a telescopic baton if it is legal where you live.Or a taser. Or just have a gun if you are lucky enough be allowed to do so.
Any weapon with shorter than 50 cms reach is not a defensive tool.- 37GeraldMarch 15, 2013 at 8:36 pm
@Tac
I wont overrate the influence of mma and especially all that Brazilian JiuJitsu groundworking stuff.
Why? Because its nothing new, never was..
Back to the basics it all the same Kodokan Judo Roots as in these pictures.
Some people tought it was new because of the 70/80s media hype on kung/fu, Karate, Kickboxing etc that ignored grappling and groundwork in the popular styles. I dont say its useless, it should be involved in any good system (and it is and was)
But in the US all that “Ground£" got as clearly overhyped as Bruce Lee and his magical TschingTschung art. But its what it is. Just a trend.Even the US Army “updated" the proven WW2&Nam combatatives FM 3-25.15 in 2002 with lots of groundwork and “crazy" jiujitsu… cutting down the basics of course.
“military use?" like this would work clothed in full gear..maybe they should add mud-wrestling next time..sending drones might be more safe.If you kick someone you have to do it as fast as punching someone to avoid getting grappled.
This is today not different then 30 or 50 years ago. Nothing changed in the physics. And many “untrained" people in any Martial Arts tend to grapple on instinct if the get into fights.- 38JedMarch 15, 2013 at 11:53 pm
It would be wise and advisable to PRACTICE these techniques before relying on them…Practice-partner, foam mats on the floor and slow-movement at first…Learning basic martial-arts (even white-belt level) would be a good start before learning “moves" from a book or cartoons!
- 39DaveGormanMarch 16, 2013 at 1:40 am
One of your best posts yet. Awesome
- 40GilMarch 16, 2013 at 5:19 am
TAoM rocks!
- 41AlanMarch 16, 2013 at 9:36 am
As someone who was into ju jitsu before it was cool – this post serves only one purpose, which is hopefully to get you down to a local dojo to learn.
Some of these moves are taught in JJ (and some look plain silly) but you’ll never learn them via cartoons on a screen.
I spent years practising such moves but it’s also been years since then, and I’m sure I’d struggle to remember half of them in a serious fight. Which is why I got really really good at just 7 different moves… I call it “Sevenfu" :)
- 42jason taylorMarch 16, 2013 at 10:05 am
One thing the critics did not mention was that all of these, as I understand were meant to be used against a thug. Now it is true someone who doesn’t train regularly wouldn’t be much good. But your average thug will be worse. Not that one should rely on such thing; it is usually safer to just give him the money. Sometimes however it is useful to keep such things in the back of yourmind though.
- 43Stengel99March 16, 2013 at 11:02 am
My favorite part of this post: The men are wearing suits.
- 44JedMarch 16, 2013 at 8:41 pm
I forgot to mention–we live in a different day-and-age now…This is not the 1950′s when men fought men one on one…We live in 2013 where groups of 3-4 thugs usually attack one person…So, these cartoon-illustrations on self-defense are like a joke anymore!
- 45JohnMarch 17, 2013 at 2:13 am
Men have ganged up on other men since there were men! Pick a decade. The real difference is that back then, men didnt need disclaimers. They didn’t fret, or wring their hands because they might not do it right, or that they might get hurt (I mean, we are talking about fighting). Back then, men demanded the dignity to make their own decisions, and to live or die by them. Living life without being brow beat, criticized, and secound guessed, was taken for granted.
Now, everyone feels they must be heard. They know more and it must be shared. What if some one gets hurt? What if they do it wrong? What if…if there’s a MISTAKE!!
Yes, these are cartoon-illustrations, but they work for what they are intended. So quit hovering like somebodys Mother. Assume the man that reads them is man enough to decide when, where, and how to use them.- 46MichaelMarch 17, 2013 at 2:59 am
Jed, learn to use the opponents energy against him. That could be in the form of a wildly wielded weapon, a bunch of cowardly “friends" (bullies), or most often, just him or her alone- angry, impatient, self-righteous and out-of-control.
Techniques against such attacks include issuing combinations to the front attacker, while circling around him and pushing him into another attacker, then delivering another quick combination (kick and punch or other quick blow(s)) to the second (or third if there’s more). Then while still circling, push the second into the first dummie, or third if needed. Retreat or advance as needed.
Another common scenario is your grabbed by one nutter and a second comes at you with a punck, kick or weapon. Grab the arms of the first attacker and use his mass to add force to your forward deflecting kick, stomp kick or two handed thrust or push. You may also drop all your weight onto the first attacker so that it’s easier to throw him after you’ve attacked frontally.
A third common scenario is being held by two kidnappers or assailants at both sides by the wrists or arms.
You may pull your arms down, causing both men bring force upwards. You then use that force to nail them in the balls, elbow them in the chest or strike the neck, chin, temple or nose.
Another of the escapes(there are many) is to push forward with yours arms leading your body (only if held tightly) and use their pull to assist your reverse hammer or chop to the groins or elbows to stomach or solar plexus. Strike twice if you must. Then grab the two closest pant cuffs or ankles- swooping them upwards while you walk forward all in one motion. Your adversaries on their backs and you may retreat or attack as needed.- 47Native SonMarch 17, 2013 at 10:36 am
Nice nostalgic article. Judging from the illustrations, the cited article seems to be based on an earlier law enforcement self-defense techniques (from the 1930s or 1940s, I think, the dark suited thug showed up prominently in the first work’s photographs), that relied on the Oriental martial arts being virtually unknown in the US.
And as with anything, “a little learning is dangerous", you don’t practice, you’re toast.- 48NicholasMarch 17, 2013 at 2:16 pm
Nice article. As I ride the bus to work every day in a suit, I know it’s only a matter of time before I need to employ some of these techniques on a would-be assailant.
- 49Jais HenanMarch 18, 2013 at 6:42 am
Most of these techniques require a lot of practice to work.
Awesome illustrations, though.
If someone needs to go right from paper to reality, I would suggest eye gouging, biting pieces off (not just biting down — bite through!), breaking fingers (grab one at a time and bend them the wrong way — they snap easily enough), carrying a small, easily handled blade you are familiar with and making deep, long cuts in areas of high vascular content.
On top of all that, being familiar and comfortable with something in .45 can be a big help. As they say:
God made men. Samuel Colt made them equal.
- 50BriaMarch 18, 2013 at 10:49 am
Watching a series on the Discovery Channel called “Human Weapon" made me really want to join a Karate or Kung-Fu class. Then they showed the episode on Krav Maga and I immediately said to myself “that’s what I want to learn!" So, I found the nearest Krav Maga class and joined. One of the best decisions I ever made. Learned self-defense and get a great workout as well.
- 51PapaPaulMarch 19, 2013 at 12:07 am
At 48 the one move I learned at 6 y/o has served me well. A good firm poke in the eye STOPS a jerk cold, drunk or sober…
- 52TaylorMarch 20, 2013 at 1:57 am
I do not have extensive training in martial arts, but I have studied a few. The knife technique mentioned above is a terrible idea, Knife disarms are heavily debated in the martial arts community, there really isn’t a good knife disarm, especially for individuals that have absolutely no experience doing such a dangerous task. I do not recommend this move. If you think its a good idea, grab a partner and give him/her a sharpie, try this move; he/she will mark on you with that sharpie.
- 53Ben WMarch 21, 2013 at 12:01 am
Wow, this is a simple collection of somewhat effective techniques presented in a manner the lay man can understand. It is unsurprising that many correlate to elementary techniques from several forms of traditional martial arts and wrestling.
I personally take offense with the kick defense illustration for several reasons.
1) Most untrained people have a difficult time kicking above the groin.
2) Timing a cross block defense (aka an X-block) requires acute timing and precise hand positions. Both of these can be acquired with some practice. Failure results in a weak block, or worse… a fractured hand.
3) The illustration displays a notable error. The kick is low (and therefore rather harmless), and defender is bending over to block it. Not only is it unnecessary to block such a kick, it also puts his head in a vulnerable position to be punched. Stepping back once is much easier than the cross-block as demonstrated. Kicking the knees is also a quick way to remove an assailant’s mobility.My comments are drawn from my personal study of karate of 4 years. The more I train the more I find that the simple techniques tend to be the most effective. Also, as with anything in life, practice makes perfect!
- 54Andrew SMarch 24, 2013 at 1:06 pm
Of course, you could just kick him in the b**ls, or failing that run.
Alternatively, remember that you can talk your way out of the vast majority of conflicts – it’s much less dangerous, and even if you do lose a little pride in the process, it’s a price worth paying if the alternative is to risk a knife in your chest.
With either option, you’re less likely to damage your suit.
Great post.
- 55George F Matheis JrMarch 26, 2013 at 12:10 pm
Neat old article, but take it for what it is, I make my living teaching combatives as well as edged weapons, impact weapons and firearms. The core of my traditional training is Yo Shin Ryu Ju Jitsu and Judo. Most of what is shown is very bad form. Also know that Judo is the sport form of Ju Jitsu and by itself is not usually studied for self-defense.
- 56Matt BMarch 28, 2013 at 6:36 pm
This is cool, but kind of funny too. I practice Krav Maga, and we’re taught to end a fight in under a minute. Like with the knife defense, I’m either going to jab an eye out or give a solid punch to the throat, breaking the windpipe or larnyx. And the hair grab, that would be a kick to the balls followed by a punch to the nose. And if someone grabs me by the shoulder, I could simply grab them around the arm with mine, hit them in the nose with the meaty part of my palm, and lean back, popping their shoulder out of place and putting them on the ground. But, all in all, I have always thought Judo was a cool martial. Sure, in Krav Maga we have quick and brutal ways to end a fight, but it’s also cool as hell being able to throw a guy a few feet. Plus, several Judo throws can cause death or paralysis. Good article.
- 57SerafinMay 7, 2013 at 7:46 am
Funny that you would call this Don Draper Judo… The only time that Draper got into a scuffle on Mad Men he got his butt handed to him by a much older man.
- 58MichaelMay 18, 2013 at 1:50 am
I remember reading this article in the 60s while staying at my uncle’s house during the summer. Thanks for a chance to visit Memory Lane and save a copy for my grandchildren.
- 59AndyJune 3, 2013 at 4:47 pm
Nothing is infallible, but this certainly provides some creative suggestions.
- 60N.W.June 13, 2013 at 5:57 pm
You can read a lot of these type fighting tips in Dashiell Hammett. His writing about how his protagonists defend themselves is very specific.
In fact, in the short story “The Whosis Kid," the Continental Op explains a trick similar to the first one shown in this article. If someone is dumb enough to try to choke you from the front, consider the fact that even a woman’s whole hand is weaker than even a strong man’s little finger. So, rather than trying to pry away the attacker’s hands, you grab him by his pinkies, and bend them backwards till they snap. If this isn’t enough, you proceed to the ring fingers and break those, and so on.
Even though Hammett’s writing is fiction, there’s a lot of realistic and practical techniques, as when he was a Pinkerton, he got into a lot of fights.
- 61ZackJune 17, 2013 at 6:22 pm
I have to agree with some of the skeptics. The last bit about knife attack is not really that well designed. I have done judo before. If any of you are really interested in how judo is used in combat. Check out Major William Ewart Fairbain’s “Get Tough" which contains mainly W.E Fairbain’s own street experience during his service in Shanghai. Arguably the crime capital at the time. It’s more of a mix between his experience, jujutsu, judo, kung fu and boxing. The system has a record of 600 successes.
Back to the knife defense. There are several misconceptions. One is that the knife is shown to the defender. With an unskilled knife user, he might be dumb enough to show you the knife. In most cases, if a knife is shown, there’s a probability of winning. However, on the other hand, it’s more likely that the knife user would conceal his knife and stick it in before the defender could realise there is a knife. Draw out his blade during grappling. Conceal it around his arm pit, then cover the eyes of the defender, then stab, or throw something at the defender to distract him in order to deal multiple slashings. The most successful technique is to just sneak behind someone cover their mouth or their eyes, and stab them from behind. No noise, no struggle.
So first of all, situational awareness beats any physical self defense. If you are hyper about self defense, do you plan your route? Do you walk away from streets or alleys of crime? Do you stay on the right code? Meaning can you automatically know escape routes on the street, are you aware of who’s around you?
If you are suspicious about someone behind, cross the road. Know if he crosses as well, change your speed, does whoever you suspect is following you, altering his speed in response to your change. If yes. Go to somewhere public. It’s not a matter of manhood, it’s a matter of SURVIVAL, no matter how dishonourable it is.
Secondly, another mistake assumed is that the knife user will be compliant and let the judoka execute the lock. Under stress due to adrenaline, and sheer insanity, the knife user will retract his knife hand. This is dangerous as the knife attacker could now aim for the throat, the face or the heart, in close quarters. Furthermore, if he can’t pull his hand back because the judoka has a strong grip, an option would be to swap the knife into his free hand. Again this is a major problem, as the defender leaves his kidney exposed.
The next thing is that the knife user leaves his knife hand in front, his free hand back. Someone who knows how to use a knife won’t do this. Any guy who knows his knife leaves his free hand out. Leaving him able to parry block, and grab the left side of the victim, to carry out stabbings near vital coronary arteries. Leaving someone dead in minutes. If anyone wants to look for knife defense, read “PUT EM DOWN TAKE EM OUT" by someone who was a former ex-con in Folsom Maximum Security Jail. His name is Don Pentcost.
Finally, let me conclude by saying that judo is mainly practiced as a sport today. Trapping, and all other stuffs are largely forgotten. Even my judo teacher told me to always run. Any martial art or physical defense only heighten your possibility of leaving the scene in one piece. Not guarantee it.
Another final misconception is that many of us are looking TOO MUCH on these techniques above. As opposed to something more important. Techniques are manifestations of a principle. These movements contain physics that could be applied to every situation. Instead of interpreting the images as throws, locks. We need to look at the biomechanics. They all contain the concept of kuzushi waza, off balancing, tuskuri, displacing someone’s center of gravity on top of you. Redirection of momentum, acceleration of momentum. Fulcrum points in the form of human joints. We need to look these techniques with those things in mind as opposed to just what should I do if you do this, I will throw you, lock you etc…….
Bruce Lee once said, “I don’t fear 10,000 kicks you have practiced 1 time. I only fear the 1 kick you practiced 10,000 times."
An interpretation is that having too many techniques and evaluating technique is futile. Attacks change. The only principle that the many techniques are based on, will be useful in that it applies to 10,000 different situations.
- 62donJune 24, 2013 at 2:43 pm
I always liked the approach of ww2 instructor william fairbairn-kick them in the groin, when head comes down palm stike to chin and go for the eyes-the idea was to pre empt someone getting ready to attack you and then you attack them first.
- 63T. RochonJuly 14, 2013 at 4:31 pm
Don’t even interlock your fingers when striking someone. It’s a good way to break all your fingers. Rather, clasp your hands together like your an eight year old trying to make farting noises. This will give you the same shape and save your digits.
Source: I’m a Judo brown belt and instructor as well as a train boxer.
Leave a Comment
Name *
E-mail *
Website
Previous post: Outfitted & Equipped: Sunny Spring Patio Happy Hour


Posted on October 16th, 2013
It’s All About the Smalls: How to Make a Primitive Small Game Hunting Gig


It’s All About the Smalls: How to Make a Primitive Small Game Hunting Gig
by A Manly Guest Contributor on May 22, 2013 · 20 comments
in Manly Skills, Outdoors, Survival

Creek Stewart is a Senior Instructor at the Willow Haven Outdoor School for Survival, Preparedness & Bushcraft and the author of the just released book, The Unofficial Hunger Games Wilderness Survival Guide.
I’d like to start this article with how I start many of my teaching programs and seminars – with The 3 Survival Rules of 3. In extreme circumstances, humans can survive:
- 3 hours without shelter
- 3 days without water
- 3 weeks without food
I didn’t invent these rules. Mother Nature did. This mantra has been around for many years. I’m a big fan of simple, easy to remember survival phrases like this. Sudden survival scenarios can feel overwhelming. The mind tends to go a bit crazy with panic and fear. Even simple tasks become complex. The emotions that come with being lost, stranded, or in danger can become paralyzing, overwhelming, and just flat-out scary. Easy to remember phrases like The 3 Survival Rules of 3 can help survivors regain balance and calm by helping to establish critical survival priorities. Often, it’s the simple things that matter the most in a survival scenario – like getting your priorities mixed up and pursuing food before shelter or water.
With that said, if a survival ordeal lasts long enough, you will eventually need to put fuel (calories) on the human furnace. Gathering wild edibles is one of my favorite things to do. I absolutely love making a salad from fresh wild greens in the spring, foraging for berries in the summer, and digging starchy wild tubers in the fall. I’ve had many years of practice and consider myself a fairly adequate wild plant forager. I even teach a seminar for restaurateurs who want to incorporate wild foraged plants into their uniquely local menus. Even with all of this practice and skill, I can state with 100% certainty that I could not live long-term on wild gathered plants alone – especially in certain environments (desert) and seasons (winter). It is not possible for even the most experienced forager or survivalist. At some point, a long-term survivor will need the calories that only meat can provide.
Survival hunting is a delicate balance of risk versus reward. One must always try to calculate whether the energy expense of making hunting tools and the act of hunting will result in an ultimate calorie loss or gain. Making hunting tools requires energy. Hunting requires energy. Field dressing and cooking requires energy. The goal is to choose a hunting process that trades the best chances of calorie reward for the least amount of calorie risk.
I have a friend who sells items at fairs, festivals, and flea-markets. He always says to me, “Creek, the money is in the smalls." He tells how it’s nice to sell a $50 or $100 item every now and then but if he depended on those products to make a living he’d be bankrupt. He tells me that he makes his living on the $1 and $2 items.
This is the best analogy I can think of when it comes to survival hunting. You will make your living on the smalls. Don’t try to hunt the big ticket animals like elk, deer, boar, or bison. These animals require too much effort. You run the risk of caloric bankruptcy if you focus on these big ticket animals alone. Your chances of bagging one with primitive weapons is slim to none anyway, regardless of what you see on TV. Primitive peoples hunted animals like these in hunting parties of up to thirty adult men and it sometimes took many days. Even then they often came back empty handed. In a sudden and unexpected survival scenario with limited resources, your best hunting chances are with the smalls. These include wild game such as frogs, fish, rodents, snakes, birds, and maybe (if you are really lucky) rabbit, squirrel, groundhog, muskrat, and possum.
One of the best primitive-made multi-use small game hunting tools is what’s known as a split tip gig. Split tip gigs are still used in remote parts of the world to put food on the table every day. They are easy to make with limited tools and very effective at up-close and short-range distances. Below I walk you through how to make one.
How to Make a Primitive Split Tip Small Game Gig
You want to start with a green sapling (small tree) that’s about 1-1.5 inches in diameter and 6-8 feet long. Dead, dry wood won’t work. You must cut down a fresh green sapling. Bamboo makes an exceptional split tip gig, but most of us don’t have access to it. I like to use willow. Willow is very common in places where you’ll get the most use out of a gig like this – near water. You can use virtually any species of tree as long as it’s nice and straight.

Next, you’ll want to trim away all of the branches and chop off the top where it starts to taper to smaller than 1 inch in diameter.

The business end of the gig is made from the bottom of the sapling (the fatter end). You’ll start by holding your knife or sharp rock directly across the bottom of the sapling. It must be as perfectly aligned in the center as you can get. Drive your knife down the sapling about 10 inches or so using a stout stick or rock. I prefer a stick so as to not damage my knife. It’s important to split the gig shaft directly in half. This is known as batoning.

Now, rotate the sapling 90 degrees and baton again. This will split the base of your gig into four equal quarters about 10 inches deep.


From the branches you trimmed off in the previous steps, cut two pieces of branch that are about the diameter of a pencil and two inches long.

One at a time, push these down into the splits you just made.


This spreads the tines of your split tip gig. You can now see the gig starting to take shape. Your gig tines should have about a 4-6 inch diameter spread. The benefit of a gig like this versus just one sharp tip is that it increases surface area; improving your chances of a successful strike. The tines also form wedges that help to trap and pin potential prey.
Now it’s time to sharpen your tine tips to a sharp point. You will have to work your knife inside and out of the gig tines. Willow is a very soft wood and is easy to carve. Other species such as walnut or maple are harder and will take more effort.


In spring and summer, the bark from willow (and many other species including mulberry and basswood) can be peeled and used as crude cordage to lash the end of your gig so that it doesn’t split out with continued use.

If you only plan on using the gig a few times, lashings aren’t necessary. However, lashing the base of the splits makes the gig more durable and prevents it from splitting out. In the photo series below I detail a quick and effective lashing that works perfect with traditional cordage or primitive plant and bark fibers. I’m using paracord so that it’s easy to see how the lashing works.
Lashing Your Gig

Loop one end of your cordage as shown.

Wrap the long end around the gig and over the short end.

Keep wraps tight.

Continue wrapping.

Feed the end through the loop you made in the beginning.

Firmly pull the bottom tail and the loop with the loose end of your cordage.

Pull the loop just under the first couple of wraps and trim the two ends.


Tips for Hunting with a Gig
Survivors are opportunists. Split tip gigs are perfect weapons of opportunity. Whether happening upon a quail hidden in a tuft of grass or spotting a frog on the bank of a muddy swamp, a gig is easy to use and quick to deploy. Gigging can also be a waiting man’s game. Oftentimes, waiting for a fish to pass within striking range or waiting for a rodent to peek its head out of a burrow can take a lot of patience. Either way, it’s a tool that works well as one goes about daily survival chores or while actively hunting and gathering. It can also be used as a self defense weapon, hiking staff, and cooking skewer.
Gigs are most effective for game in and around water. Fish and frogs are primary targets. The American bullfrog is nocturnal and comes out at night during the spring and summer months. Shining a light into the eyes will prevent them from seeing you approach. Frog legs are nutritious, hearty, and an ideal survival food. Primitive tribes all over the world have used versions of the split tip gig for many thousands of years to put food on the table. From freshwater trout and salmon to sea urchins and coconut crabs, the split tip gig is one of the best marine hunting tools available.

Summary
If you’ve never used a gig, I would suggest trying it at least once simply for the experience. Metal commercial gigs are available at many hunting/fishing stores for just a few bucks. They easily mount to the end of long pole with a couple screws. Check with your local DNR office about frog gigging rules/regulations/season for your state. Most states don’t allow the use of a primitive gig, but using a commercial gig is good practice just in case you ever have to draw from your survival knowledge in a desperate situation.
Remember, it’s not IF but WHEN.
Creek

If you enjoy learning primitive survival skills like this one, consider picking up a copy of my new book, The Unofficial Hunger Games Wilderness Survival Guide. It is a primitive skills manual themed after the popular book series The Hunger Games. It’s a great read packed with practical lifesaving primitive survival skills in the areas of shelter, water, fire, food, and rescue. Great for getting kids interested in survival skills, but can be enjoyed by readers of all ages!


{ 20 comments… read them below or add one }
- 1Andrew VMay 22, 2013 at 7:00 pm
Three hours without shelter? At what temperature? In what conditions?
- 2LukeMay 22, 2013 at 10:38 pm
It did say in extreme circumstances Andrew, i’d say it also emphasises the importance of making/finding shelter.
- 3DarkoMay 23, 2013 at 2:41 am
Three hours are a good example. Probably three hours, when shelter is really needed (heavy rain, snow, low/high temperature).
- 4calebMay 23, 2013 at 7:09 am
You forgot: 3 minutes without oxygen and 3 seconds without thinking.
- 5Mark RuddickMay 23, 2013 at 8:23 am
We teach our scouts the rule of 3s as well. We do add 3 minutes without air. They’re not hard rules, what they do is prioratize what you need to do.
1. Medical.
2. Shelter / Fire.
3. Fresh Water.
4. Food.A lot of people go right for #4
- 6PeterMay 23, 2013 at 8:31 am
Awesome article.
- 7JohnMay 23, 2013 at 9:02 am
i have never used a gig but i will try it im extreamly into anything outdoors and i concider my self very versitile in the woods
- 8MarcMay 23, 2013 at 11:55 am
I made gigs from giant canes for gathering sea urchins or fruit high in trees. I’d do it the same way, but I used a small stone to keep the four tines split open.
- 9larrylMay 23, 2013 at 1:42 pm
A mild breeze blowing on your wet skin can bring on hypothermia in a few short hours even in 60 degree weather – all it takes is getting your body core temperature down to 95 degrees F.
Creek, you are the master of using picture angles for teaching aids!
- 10ChristopherMay 23, 2013 at 3:05 pm
Great idea! I’m going to make one of these this weekend and try it out. I was just reading something that might make this even better for fishing: fish fences (http://www.m4040.com/Survival/Skills/Hunting%20and%20Snaring/Fishing.htm). Between these two tools, the fish had better look out!
- 11Alyssa SMay 23, 2013 at 5:49 pm
Thanks for the great article, Creek. I would love to see one on how to build a simple emergency shelter.
- 12BrandonMay 24, 2013 at 7:49 am
Always love these articles. As someone living in a big city, one of my dreams has always been to go into the wilderness with minimal packing and be able to survive for a week.
- 13YupMay 24, 2013 at 2:09 pm
Creek, your posts are always solid, keep it up. Any tips on collecting or producing water in remote situations?
- 14AntMay 25, 2013 at 8:51 am
I’ve only ever used mini ones for cooking toast on a campfire :D , this is another good use! Unfortunately, I’m pretty certain spear fishing is illegal in England…
- 15Max PowerMay 25, 2013 at 6:37 pm
I like to read about survival training on occasion, but all the snares and traps always seem way too complicated for me. This seems PERFECT. Keep up the excellent articles.
- 16DavidMay 28, 2013 at 5:12 pm
These do work well and I have used them for fishing. That said I do want to point out for larger game such as wild hogs it would work better to use that paracord to turn a similar size stick and your knife into a more rugged spear. If you say…" I don’t have a paracord survival band"…well you should.
- 17Peaver BogartMay 28, 2013 at 5:19 pm
I would add one thing about making a gig. Put the tip over or near a fire to dry out the tips and make them harder for more penatration. You may have to resharpen the tips after drying out close to the fire.
- 18ScublokeMay 30, 2013 at 12:54 am
Why would you use these for coconut crabs? In Vanuatu all we did was lay a series of baits during the day and check the baits at night. Each bait was a large piece of coconut staked to the ground so that the crab couldn’t make off with it. To catch them you just walk up to them and pick them up, they’re not exactly lightning fast.
- 19TedJune 3, 2013 at 3:08 pm
This is the best article on survival hunting I’ve read in a while. Most articles set goals too high while this article is realistic and workable. Well done, I’ll check out your book.
- 20JJamesJune 5, 2013 at 8:25 am
Adding little notches into your gig so that an animal that is pierced will not be able to slide off as easily is an improvement to this gig.
Leave a Comment
Name *
E-mail *
Website
Previous post: Fiction for Men as Suggested by Art of Manliness Readers
Next post: On Being Neighborly


Posted on October 16th, 2013
How to Survive a Natural Disaster


How to Bug-In: What You Need to Know to Survive a Grid-Down Disaster
by A Manly Guest Contributor on November 1, 2012 · 98 comments
Editor’s note: This is a guest post from Creek Stewart of Willow Haven Outdoor.
As the East Coast of the United States recovers from Hurricane Sandy, aka “Frankenstorm," the rest of us watch the unfolding aftermath from a distance – thankful Mother Nature hasn’t unleashed her fury on our doorstep today. Hurricane Sandy is yet another sober reminder that none of us are exempt from disaster. Mother Nature doesn’t discriminate. She doesn’t care where we live, what we drive, how much we make, or what we do for a living. Her antics are diverse and far-reaching. She has a recipe of devastation for all parts of the world: hurricanes, tornados, floods, wildfires, winter storms, earthquakes, tsunamis, droughts, heat waves, volcanoes, land-slides, and sometimes even a combo pack.
It is human nature to avoid potentially bad news. It is also human nature to procrastinate. Consequently, many of us avoid going to the dentist, taking our car in for routine maintenance, implementing a home security plan, getting our yearly physicals, and many other important preventative and preparative tasks. Unfortunately, avoiding the thought of potential bad news has absolutely no bearing at all on whether or not it will happen. In fact, this attitude is completely self-destructive. Avoiding preparing for or prevent a very dangerous and probable threat is irresponsible and incredibly foolish. Yet, people do it all the time when it comes to potential natural disasters. The mentality of “it’s not going to happen to me" is no longer an acceptable excuse. In the 15 years I’ve taught Survival and Preparedness courses I’ve come to the conclusion that there are no acceptable excuses and I have run thin on patience to those that offer them. Burying your head in the sand is not a strategy and depending on the government to save you is not a plan.
Many of you remember the article I wrote a while back titled How to Make a Bug Out Bag. “Bugging Out" is the decision to abandon your home in search of a safer destination in the event of a large-scale disaster. Sometimes, Bugging Out is not necessary nor is it the best decision. A disaster may, in fact, make it impossible to Bug Out. The alternative is called “Bugging In." Bugging In or hunkering down during a large-scale disaster can present many challenges to a survivor. Oftentimes, the utilities we depend on are ripped off-line – known as “Grid-Down."
Disasters can devastate our most critical services including water supplies, medical facilities and first responders, waste and trash processing and removal, transportation options, fuel and grocery supplies, natural gas lines, electricity, phone service, and even public safety. A Grid-Down scenario can last for several days or even weeks. During this time, you must be able to provide basic survival needs for you and your family. These Bug In preps and plans need to be made in advance. They cannot be made in the heat of a disaster.
How Long Should I Prepare to Bug In?
That’s the question of the century! The government says 3 days. I have preps to get me through 1 year. My answer is a minimum of 2 weeks and then keep prepping for longer as time and money allow. Start with 3 days then work up from there. Don’t let this question prevent you from making progress.
What Are the Categories I Should Consider When Prepping?
Our basic human survival needs remain the exact same no matter where we are in the world or what circumstances we face. They will always be: shelter, water, fire, food, first aid, and self-defense. The order of priority may change, but the basic categories will not. Below is a brief breakdown of each category including several solutions to consider for a short-term Bug In scenario.
Shelter
During a Bug In scenario, shelter may seem fairly obvious. It is your primary place of residence. However, there is more to shelter than just a roof over your head. Shelter must protect us from the elements – even if access to modern utilities is limited or nonexistent. Shelter becomes your #1 priority in cold conditions. You must have alternative heating solutions in place just in case a disaster strikes during cold weather. Some excellent and affordable options are wood burning fireplaces, kerosene heaters, and portable propane heaters.

The back-up kerosene heater I keep at Willow Haven that will heat 1000 square feet for 11 hours on one tank of fuel.
Kerosene heaters can be purchased for just over $100 at virtually any home improvement store. My grandparents heated with a kerosene heater in their living room most of my life. They don’t require electricity and are very easy and safe to operate. Some countries use kerosene heaters as a primary heat source, in fact. The fuel (kerosene) also has an extremely long shelf life – I’ve heard of 20-year-old fuel burning just fine, and I’ve personally used kerosene that’s been sitting for 5 years with no issues. Above is a photo of a back-up kerosene heater I keep at Willow Haven that will heat 1000 square feet for 11 hours on one tank of fuel.

A small propane heater can last 4-6 hours on one tank.
For smaller spaces or supplemental heat, portable emergency propane heaters are excellent little solutions. Mine photographed above takes a one-pound propane canister that is available at most camping and home improvement stores. It really puts out the heat and lasts a surprising length of time (4-6 hours) on one tank. Extra propane canisters are easy to store as well.

I had the wood burning fireplace pictured above installed in my home for about $1500. Even a small stove like this one will heat 1000 square feet of space to a comfortable temperature in freezing conditions for as long as you have wood to burn. If you opt for a fireplace, choose one that can also cook and boil water. Multifunctional uses are always a survival plus. The brand I have is Jotul though there are many excellent brands on the market.
Below are some other home (and car) heating tips I’ve collected from personal experiences testing my preps:
- Close off certain rooms of your house and ‘move in’ to the room with the heat source. Close doors or hang blankets to zone out other areas.
- Hang blankets in front of large windows to reduce heat loss.
- Have good blankets and sleeping bags on hand to help keep you and your family warm.
- Just one candle can warm the inside of a freezing car as much as 8 degrees.
Action Steps:
- Decide on an alternative heat source
- Buy it / install it
- Test it to calculate how much fuel you need for your chosen prep period
- Stock up on fuel
Water
This summer we had the worst drought in over 100 years here in Indiana. It sucked my well dry for over 2 months, and I had to live on my water storage. It wasn’t fun, but really put my back-up plans to a test. Whether you use a well or depend on municipal water service, a disaster can put a stop to your flow of fresh drinking water. Without water you can die in as little as 3 days. The best short-term Bug In water solution is to simply store extra water in your place of residence. You can buy commercially bottled water by the case/gallon or you can bottle and store your own water in food-grade containers.
A very popular do-it-yourself water storage solution is repurposed 2-liter pop bottles. Below is the process I use (I don’t drink soda but friends and family members are happy to give me their empty bottles):
- Step 1: Wash each bottle using water and dish soap.
- Step 2: Sanitize each bottle and cap inside and out with a bleach solution (1 teaspoon bleach mixed in 1 quart water). You can use this same solution to sanitize other types bottles. Rinse the sanitized bottle with clean water.
- Step 3: Fill each bottle with tap water. Add 2 drops of standard unscented household bleach (4-6% sodium hypochlorite)
- Step 4: Empty and refresh your water storage once each year.

There are countless water storage solutions available ranging from fancy interlocking containers to 55-gallon drums. You’ll have to choose a solution that is right for your environment, budget, and consumption needs. Always store your water in a cool place away from full sun exposure.
A few additional emergency water storage tips:
- Keep a few gallons of unscented household bleach on hand at all times. This can be used to purify water and for other sanitation needs.
- A 55-gallon rain barrel used to collect water from your gutters is really easy to install and only costs about $100. You can make your own for even cheaper.
- Your hot water heater contains many gallons of emergency water storage. All hot water heaters have a drain valve at the bottom. This water does not need to be purified.
- In the event of a large-scale disaster, fill your bathtub(s) with water as an extra precaution. This is bonus water if your supply is threatened.
- Pets? They need water too – don’t forget to store water for them.
- If it’s yellow let it mellow, if it’s brownflush it down.
- One gallon of water per day per person is a good rule of thumb for water storage.
Action Steps:
- Decide whether you are filling your own containers or if you are buying commercially bottled water
- Calculate how much water you need (one gallon x people in household x days in your chosen prep period)
- Stock up
Fire
During a Bug In scenario, fire represents two categories: warmth (which we’ve covered) and cooking. You’ll see in the next section that I recommend your emergency meals be very simple to prepare, requiring no cooking at all, if possible. However, it’s important that you have an alternative cooking solution in place to cook meals and boil water if necessary. Several affordable and turn-key off-grid options exist. I’ve listed a few below in no particular order.
Solution # 1: Fireplace or Wood Burning Stove

Not all wood burning stoves can be used to cook meals or boil water. If you are installing one, be sure it can do both. Even an open concept fireplace can be used to cook and boil water. I installed a metal swing arm in the fireplace at Willow Haven that can hold pots and kettles over the open flame. This is an excellent cooking solution.

Even an outdoor fire pit can be an efficient means of cooking or boiling water. A tripod and swing-away cooking grill make these tasks much easier.
Solution # 2: Good ‘Ol BBQ Grill
Now this isn’t even roughing it! However, you can’t cook on the grill if you don’t have a propane tank or charcoal. Always keep an extra full propane tank (or two) or several bags of charcoal on hand if you choose a BBQ grill as your back up cooking solution. Both store long-term very well.
Solution # 3: Natural Fuel Rocket Stoves

Solo Stove works really well for one-pot meals for one or two people.
Rocket stoves have come a long way in recent years. They are incredibly efficient and can operate on a variety of natural fuels such as sticks, twigs, pinecones, charcoal, and other biomass. Above is a photo of a small version from Solo Stove that works really well for one-pot meals feeding one or two people. You can literally cook an entire meal with a little pile of twigs and sticks.

The EcoZoom stove is also a great off-grid alternative that can burn small sticks and split wood for fast efficient cooking.
The EcoZoom stove is also a great off-grid alternative that can burn small sticks and split wood for fast efficient cooking. The cooktop can accommodate big pots when cooking or boiling for larger groups of people.
Solution # 4: Camping Stoves

The MSR Pocket Rocket Stove is what Creek keeps in his Bug Out Bag
Your options are endless when it comes to lightweight camping stoves. They are all fuel dependent so you will need to stock applicable fuel canisters if you intend to use this option for more than a few meals. They are also designed to cook for one or two people at a time versus a large group.
Regardless of which cooking stove you choose, make sure you have the necessary metal cookware, pots, and utensils to both cook meals and boil water in an emergency.
Action Steps:
- Choose an off-grid cooking solution that best fits your needs and budget
- Stock up on fuel
- Make sure you have metal cooking pots and pans that fit your stove choice
Food
Our food supply is dependent on a myriad of factors. When disaster strikes, it screws with pretty much all of these factors. 99% of the food you see in a grocery store is on the shelf. Their back rooms are filled with empty cardboard boxes. The food arrives on a truck and is immediately stocked on the shelves. If it’s not delivery day, guess what? No milk and bread today – that’s what. But you won’t have to worry about that because you’re stocking your own shelves in advance.
Think “open and eat meals." Ideally, your emergency food rations will consist of meals that require little to no preparation. Boiling water for reconstitution should be the most complicated step of any emergency food ration. Your food preps should also have a long shelf life and not require refrigeration. There’s no sense in stocking your shelves with fresh vegetables that are going to rot in a few days or with frozen dinners that will go bad without electricity. It’s very easy to overcomplicate food storage. Keep it simple! Below are a variety of emergency food storage options.
Food Storage Option # 1: Freeze Dried/Dehydrated Meals

Many dehydrated meals have a 10+ year shelf life.
These meals are easily reconstituted with hot water. You can eat most of them in the pouch they come in. And, many of them have a 10+-year shelf life. This is a really easy and nutritious food storage option. Some reputable brands are Mountain House, Wise Foods, and Backpacker’s Pantry.
Food Storage Option # 2: Military Meals Ready to Eat (MREs)
MRE Star. Editor’s Note: In the McKay household, we’re partial to MREs from Emergency Essentials.
MREs are packed with calories – they are designed to fuel soldiers in the field. They are also easy to prepare, often coming with their own little chemical “just-add-water" heating element. And, they have a long shelf life.
Food Storage Option # 3: Store-Bought Canned Goods/Packaged Foods
Add a few cans to your grocery list each week and you’ll be surprised at how fast a small stockpile will develop.
Canned goods make great survival meals. Most of them can be eaten cold right out of the can. Just keep tabs of the expiration date and use them up before they go bad. From soups to vegetables to tuna and chicken, the options are endless. Add a few cans to your grocery list each week and you’ll be surprised at how fast a small stockpile will develop.
Food Storage Option # 4: Can Your Own Food
You can also can your own fresh fruits, vegetables, and meats. This is more labor intensive but is a great way to preserve items from a garden or extra meat from a large-game hunt. Growing up we had canned vegetables from the garden all winter long and they were delicious.
Food Storage Option # 5: Hunting, Farming, Gardening, and Gathering

For extreme long-term survival scenarios some basic hunting and gathering skills can go a long way. Depending on the season and time of year, wild animals and plants can be very viable meal options. You’ll need to know how to clean and dress wild game as well as how to identify wild edible plants, so further training is advised. Small game animals such as squirrel, rabbit, and fowl make excellent survival meals. Learn how to field dress a squirrel here. I have a pond at Willow Haven that I like to call my long-term food storage solution. Fresh caught fish make easy survival meals and require zero maintenance.
Growing your own fruits and vegetables can also supplement other food storage you might have. Even apartment dwellers can grow impressive container gardens with limited space. Fresh herbs can easily be grown in windowsills or on balconies. You can store root vegetables and apples all winter long in a cool basement or cellar.
Other more self-sufficient options include raising animals such as goats, rabbits and chickens. I’ve found raising backyard chickens to be a very fun and productive hobby. They are low maintenance and keep me in fresh eggs year-round. And, they could care less if the natural gas or electricity is flowing.
Raising backyard chickens to be a very fun and productive hobby. They are low maintenance and keep you in fresh eggs year-round.
Food Storage Option # 6: Mix & Match
One of Creek’s storage shelves.
Mix and match the above options for a very well rounded food storage solution. Other great food storage options include rice, dry cereal and granola, powdered milk, energy bars, and beef jerky. Your food storage doesn’t have to look like a well-organized grocery store shelf like you see on those prepper TV shows. It can be crazy-looking like this picture of one of my storage shelves above.
What About My Refrigerator and Freezer?
Well, unless you have solar, hydro or wind power (which most people don’t), you’d better start eating the stuff in your refrigerator and freezer first. If it’s below 40 degrees outside you can just put the contents on your back porch. Or, you can pick up a generator for a few hundred bucks. If you choose to buy a generator you will also need to consider fuel storage. I do have a back-up generator to run my refrigerator and power a few miscellaneous electronics. I’ve found that running a generator in a “2 hours on – 4 hours off" cycle makes best use of fuel. Keep a thermometer in your fridge. If it rises above 40 degrees for more than 2 hours then throw any perishable food away.
Other Emergency Food Storage Tips:
- Do you have a manual can opener? Get one!
- Don’t forget your special dietary needs.
- Infants? Stock up on powdered formula.
- Pets? They need food too.
Action Steps:
- Choose a food storage solution (or combination)
- Start building your stockpile
- Routinely check expiration dates and rotate in new stock when necessary
First Aid
You may not be able to leave your house. Hospitals and pharmacies may not be open. Heck, medical supplies may not even be delivered to your area for a few days.
The most important facet of this category is prescription medicines. If you or a loved one is dependent on some kind of medicine then you need to have enough on hand to get you through a short-term Bug In disaster. Explain to your doctor that you are preparing an emergency kit and you would like to have an extra refill for that kit. If he/she denies you, I’d say get a new doctor who is like-minded in these matters. These medicines need to be monitored and rotated just like food.
In addition to prescription meds, you need to beef up your first aid preps as well, and even consider taking a local first aid course through the Red Cross. I own an emergency first aid kit from Alaska-based MedCall Assist and it’s the best I’ve seen. If you build your own I’d suggest using their kit as a guide. It is a very thorough and well-thought-out disaster preparedness medical kit.
Other tips for first aid issues:
- Does anyone have severe allergies? Do you have an EpiPen?
- Pets? Do they have medications?
- Don’t forget extra contacts/eye-glasses/solution.
Action Steps:
- Get some back-stock on important medications – have a conversation with your doctor
- Beef up your first aid supplies
- Consider taking a basic first aid course from the Red Cross
Self-Defense
Disasters create abnormal circumstances. First responders (and public safety) are always overwhelmed. Response times are always delayed. 911 is always inundated with calls. Phone and internet services (land and cell) are often interrupted. Disasters can drive good people to do things they would not normally do. Disasters also have a tendency to embolden and empower existing criminals as well.
The importance of self-defense is often overlooked in disaster preparation. Unfortunately, it is an aspect that must be considered. Violent crimes increase during large-scale disasters. Some people further exploit disaster victims under the cloak of chaos and disorder. Whether driven by desperation or greed, it is the darkest side to every disaster.
Self-defense comes down to two basic categories: Home Security & Self-Defense Tools and Training
Home Security
Simple and inexpensive upgrades to your home’s security can be very effective in preventing successful break-ins during disaster scenarios. A few basic upgrades can include:
- Solid metal or wood doors – no decorative glass.
- Dead-bolt on every outside door.
- Consider an inside mounted door bar for added security.
- “Beware of Dog" sign even if you just have a cat or goldfish. Criminals are looking for easy targets.
- Upgraded door hardware with deep-set 3" screws.
- Exterior motion lights (solar-powered) – front and back.
- ‘Defensive’ rose bushes below each ground-level window.
- Upgraded window locks / cut wood-block stoppers for inside.
- Well-advertised video alarm system – whether you have one or not.
Self-Defense Tools & Training
Guns are the obvious home defense weapon. The type is a personal choice. I prefer shotguns. Regardless of what type of gun you choose to own, it can be more of a liability than an asset if you don’t know how to use it. Firearms training and practice are crucial elements to gun ownership and effective self-defense. Other inferior self-defense tools include pepper spray and stun guns.
Action Steps:
- Make necessary upgrades to home security
- Decide on a home self-defense weapon
- Train and practice with your weapon of choice
- You can’t shoot without ammunition
Two Things Many People Forget
1. Know how to turn off your utilities. Disasters have a way of damaging electrical lines/circuits, gas lines, and water lines. If yours are affected you may need to turn them off. The crawl space in my house once filled with water during a large-scale flood. I had to shut off the electricity to my house to prevent a very dangerous situation. Make sure you have the proper tools (and knowledge) to quickly and safely disconnect all of your utilities.
2. Disasters can also affect sewage systems and trash removal. When that flood I mentioned happened, I could not flush my toilet. The flood water had completely filled my septic tank. Store extra heavy-duty trash bags to contain human waste and trash just in case. It’s important to maintain a very sanitary bug-in environment. A 5-gallon bucket lined with a trash bag makes a suitable makeshift toilet.
Conclusion
There are many facets to consider when preparing for a potential Bug In. While this is not an exhaustive list, it is a great place to start. There are countless people on the East Coast right now wishing they had prepared just the basic necessities for the uncertain days or even weeks ahead. This is the unfortunate truth after every disaster – regardless of type, size, or location. As of this writing over 4 million people are still without power from Hurricane/Storm Sandy, and some may not have it restored for another ten days. It’s easy to let life get in the way of preparing for the future. Ironically, though, our future is shaped by the things we do (or don’t do) today.
Remember, it’s not IF but WHEN.
Creek Stewart
____________________
Creek Stewart is a Senior Instructor at the Willow Haven Outdoor School for Survival, Preparedness & Bushcraft. Creek’s passion is teaching, sharing, and preserving outdoor living and survival skills. Creek is also the author of the book Build the Perfect Bug Out Bag: Your 72-Hour Disaster Survival Kit. For more information, visit Willowhaven Outdoor.


{ 98 comments… read them below or add one }
- 1HalNovember 1, 2012 at 10:32 pm
Yes but you need to be careful with fuel heaters and generators. The exhaust / burnt fuel will produce Carbon Monoxide that can kill just as bad as a storm could. Ventilate your generator and have a fresh air system / vent for your burners.
Camping stoves should be fine if you use them only once and a while.
- 2MikeNovember 1, 2012 at 10:51 pm
Zombie Squad (http://zombiehunters.org/index.php) is a good resource for this kind of info, and the forums have a lot of friendly folks offering advice on disaster preparation.
Don’t be fooled by the zombie schtick, either – as they say, if you’re ready for the zombie apocalypse, you’ll be ready for a pesky tornado, hurricane, or other natural disaster.
- 3CaseyNovember 2, 2012 at 12:07 am
I enjoyed the action steps. Having that clear concise “do this now" was really helpful.
- 4G.M. SchooleyNovember 2, 2012 at 2:01 am
Great article! I have learned much from the folks over at http://www.survivalistboards.com
similar info here!- 5SplashmanNovember 2, 2012 at 4:49 am
Great article, thank you.
I live in the Seattle area, where the only real threat of natural disaster is an earthquake — an unpredictable but no less real threat. I am slowly (as finances allow) working on an emergency stockpile, and this article gave me several good ideas, especially re: fire & cooking.
I’ll second the author’s exhortation to get first-aid training (and I don’t mean only CPR). I took a course through a local community college; it was the best and most useful class I’ve ever taken on any subject. One fringe benefit is that the notion of dealing with a life-threatening injury doesn’t completely freak me out now.
- 6Ming BucibeiNovember 2, 2012 at 5:28 am
Beware unverted heaters carry hight risk of CO poisonig as do unvented generators!!
Bulk dried beans, rice and corn, etc…long storage like store in vermin proof containers.
Ming Bucibei
- 7MattNovember 2, 2012 at 6:15 am
As a resident of NJ who just recently got power back after Sandy, I only wish this article had been distributed to the rest of the state a few weeks ago. I had/have most of the items on this list handy, and was able to fare a few days power-free with my wife and son without any issue. Neighbors helping anyone who was less prepared is how the rest got through it safely. So many people here believed that a true disaster could never affect them, and now that it has, they are unprepared and confused as to why they aren’t on the top of the list to have their power / water restored. It never ceases to amaze how reliant we are on our utilities and how quickly we crumble without them. Here’s hoping everyone can be this prepared in the future, and makes it safely through this disaster.
- 8MattNovember 2, 2012 at 6:22 am
The other consideration may be tools you will need in a long term survival situation. A chainsaw, axe, hatchet, handsaw, etc. can be essential tools to collect firewood or clear fallen trees that present a danger to your shelter. A small toolbox to keep all those heaters, stoves, and generators running is always a good idea as well.
- 9NoelNovember 2, 2012 at 6:58 am
Important thing to remember: Make sure you have at least one battery-powered CO (Carbon Monoxide) detector handy before you use ANY of the emergency heat options suggested above. AND MAKE SURE IT WORKS!!
I live in Maine, and every time the power’s out for more than a couple days it seems like there’s an article in the news about somebody who died because their heater pumped their house full of CO, or their house burned down around them, and their detector had no batteries.- 10MNovember 2, 2012 at 7:14 am
Take care with using portable heaters indoors – if not properly vented, they could kill you. Carbon monoxide and other gases can be deadly. Elderly, children, and sick people should be especially careful. Never use camping stoves without fresh air ventilation. Also portable heaters and stoves greatly increase risks of burns and fires. Keep fire extinguishers and first aid kits handy. Be prepared.
- 11W. Scott Hannon, Esq.November 2, 2012 at 8:42 am
Your website continues to impress me. At first I thought it might be a bit boy-scout-esque and not very useful, but after following its articles for awhile now, I recommend it to my brothers at my Masons lodge, and continue to peruse it for new ideas I might have missed myself. As a former Marine officer and combat veteran, I can tell you that I know much thought is put into every recommendation you make in all your articles. Young men in this day and age would be well served to read your site and at least think about your recommendations. There is no more stark example of “manliness" than a man being able to survive and thrive under all circumstances – be it dressing appropriately for any situation to being ready for natural and man-made disasters. Keep up the good work!
- 12Ben ThompsonNovember 2, 2012 at 9:20 am
Thanks for posting. I thought I was somewhat ready to “bug in" but now I see I am now where near actually being ready. This will be remedied soon.
- 13Bruce WilliamsonNovember 2, 2012 at 9:30 am
We don’t have long power outages but we have frequent outages. Usually during strong storms and at night. We use light sticks for lighting areas like the bathroom. Your eyes adjust to the darkness and become sensitive enough that the light from one stick will enable you to see well enough to move around a room.
- 14JTNovember 2, 2012 at 9:35 am
Very good article.
- 15ChrisNovember 2, 2012 at 9:54 am
Good information. I started “Prepping" about 4 years ago. In both of my “Bug out bags" is a copy of the FM 21-76 ARMY SURVIVAL MANUAL. Here is the link to the free manual:
http://www.ar15.com/content/manuals/FM21-76_SurvivalManual.pdf
Still looking for it on waterproof paper… I’m not saying you should just print this out and relax – you need to have prepared – just as this article describes – but this manual shows you everything from what plants you can and cannot eat to traping techniques to weapons making, first aid, psychological survival (which most people overlook!) and everything else you can imagine. It also contains a ton of information on things you probably did not think of as well. I also thought of my wife and kids when I printed it out, because, although I believe I am prepared, there is a chance something could happen to me and they may have to survive on their own.Anyway – great article!
- 16Iron GhostNovember 2, 2012 at 10:44 am
Good article! Also I have modified regular 220 and 228 model coleman lanterns to run on e10 87 octane gasoline without clogging, instead of coleman fuel (white gas, naptha). They will still run on Coleman as well, and do it allot better. I’ve run 3-4 tanks through each lantern without a hitch so far, where as 1/2 a tank of gasoline would clog the generator in the original design. It’s easy, anyone that wants to know how, give me a shout. Also in freezing conditions, if you loose power, you must turn off the water to your building/house, and open a faucet outside and let the pipes drain, otherwise when it warms up the next day or a few days later, you’ll be flooded by broken pipes.
- 17CherylNovember 2, 2012 at 11:04 am
As always, EXCELLENT info, Creek. Good refresher ‘course’, plus reminds me of things I need to update in my preps. Shared with my loved ones.
- 18Ryan GrimmNovember 2, 2012 at 11:05 am
Some Caveats:
Kerosene heaters are illegal in Massachusetts. Just sayin’…that ‘Kleen-Heat’ is the best if not cheapest fuel…odorless, and also great for oil lamps….see more below on lamp fuels.That little propane heater can be adapted to run on 20 or 100 pound bulk tanks. Not to mention, a hell of a lot cheaper to operate…
Oil lamps are a safe and bright alternative for both light AND heat. Use the aforementioned Kleen-Heat for fuel…and the best lamp, albeit priciy initially, is an ALADDIN oil lamp…get spare mantles, one spare wick, and a spare chimney or two.
TWO GREAT sites for oil lamp info and parts are:
http://www.milesstair.com/
They have the most info on wicks, and the best selection.
Also see what they have related to Tubular Wick lamps and fuels….you’d be surprised.http://www.oillampparts.com/
Another great source of parts and advice.I restore and sell oil lamps…sorry, no web page up yet.
- 19GaryNovember 2, 2012 at 11:17 am
We keep an emergency cash fund on site-all small bills. Cash is still king when disasters hit.
- 20RichardNovember 2, 2012 at 11:22 am
To your supplies I recommend add some tarps of plastic sheeting. Many of the natural disaster that would require you to bug-in could involve high winds or ground movement both could affect your structure. For a broken window or damage to your roof a sheet of plastic or tarp comes in very handy. I keep 3 8×10 traps and a larger 20×40. A positive mind set .. think of it as camping and enjoy.
- 21ShanonNovember 2, 2012 at 11:34 am
I’m mostly prepared and am grateful for your posts. I wanted to bring up a few things I didn’t see mentioned. Stock up on dry beans and peas. These are cheap and easy and store for years. Don’t count on being able to hunt for food. Game animals get scarce. After the mine closed in Leadville CO, hungry miners ate all the available game in just a few months and deer, elk, etc. took years to return. The last thing I want to mention is to build a simple solar water purifier to purify saltwater or silty, river or creek water. I’ve seen them in action and a 1 1/2 ft by 8ft purifier can produce gallons of clean water on a sunny day. I did a quick search for a link, there are few methods, but none that I like as much as the one I have in mind. I’ll see what I can find later to share.
Thanks again for your dedicated work. Hope this helps.- 22Mike KeyNovember 2, 2012 at 12:36 pm
Great article and timely advice considering all the horribly unprepared people who are now starving and without power or fuel in NY.
- 23DavidNovember 2, 2012 at 12:44 pm
Would there be carbon monoxide concerns with those kerosene heaters when used indoors?
- 24MikeNovember 2, 2012 at 1:01 pm
Do not forget, if you are using any type of open flame to heat indoors you need to consider ventilation to prevent a potentially lethal situation. Kerosene and propane heaters are great- but they need a cracked window or some type of air exchange or you will eventually smother yourself. Properly installed fireplaces and wood stoves are vented by design.
- 25bigWOWONovember 2, 2012 at 1:32 pm
Creek,
I enjoyed your blog post.
One thing I would say though–not for me, but for other people–is that some of the solutions above, especially those for cooking food, should be explicitly and conspicuously marked with a big warning: “OUTDOOR USE ONLY" I unfortunately have read of too many people barbecuing indoors, only to succumb to carbon monoxide poisoning.
- 26John WaldronNovember 2, 2012 at 2:07 pm
GREAT article! As an Eagle Scout and US military vet, I would like to add one thing. The BEST survival tool in the world is your MIND and the ATTITUDE that you MUST have to survive.
- 27Bill GNovember 2, 2012 at 3:21 pm
Excellent article. My two cents: You evacuate when you are told to evacuate. You prepare when you are told to prepare. Hurricane Sandy (and last year’s Irene) has taught me (I live in NJ) one important lesson – even though you’ve “prepped", don’t wait till you are down to your last bottle of water, can of beans, or gallon of gas to work on getting more. All of these things are available – but everyone waits till they’re desperate then PANIC.
- 28Mike Y.November 2, 2012 at 3:30 pm
Great article! I follow most of these advice already. My skills were put to the test here in North East. We had no power for 3 days.
I will second the other Mike. Zombie Squad forum is very much in line with this blog. You can get a ton of additional information on the topic there.
http://zombiehunters.org/forum/- 29RobNovember 2, 2012 at 3:40 pm
One thing I think should be included in disaster/ apocalypse/ bug out prep is Liquor! Some cheap scotch or whiskey has many uses that people don’t really think about. In dire situations it can disinfect wounds, you can use it to cook, use it for trade(in cases of the apocalypse), use it to help yourself sleep, help keep you warm, etc…
I am open to critique! Let me know what you guys think!
- 30PracticeNovember 2, 2012 at 3:46 pm
Just noticed that “Build the Perfect Bug Out Bag: Your 72-Hour Disaster Survival Kit" by Creek Stewart is part of this month’s Amazon’s collection of 100 Kindle books for $3.99 or less.
- 31Keegan Elliot FonteNovember 2, 2012 at 4:09 pm
I would really like to see a link to an article written about canning if that is the way that we decide to go for food storage. I live in NYC and belong to a CSA (Community Supported Agriculture) which delivers organic vegetables weekly. I never seem to be able to eat all of them before the next delivery(although my girlfriend and I try REALLY hard to do so) and I would love to can the leftovers in the meantime. Any suggestions Brett?
- 32GratefulPrepperNovember 2, 2012 at 5:27 pm
Regarding your deep FREEZERS… I have stored gallon jugs of drinking water in the freezer so that in the event of a power outage, I can move these jugs around in there to keep things cool at least for a little while, or even use them in a cooler to temporarily keep meats and such. When the jugs thaw, they will provide us with gallons of pure drinking water. I agree we need to begin consuming what is in the freezer and only use it for short term storage. I have taken to thawing out the vegetables, draining them, then dehydrating them. Since they are already blanched before they were frozen, it is an easy task which is helping to reduce the inventory in our freezer.
- 33Patrick BuechnerNovember 2, 2012 at 5:35 pm
Because we live in the San Francisco Bay area, we’re concerned with the water and SEWAGE system being offline in a big quake. So I would add an emergency toilet to the list. You can find toilet seat attachments for 5 gallon drums online. Add strong plastic bags and sawdust or kitty litter.
- 34Chris ThompsonNovember 2, 2012 at 7:32 pm
Good article. I would like to add Cyalume brand glowsticks to the list. They have no flame, and are non-toxic. We snapped two each night this past week after Sandy knocked out our power. One went to bed with our five year old son. The other was placed in the hallway of our house. They provided more than enough light to navigate by.
- 35DebbieNovember 2, 2012 at 10:05 pm
Great Article. In light of the country’s recent natural disaster hopefully people are realizing that we all need some type of emergency or survival kits. Every house hold in America should have on a minimum one 72 hour kit per person in their household. When this task is done each family should store enough water for a week and at least 2 weeks to 3 months worth of food to survive on.
- 36Erin GraceNovember 3, 2012 at 12:53 am
Great article as always, Creek! Although it’s slow going, I’ve been working on both Bug-Out and Bug-In solutions since your BoB article last year, and I’m proud to say that I’ve amassed reasonable kits for both! Although it’s slow going if you want to do it cheap, it’s worth it for the peace of mind.
- 37BradleyNovember 3, 2012 at 7:19 am
@ Rob, re: Liquor.
Rob, my uncle is a retired Army Col., and a serious prepper. I trust his advice. He says that liquor will be a top currency in any serious disaster since it’ll pull double duty as a moral booster and an antiseptic. You’re spot on!- 38KateNovember 3, 2012 at 7:20 am
@Keegan Elliot Fonte: One great canning site I recommend is http://www.foodinjars.com/ From there you’ll find lots of great ideas as wellas links to other sites. Happy canning!
- 39BradleyNovember 3, 2012 at 7:20 am
Oops! I meant morale booster. I don’t know if alcohol has ever been a moral booster. My bad.
- 40J SNovember 3, 2012 at 8:14 am
Standard water jugs, like the one gallon ‘milk’ jug and the rectangular countertop 2.5 gallon containers often don’t last a year before they spring a leak and empty themselves. So keep watch of them to ensure you have the water you think you do .. and don’t store them over top of your dried goods.
- 41Native SonNovember 3, 2012 at 10:00 am
A couple of cationary notes on the kerosene & propane heaters and the gasoline fueled generators.
Virtually every kerosene and propane heater I’ve seen is clearly labelled “not for indoor use" because of the carbon monoxide threat.
Gasoline generators have two issues. First you have to keep the exhaust out of the living space. A recent news article reported some folks had been killed by the carbon monoxide from their generator. They’d put the thing out in their garage and run it there. Unfortunately, the garage had some vent connection with the house (per the article, they were separated by a breezeway) and the CO got into the house, apparently via the attic.
Second, modern gasoline is quite iffy concerning “shelf life" in the mall quantities one would have on hand for a week or two’sworth of running the generator. Also, the stuff is ntorious (at least in California) for gumming up small engine carburettors to the point of the engine not running. Not the best thing to discover when you need the generator. Although fuel stablizer helps, the local small engine repair shop advises not storing gasoline longer than two weeks. Their advice is after that, put it in the car, and refill the gas can with fresh fuel. quantitiesbeyond- 42SteveNovember 3, 2012 at 1:05 pm
Just a reminder that almost everyone has a ready-made generator–your car.
You can buy an inverter cable kit for about $50-60 that plugs into your cigaret lighter and gives AC output. That, along with an extension cord can provide power for some basic items.- 43Ray SalomoneNovember 3, 2012 at 5:09 pm
I’m a former special ops soldier who just made it through the hurricane. We live on the Hudson River. I made the decision to stay where we were based on my experience and all available info. But I monitored the situation closely and had a Plan B and C and D ready to roll.
- 44MartinNovember 3, 2012 at 6:41 pm
Thank you for the great article!
May I suggest a German made Fissler pressure cooker? This is not for canning, but for cooking. Stainless Steel!
Gets to steam fast; after that, tiny heat under it is all you need. Great for meats, grains, and veggies. Highly efficient use of fuel, and perfect for rocket stove.- 45CraigNovember 3, 2012 at 9:44 pm
Good article but incomplete. As I prepare I focus on these 12 items (not necessarily in this order):
1. Cash or bartering assets
2. Security
3. Housing
4. Heat/cooling
5. Water
6. Food
7. Garbage
8. Sewage
9. Health Care
10. Transportation
11. Communication
12. PowerMost of these were covered well. It would be nice to see a write up on the others.
- 46NicoleKNovember 4, 2012 at 2:39 am
Why don’t American homes, as a rule, not have functional shutters? I live in Switzerland and almost all the homes have them, either the ones that close over your window like a door and hook shut, or the ones that roll down like blinds. They keep in heat, and keep out burglars. Many families close all the shutters every night. We shutter rooms like the guest room when we don’t have guests to save heat.
Forget blanketing your windows. Consider getting shutters. Real ones.
- 47Rob KNovember 4, 2012 at 8:11 pm
Great article. A couple of notes. Many of us live south of the Mason-Dixon line. Heat, not cold is the problem. Tarps for roof repair can also be shade outside a badly damaged house. A family sized tent allows you to bug out as far as your own yard if the house is unsafe (or just too hot)
Besides water, sports drinks are not that costly, take up the same amount of space, and provide much needed nutrients when working in the heat.
Our gas grille (bought after Katrina) has a side burner that makes it much more useful, think coffee, scrambled eggs, boiling water, soups, etc
- 48NancyNovember 4, 2012 at 8:53 pm
You can also bring your solar pathway lights indoors to light up the house at night and recharge during the day (if the sun shines, that is)
- 49J. DelancyNovember 4, 2012 at 9:27 pm
Good article but it missed a really important item. Radio.
Here in The Bahamas we still depend on a National Radio Station to give us updates on the movement of storms, how powerful they are and the ‘all clear’. Even though the government can’t get to us during times of emergency they can keep us informed. I’m sure that is the case in most parts of the world.Get a AM/FM radio.
- 50JonnyNovember 4, 2012 at 10:49 pm
http://www.emergencyfoodstorage.co.uk if you’re in the UK or Europe.
- 51Jonny GibaudNovember 4, 2012 at 10:55 pm
http://www.emergencyfoodstorage.co.uk if you are in the UK or Europe.
- 52CDSNovember 5, 2012 at 8:53 am
One step my family also takes is to fill the bathtubs with water so that we can still have a modicum of toilet functionality if the water lines leading to the house stop flowing.
We also use GratefulPrepper’s freezing ice technique on a smaller scale and use ice in sandwich bags or frozen water bottles to help keep the freezer and refrigerator as cool as we can. Having small bags of ice means that we can remove it in small amounts if necessary after going to the store. (Our main threat is hurricanes, so we usually have time to prepare both generally for the season and for a specific storm.)
- 53Kevin T.November 5, 2012 at 10:16 am
I’d also add to the list a section on communications. Having a solar or hand cranked Am/FM/Weather radio is a must. I would also consider adding a CB / Ham radio to the mix as well.
- 54DennisNovember 5, 2012 at 11:20 am
I have a propane indoor heater. It has 2 safety features. One is if the heater falls over, it will shut off automatically and the other if it detects too little oxygen. I used it during Sandy when our power was out and it heated my living room and dining room area 4 degrees in 2 hours. I also purchased a unit which fills your small canisters of propane from your 20lb tank. It cost about 20.00 but I could not get the small canisters at any of the usual home hardware stores or sporting good stores.
- 55LexingtonNCNovember 6, 2012 at 12:28 am
Drying food is one way to stockpile shelf-stable food.
My wife was pretty excited tonight when she nibbled some 7 year old apple sections we had in the cupboard. Amazed, actually. Fruits, vegetables, meats, soups and snacks can all be dried years in advance of need and are unaffected by heat (if you can take it, they can take it), cold, loss of power.
Dried food is also 1) nutritious, 2) calorie dense (important when under stress) and lightweight — in case your plans to bug-in don’t work out.
Drying is not some sort of magic wand, but it is a very worthwhile arrow in your preparedness quiver.
- 56Jude MontarsiNovember 6, 2012 at 3:22 am
Very well written and illustrated page. “Survival for Dummies". Useful primer, good product suggestions and links.
- 57EdohausNovember 6, 2012 at 5:37 am
Seen Doom’s day preppers on Discovery Channel, what bothers me more is that not all people have their own houses. Some live in apartment buildings. Guys have any idea for this type of scenario?
- 58WhoWuddaThunkItNovember 6, 2012 at 10:24 am
Good Article, I would like to follow up with a few added suggestions and cautions.
Burning a candle in a car, seems creative, but can also deplete oxygen in the car as well as it is an open flame and be sure not to fall asleep.. or occasionally open a window for fresh air and let out the moisture. Wet and cold is not good.
The Freeze Dried Food WISE Brand is nasty tasting, so buy some samples before buying in bulk. I recommend Mt House for sure. Its excellent. Wise food contains a lot of salt, some as much as 300% of the daily intake so if you want a heart attack, then sure buy WISE. LOL MRE’s are good, but weigh more than MT House if you need to carry food out for a bug out.
For canned and other food storage, write the expiration date in large bold print like with a Sharpie on the item like the top of the can. Like 9/16.. Thus insures proper rotation and keep food categories according to date, not by type so you eat the soon to expire food first.
RE: Household Bleach to purify water – Clorox has many varieties, and I suggest the COLD WATER Bleach as it has the right amount of (4-6% sodium hypochlorite) Many of the other types do not have this percentage of NA HCL.
In your bug out bag, keep a Paper list of phone numbers, as your cell phone battery may die and many people cannot remember a phone number like in the old days when we dialed. Also keep a PAPER Country map of your area, if you need to bug out or go in search of an alternative water source; Ponds creeks, rivers etc.
For Self Defense – Forget 911 – it already takes 15 mins to an hour for them to arrive to take a report after the fact, take care of Biz yourself. Stock up on heavy duty trashbags, rubber gloves, bleach and a shovel to dispose of the debris.
Collecting and storing rain water to use as Toilet flushing is perfect, and can be used as a back up for drinking water with some COLD Water Bleach sanitizing.
Good Luck out there everyone!!
- 59Jason B.November 6, 2012 at 10:39 am
Three days before the hurricane, I went to the grocery store and saw people buying all the water and bread off the shelves. I went not to purchase food but just to watch the craziness. The lines were tremendous. My wife and I are from GA and live in DC. We’ve been days without power on many occasions and know how to get through. After hearing about a lady who bought multiple gallons of water so her family could take a shower, I decided to make this video to help people get in the right frame of mind.
- 60cherrylNovember 6, 2012 at 11:50 am
My emergency supplies keep getting raided
( mostly by my husband). So instead of tarps, I bought a bunch of pink shower curtain liners from the dollar store. Pink twine and rope as well. The dollar store is a great resource.- 61QuigathNovember 6, 2012 at 12:17 pm
That’s a little overkill on storing water in 2-liter bottles. Not the amount, just the method. If they’ve been properly sanitized as described, and filled with municipal water that’s been chlorinated already, 2-liter water bottles should last in a dark place for 3-5 years not just 1 year, without needing to be changed. You only need to change the water if it gets algae or bacteria. Also, everything’s been sterilized previously so you don’t need to add bleach to each bottle, spare your body the toxicity bad taste when you eventually need to drink that stuff.
I like the ideas for fire and using a wood stove or backyard fire pit. I saw an instruction for a diy rocket stove recently (there are many).
For home defense last year I cut 1″x1.5″ wood sticks to block all sliding windows. I also painted them white to match the window frames.
Anyone have recommendations for “Exterior motion lights (solar-powered) – front and back."? I bought one from Lowes last year for $50 but took it back before installing; it seemed too cheap to do the job.- 62hbgNovember 6, 2012 at 8:17 pm
Great idea in regards to the toilet. How many people have bought homebrew beer kits, and no longer use them?
- 63RobNovember 7, 2012 at 7:17 pm
Something else I found looking into MRE’s and stuff are these survival tabs. Apparently you can survive for a month or two just eating 12 tabs a day provided you have water.
- 64HughNovember 7, 2012 at 8:48 pm
Great article! One suggestion, though: a good AF/FM radio, preferably with a hand-cranking option, and/or spare batteries. Also, a back-up battery (or 2) for your cell phone.
- 65frank gucciardoNovember 8, 2012 at 9:22 am
I am living in the middle of Sandy here on Long Island and have been traveling into the hardest hit area where whole blocks have burned to the ground because of a blown transformer. 99.9% of Long Island was not prepared in any shape…we just got 6″ of snow last night and the power is still off in the hardest hit sections.. Flat out bad deal.
- 66frank gucciardoNovember 8, 2012 at 9:26 am
I should say that I have been traveling into the hardest hit areas with my Church to help those folks who don’t see any hope. Cleaning up, encouraging…doing our part as Americans and doing our part as the Church.
- 67AlanNovember 11, 2012 at 9:26 pm
“A 55-gallon rain barrel used to collect water from your gutters is really easy to install and only costs about $100. You can make your own for even cheaper."
Warning — if you collect rainwater from your roof, etc. be aware that the water being produced is not immediately usable for drinking, even if filtered to remove the “big chunks".
Remember that many types of animals leave droppings on your roof and by collecting water into a large, often warm in the summer, dark collection point, you are creating a incubator for bacteria, mold and parasites.
Be careful.
- 68habibNovember 13, 2012 at 2:52 am
Does anyone have any recommendations on a Solar powered motion light that actually works decently well.
- 69RichardNovember 19, 2012 at 3:24 pm
(not the Richard of Post #20)
Funny how I’m reminded of all the Civil Defense films and preparedness drills of the 50s… maybe it’s time to revive them?
Anyway, do not under any circumstances forget a manual can opener! All the canned foods in the world can’t help you if you don’t have power for your electric can opener…
- 70ValNovember 19, 2012 at 4:52 pm
Having read this article and the Bug-Out Bag article, I would be interested to read a piece on preparedness specifically geared towards families. Like what kind of equipment you might need if you’ve got kids with you and how to prepare children to be safe and helpful in an emergency. The burden mostly falls on Dad, it seems, but some guidelines on getting the entire family ready would be a great read.
- 71ETNovember 25, 2012 at 5:18 pm
Violent crimes increase during large-scale disasters.
Do you have stats to back this claim up? What happened with Sandy?
- 72StevenNovember 27, 2012 at 11:57 am
This is important information. As a Californian, we’re always reminded to have preparations ready for “the big one."
But I’m just wondering one thing. The author is suggesting we should build up our supplies to last over a full year. What kind of emergency is the author preparing for? Even in Haiti, one of the poorest nations in the world with a barely operating government, didn’t need a full year’s supply of goods after the entire nation collapsed after the earthquake.
It seems overboard to prepare for more than a couple months, and then only in climates that would be shut off for a few months from the outside world.
Unless you really are preparing for a zombie apocalypse, a year seems too long. And if it is a zombie apocalypse,a year is too short.
- 73RenaDecember 1, 2012 at 4:39 pm
thanks for showing the photo of one of your storage shelves. You’re right, a pantry doesn’t have to look like the well organized grocery store shelf, and now I can quit telling myself that I must re-organize the cellar asap.
I’d also like to comment on the lady who purchased the pink shower curtain liners so that her husband will stay out of her stash. A flimsy shower curtain liner from the dollar store is a far cry from a good tarp or heavy plastic sheeting.
On a different note, have you thought about challenging your readers to put their preparedness to the test? My husband and I (the teens are not as willing) are getting ready to challenge ourselves with a 48 hour grid-down weekend. We’ll shut it all off on Friday after work and learn where we’re lacking. I’m sure we will have a long list of to-do’s afterward.- 74Kristi JDecember 3, 2012 at 3:29 am
@Steven…Disaster doesn’t always mean a storm or quake or flooding, etc. It could also mean a personal or financial disaster where one loses their job, etc. I know of several people in my church who have been through this and the year’s worth of preparations were quite the blessing for them as they did not want to be dependent on any one else for help.
- 75Greg MDecember 5, 2012 at 8:03 pm
Please also keep in mind legalities in your preps. For example, the pic above shows prescriptions in plain bags. In some states, it’s required that you keep prescriptions in the pharmacy bottles marked with the physician’s name and person who it’s prescribed to. In the same sense of keeping things marked, keep your concealed carry permit, ID’s, ALL account numbers (we needed our Verizon FIOS, LIPA and insurance policy numbers for Sandy) should also be handy.
And be ready to chase people out of your neighborhood. I had to do this with a guy casing the block’s generators.
- 76GreatAmericanRedoubtDecember 6, 2012 at 2:26 pm
Great artical ……if you live 50+ miles away from the smallest town in your county.
Realistically, in a grid down situation after the stores are all looted, and unprepared people (97% of the population) your odds of survival “bugging in" depleat drastically, as each hour passes.I am your neighbor whom you randomly wave to on occasion. You do not know me.
I own guns. My wife is addicted to pain killers, i drink, my kids drink and smoke pot. So do my friends. We pay our house payment, buy cars, have a 401k..and a little money in the bank.
We are aware that something is going to happen. So we bought some bottled water and top ramen just is case.One week after grid down, most of my friends have come to stay at my house and brought what little they had with them…..including guns and ammo.
Three weeks after grid down. I am out of food. My wife is in withdrawls the kids are driving me crazy. I am out of food, water….and dying for a drink and cigarette …..
Getting mad and hungry….me and my armed friends decide to go hunting….something we never have done before…..not knowing where to go and not realizing that every other real hunter has desimated the local populations of deer and elk and other small game….after two days of looking, Our group of six make adults. Admits the truth. Were screwed …..really were are
…knowing the women are at home trying to tend to the childrens needs….with nothing….were even more screwed….."hey….its the rich peoples fault"…
Isnt it?….one of our group proclaimed….yeah…..everyone is hungry…wants some booze and decided that the rich people can spare some food….booze and some pain killers…..its there fault that this all happened…..and that is how simple it could start…next thing you know….we are a group of cunning, non-caring , no remorse, group of men, looting…..killing…..raping….house to house…burning you out….taking what you have….because we are entitled too it……right….STILL WANT TO BUG IN?
If I had to…..say during the dead of winter…..I would consider it only as a last resort.
Otherwise i would want to stay as far away from the hordes of looters as I could..This is all food for thought.
- 77StephanieDecember 6, 2012 at 2:40 pm
To the author, Where in Indiana do you live? I am in Valpo on a up and coming permaculture farm.
- 78ScottDecember 13, 2012 at 7:58 pm
I’d love to know where the author can find a kerosene heater “for just over $100″. The model in the picture is three hundred, and the cheapest I’ve found is $250.
- 79MJDecember 19, 2012 at 12:47 pm
Excellent article. The best time to buy a kerosene heater is in the spring. I would add quality candles to your list. We lost power for 27 hours one summer and got by very well with long lasting candles.
- 80Weldon H. MetalDecember 26, 2012 at 11:56 pm
@GreatAmericanRedoubt…If there are enough “real" hunters in your area to clear out all the local game then your merry band probably wouldn’t maraud for very long.
Watch CO levels with indoor heaters and never use charcoal to heat a closed space.
- 81JoJanuary 5, 2013 at 12:25 pm
Perhaps invest in this new technology, “Gravity Lights" and then everyone can have kerosene free lighting, and ways to re-charge their batteries.
http://vimeo.com/53588182Also, I see no one has mentioned having cigarettes as barter goods. This was the defacto “currency" on the black market after WW2.
No one has mentioned having solar panels heating their water, or ways to use grey water for their toilets? What about bikes to generate electricity. Find yourself an old copy of Mother Earth news for self-sufficiency ideas.
- 82Zachery J.January 6, 2013 at 1:37 am
I liked the article, my only concern is people adding bleach to their water.
Most municipal and rural water systems add chlorine to their water. Most state require a chlorine residual of 0.5 mg/L (mg per liter) or parts per million. If you use your tap water there is no need to add anymore disinfect to your water. If you are going to add any sodium hypochlorite (bleach) to your water I would highly recommend buying a chlorine test kit. It can be dangerous to add your own bleach. Its very easy to exceed the Maximum Contamination Level (MCL) of chlorine when adding your own bleach. The MCL for chlorine is 4 mg/L.
I tested your instructions with an average size water bottle of 500 mL. I tested with my own municipal water supply, distilled water, and a local well source. To start, I tested the residual of my water samples. I had 2.0 mg/L on my municipal water, and no residual on distilled water or my well water. I placed each sample in a clean 500 mL bottle. I then add 2 drops of 6% bleach to each sample. I then tested each sample. my results were: 6.2 mg/L for my municipal sample; 4.8 mg/L for my distilled sample; and 6.1 mg/L for my well water sample. All my test samples exceed the MCL for chlorine.
I would not recommend adding your who disinfected to your water unless you can test the residual. Their is no need to add any disinfectant to your water if you buy it from a municipality. If you are concerned about the safety of your water, I would recommend buying a water disinfection kit for a camping supply store. An example would be iodine tablets or a filter kit. If you that’s not going to work for you and your have a good source for cooking, then the trusty boil method works: Bring water to a rolling boil for 10 mins. Let cool and then enjoy.
- 83JimJanuary 23, 2013 at 2:31 pm
I liked the article but need something cleared up about the water. The article said to change out your water storage once a year. Is this only if you refill soda bottles and have 55 gallon barrels? I hope it doesn’t mean even store bought water bottles. I have just started “being prepared" a few months so I would appreciate your clarity on this. I have read and been told a couple different positions on stored water. How long is store bought bottled water good for?
Thanks JfromPa- 84T1mFebruary 1, 2013 at 10:18 am
As to food… don’t forget variety.
You might get by for a week on the same MRE everyday, but the rest of the pack won’t.
Nothing will get kids sullen and wives miffed quicker than Eating. the. same. thing. day. after. day.You can spice up the water a bit with things like Kool-aid and other drink powders, and the sugar could be useful, but go easy on it.
In a Grid down/society toes up situation, all your bodies will need to adjust to the sudden change in how you all will be eating.
If the pack is happy, the whole thing will go better.
- 85MattFebruary 24, 2013 at 10:46 pm
This was a great article. Most people think of ‘bugging out’ and the main option, but ‘bugging in’ is a way to ride out whatever is happening until more information becomes available. As a private investigator, I’ve learned that information is crucial. I have a somewhat similar setup, although smaller. One five shelf unit contains freeze-dried food and MREs; another contains canned goods and peanut butter and honey(honey doesn’t expire, and pb contains glucose, a good booster if you’re diabetic or have gone long periods without food); and another contains six five gallon jugs of water along with 12 cases of bottled water. I also keep things like batteries, medication, and hygiene items in small storage boxes. I also have a kerosene heater along with a propane heater, and six bags of charcoal. A wood stove is something I’m considering installing, but my wife is iffy about it for now. We live within city limits, and she doesn’t see the need yet.
- 86SteveMarch 10, 2013 at 9:16 am
Hal is 100% right. You cannot forget to properly ventilate your generator. The carbon monoxide will kill you. Happened to a fellow ironworker who got drunk and decided to sleep in the shanty. brought the generator in and hooked up a heater, died from the exhaust.
- 87jsallisonMarch 27, 2013 at 8:03 pm
two words: toilet paper.
- 88BillApril 10, 2013 at 11:02 pm
IMO, for bugging in I’ll use my Coleman 2-burner Dual-Fuel cook stove. I have 3-4 smaller backpacking stoves, but they’re not what I would enjoy cooking on for more than a few meals. Sure the Coleman’s larger, but who cares if you’re not carrying it anywhere? Plus it is way more stable, has 2 burners, and wind screens. What’s not to love?
Plus it uses the same fuel as my lanterns, and my 1-burner Coleman stove. What’s not to love? :)- 89Eavestroughs TorontoApril 18, 2013 at 2:48 am
I think it is the only blog which differentiate the two things it bugging-in and bugging-out.
- 90steveMay 2, 2013 at 8:03 pm
Lot of fire making stuff but no fire extinguishers/suppression.
- 91celticfiregirlMay 7, 2013 at 9:52 am
This was very helpful. Some good ideas on the food and heat.
- 92Heinz DoofensmirtzMay 12, 2013 at 11:50 pm
Hunting and fishing are low on my list as food sources. In an extended crisis, everybody else will have the same idea. Game will be exhausted or scared away quickly. Many of us in the ‘burbs have “pet" deer. Not so as soon as one gets shot. You must be careful with generators. Most make a lot of noise, and that noise carries quite far when everything else is off, and is a magnet for the unprepared. The Honda and Yamaha inverter units are quiet and fuel efficient (I asked my brother how much gas he has to run his 6500W fuel-hog genny–got a blank stare), but quite expensive. I have a Yamaha tri-fuel unit and love it. It makes waaaay less noise than a lawnmower, and could be run in the garage with the exhaust vented out the ridge vent. Kerosene is a good heat source, and is prertty safe to store. Keep your cans full so there in little room for water condensation.
- 93DianeMay 15, 2013 at 5:47 pm
I am preparing to take my first lessons in canning and would like to know if anyone here has canned meat that has been frozen? We raise our own hogs and steer for meet, and butcher every year. This year I would like to try to can some of the meat left from last year instead of giving it away like I usually do. (Always tried to help out a neighbor that could use it, but would like to keep some for ourselves.) Our freezer won’t hold it all. Also, I now that if disaster would happen, we could lose a great majority of it without another option. Only thing I would add is about water storage. You need water for more than drinking and food prep. I store non drinking water in everything from vinegar and bleach jugs to empty detergent bottles – suds in. Then I can at least wash off and clean up cooking or eating utensils. Thanks and really enjoyed reading.
- 94S27May 28, 2013 at 11:09 pm
Diarrhea medication. Only one website has listed this so far.
Unscented candles, too much perfume is not good for allergies.
Batteries that match your supply of torches, LED candles and Fire Alarms. Check the size and buy a bunch on sale, especially if it’s not a standard size.
Gas bottles to go with your BBQs.
- 95JamesAugust 14, 2013 at 9:52 am
Hey man, great post.
One thing that I found is cheap, handy, and portable is a folding bathtub water bladder. Better storage than just “filling the tub", holds 100 gallons, and it’s portable. With a decent filter system and 12v electric pump, if you have to bug out, you can drop it in your trunk or pickup truck bed, or in the cargo area of a large SUV like a Suburban, too.
http://www.amazon.com/waterBOB-Emergency-Drinking-Storage-Gallons/dp/B001AXLUX2
- 96Victor EasleyAugust 24, 2013 at 1:03 pm
To Grill or BBQ in the city when people are hungry is inviting disaster. That is why dehydrated food and a solar heater to boil water may be the wisest course of action.
- 97E.M.September 4, 2013 at 7:14 pm
This is the updated location of the U.S. Army Survival Manual: http://www.ar15.com/content/webPDF/FM21-76_SurvivalManual.pdf.
Good stuff!
- 98James KearneySeptember 25, 2013 at 5:49 pm
A very thorough post, and a reminder that it’s not that difficult to prep. Having a solid plan for bugging in is the first step. This is a good as any guide I’ve read on the net.
Leave a Comment
Name *
E-mail *
Website
Previous post: How to Grow a Handlebar Mustache


Posted on October 16th, 2013
How to Tie a Shemagh/Keffiyeh


How to Tie a Military-Style Shemagh/Keffiyeh
by A Manly Guest Contributor on January 9, 2013 · 41 comments
in Manly Skills, Outdoors, Survival

Editor’s note: This is a guest post from Creek Stewart of Willow Haven Outdoor.
The shemagh (pronounced “schmog") – also called a keffiyeh and ghutrah – originated in the Middle East. They are a scarf-type wrap commonly found in arid regions to provide protection from direct sun exposure, as well to protect the mouth and eyes from blown dust and sand. It’s similar to a bandana, except much larger – approximately 42″ x 42″. It has been adopted by military forces all over the world as a standard issue garment because of its sheer functionality.
For decades, keffiyeh have been issued to British soldiers. The garment’s use by some military and police units of the former British Empire dates back to before World War II. Because of its utility, it was soon adopted by Middle Eastern units as well, including the Palestine Police Force, the Transjordan Frontier Force, the Arab Legion, and many others. They were worn while operating in North Africa as a way to combat the harsh winds and frequent sandstorms. After the war the shemagh continued to be used in both desert and temperate environments. The garment has also been in use with Australian armed forces since the Vietnam War, and extensively during the Iraq and Afghanistan wars. Since the beginning of the “War on Terror," these keffiyeh have been adopted by US troops as well, who usually use cotton olive or khaki ones with black stitching. They are often worn folded in half into a triangle and wrapped around the face, sometimes coupled with goggles to keep sand out. This style is also commonly practiced by troops in vehicles who use it in more temperate climates to combat the wind chill of being in a moving vehicle.
For an outdoorsman, survivalist, or bushcrafter, the shemagh can be a tool with literally hundreds of uses. This post is simply a quick tutorial in how to tie a shemagh as a face mask and/or head wrap. This is a very functional use in all kinds of environments. As you can see, with the right pattern, it can work as some effective camo as well. Using it as shown below is great for dusty/sandy environments. I went on a trip to the Sand Dunes in Michigan not too long ago and my shemagh was invaluable! I’ve also used it countless times in the winter for face and head protection.
I’m sure there are other ways to tie this as a face mask, but below is the way I do it. There is also a video at the bottom.


Step 3: Choose a point three-quarters the way along the folded edge and hold it to your forehead like you are going to tie it bandana style.


This green/black pattern makes for awesome camo. I also own a tan/white color scheme that makes for perfect winter camo as well.
How-to Video
Creek Stewart is a Senior Instructor at the Willow Haven Outdoor School for Survival, Preparedness & Bushcraft. Creek’s passion is teaching, sharing, and preserving outdoor living and survival skills. Creek is also the author of the book Build the Perfect Bug Out Bag: Your 72-Hour Disaster Survival Kit. For more information, visit Willow Haven Outdoor.


{ 41 comments… read them below or add one }
- 1Eric GranataJanuary 9, 2013 at 4:29 pm
Awesome! I came upon Mr. Stewart’s original post just a few weeks ago. A family member had brought me a Shemagh from his travels and I needed to learn how to use it. Was delighted that Willow Haven’s site was at the top of my Google search.
Keep up the good work!
- 2AresJanuary 9, 2013 at 4:41 pm
Wearing a shemagh isn’t just useful for protection against weather and the like. It also prevents you from having to do the hot-brass-dance every time you end up being unfortunate to catch a casing in your collar.
- 3MattJanuary 9, 2013 at 4:44 pm
Neat!
- 4Kyle LJanuary 9, 2013 at 6:15 pm
I work at an airport an the openess of the tarmac allows for some harsh winds especially in our sometimes frigid winter mornings. My shemagh makes for a night and day difference driving around on bag tugs at 4am. I happen to have the same color and print as the one pictured. Much smaller though.
- 5ClayJanuary 9, 2013 at 6:38 pm
I love mine! Have taken it on every trip for the past 3 years. It has been a blanket, a pillow, a scarf and a protective wrap for valuables. It proved its usefulness while backpacking last summer on an extremely hot day when I had to cross the top of a mountain ridge. There were no clouds, and no trees as the area had been burned out and resembled a desert. Just dust and sun. We had misjudged our next campside, and ended up having to detour across the ridge to find water. After about 20 minutes of hiking in direct sun, we had used all of our water and were quite dehydrated. The reason desert dwelling people wear full length clothes is to allow their sweat and breath to convex. Long pants, a long shirt and a shemagh allowed me to retain a drastic amount of moisture and while my companions were dehydrated, I was just beginning to feel the effects. These can really be life-savers.
- 6PaulJanuary 9, 2013 at 6:53 pm
Very interesting post – thank you.
You say “the shemagh can be a tool with literally hundreds of uses". Perhaps you can do another post where you share some of these with us – I love these sort of multi-use items.
- 7StephenJanuary 9, 2013 at 7:22 pm
Practical advise and yet they want you to finish it with a granny knot? (K)not very ‘manly’ if you ask me. Make use of a reef knot instead.
- 8OkieRoverJanuary 9, 2013 at 7:30 pm
I bought one of these to use as a scarf during the winter. I wish I’d had them when I was in the Marine Corps.
- 9JoshJanuary 9, 2013 at 7:40 pm
Not only protects you from wind, but great for camouflage. If they dont already, the military needs to issuing these.
- 10HunterJanuary 9, 2013 at 8:01 pm
I do a fare amount of snowboarding. Would this work for that when paired with a pair of snow goggles or would it leave some skin uncovered?
- 11Ben W.January 9, 2013 at 9:22 pm
I should add that if you wore this in a city like Los Angeles or New York that you might get stopped by the police. They tend to think you are up to no hood because your face is covered like that, even if your intentions are to keep the cold out. I know that it’s pretty obvious but I figured I’ll point it out to be safe.
Moving onto a more positive note… Good job on the article! I look forward to new ones that detail the hundreds of uses. The immediate one I have in mind is to soak it in water and wrap it around my neck, useful for when it’s 100+ outside and we are shooting a match.
- 12BenJanuary 9, 2013 at 11:33 pm
Living here in Australia, I can tell you all with perfect confidence that it gets hotter than the surface of the sun here. So seeing how to do one of these so that I can learn how to put one on after dousing it in water is absolutely PERFECT for what I need. Heck, if i could figure out how to freeze one and then put it on, I would.
FYI for all Americans out there: the US army comes here to train for the heat in the middle east. Yeah, it gets THAT hot. So if you think you guys have it bad with a heat wave there, you got nothing on Australia.
- 13RufusJanuary 10, 2013 at 12:34 am
They’re useful and great items. Unfortunately too many people see wearing one as supporting Palestinians and against Israel. To those who know the colors they are matter more.
Just something to consider.
- 14MorgenJanuary 10, 2013 at 1:14 am
My brother-in-law brought one home from Kuwait just before I moved to Idaho. I ended up buying a tightly woven bit of wool fabric the right size and it’s been amazing.
It’d be way too hot once it gets north of 50F, but anything below that it’s great, and once you drop past 0F it’s indispensable.
There’s one modification that I make to the standard tie he showed. If you fold a little bit over and make sure it’s on the inside it tends to slip off the nose less. It’s probably not noticeable with a proper cotton keffiyeh, but it help with the stiffer wool.
As for other uses:
Look up Furoshiki for some really useful ways of improvising a carrying device with a square bit of cloth that just happens to be about the same size as a keffiyeh. There are several basic ties that’ll handle a range of regular to really awkwardly shaped objects.
Another fertile area for alternate uses is first aid: bandage, sling, split, tourniquet, etc.
The last one that comes to mind is that I have a 3 yr old who gets cold much easier than I do. When the wind kicks up unexpectedly I put the triangle folded scarf around her shoulders, cross the ends in the front and tie them (reef knot) a bit looser than snug in the small of her back. This keeps it from falling out, and the cross in the front makes little ‘pockets’ she can tuck her arms in. The wool keeps the wind off her, and really helps her stay comfortable.
I’d say carry one around with you for a week or so, it’s like a knife and three 1 yd bits of cord – if you have a tool, uses for it will just sort of come up.
- 15KevinJanuary 10, 2013 at 1:50 am
They make for great scarves too, with a lot of different ways to tie them. With one item, you can look like you belong in a Counter Strike match or a Soho cafe.
- 16Rocket JonesJanuary 10, 2013 at 8:03 am
Or you could just use a Buff.
- 17The PrepperJanuary 10, 2013 at 8:07 am
Nice! I always wondered what the “correct" way to wear one of these was.
I hadn’t realized that this has been adopted by so many military forces around the world either.
- 18J.J. VicarsJanuary 10, 2013 at 8:24 am
Drape one with skulls printed on it around your neck and you’ll have the Keith Richards look down.
- 19JoshuaJanuary 10, 2013 at 8:27 am
The pictures from all different sides are very much appreciated here, makes it easier to understand. I do agree with other posters about hearing some of the uses you or others have come up for one.
P.S. to Ben W. I’ve found that if you keep it losely around your neck and about ear height like a rather thick or fluffed scarf you can get away with wearing one in even the largest city or past the most stop happy officer.
- 20ConnerJanuary 10, 2013 at 9:26 am
On the source site, you mention that it could be used as a makeshift backpack. Does that mean just holding it like a sack, or is there a way to tie one that keeps it on your back without having to use your hands?
- 21Pastor JoshuaJanuary 10, 2013 at 10:10 am
This is one of the many things I learned at Creek’s “Survivacation." I recommend it to any man willing to stretch himself by learning the basic techniques to survive in the wild. I wear my shemagh everyday as either a scarf or as a face mask when I am sledding with my kids on Hines Drive outside of Detroit.
- 22ChristianJanuary 10, 2013 at 11:41 am
As a new dad, found that my old shemagh works great as a baby swaddler too. The method Creek shows is very similar to how we wrap the boy up before putting him to bed.
Have to remember to wash it before I wear it again, though- sometimes his bowel contents act as a liquid breaching tool through Pampers.
- 23TimJanuary 10, 2013 at 12:48 pm
An earlier poster wanted some other ways this innovative item can be used. When I was in the army back in the 80′s, we used our t-shirts modified for the same use, but here are some other ways to use the shemagh: water strainer, hammock, belt, saddle bag, tournequet, sling, strangler, rope, smoke signal, wind sock, wash cloth, hand climbing protector, harness, bandage, headrest on hard surfaces, sponge, reins, cover, undergarment, windshield cleaner, heat shield. That’s twenty just to get your creative juices going.
- 24TonyJanuary 10, 2013 at 2:41 pm
I have two keffiyehs that I bought in the Middle East, one in Israel, and the other in Jordan. One is a red checked pattern on white, and the other is black checked. Unfortunately, as expected, one is often given the stink eye when wearing one of these in public.
They are totally awesome for wearing in the summertime, as the cotton fabric breathes yet keeps the sun off your skin. In wintertime, they are nice and snug, and keep the wind out of the ears. Now if I could just convince the local rednecks from trying to shoot at me when I wear one.
(By the way, I sometimes wear mine with the agal if I am not trying to keep my face covered so closely.)
- 25SaudiJanuary 11, 2013 at 8:11 am
I am a saudi and the badu invented the shumagh its much much harder and it needs a specific way to be ironed and folded but its okay to do this
- 26DenisParisJanuary 11, 2013 at 11:11 am
@ Hunter “I do a fare amount of snowboarding. Would this work for that when paired with a pair of snow goggles or would it leave some skin uncovered?"…
… Wear one in the wrong place and you’ll do a fair amount of waterboarding :-)
Joke aside, there is another manly oriental/military alternative to the keffiyeh : the chèche or tagelmust. French elite troops with a Saharan history still use it.
First link : a retired Legionnaire wears his chèche “leisurely". Second link : a Spahi wears his “professionnally" during the first Gulf War.
http://www.maison-legionnaire.com/modules/actualite_seule.php?id=918&block=2&titre=cheche
- 27dfolandJanuary 12, 2013 at 12:03 am
we use to use them to keep the flies off in a guard tower ( there was no other escape) if you dunk them in water the wind cools you down and the bugs stay off
- 28HunterJanuary 12, 2013 at 2:43 pm
@ DenisParis- Where can I buy a chèche? And I like the way it looks, but it also sort of looks like I might be viewed as a terrorist or something. I am not trying to be stereotypical myself, but hey, this is America. Anyone else’s opinions on other people’s opinions who might think it is unacceptable?
- 29DenisParisJanuary 13, 2013 at 6:36 pm
@ Hunter – If you’re interested mostly in the ethnic/cultural aspects try
http://www.ethnicembellishments.com/Tuareg-Scarves_c_7.html
- if it’s a “fashion" thing try
http://yhst-64477706453472.stores.yahoo.net/motudeves.html
- and it it’s a military thing try
http://www.amazon.fr/dp/B009OEVAH0/ref=asc_df_B009OEVAH011461859/?tag=hydra08-21&creative=22710&creativeASIN=B009OEVAH0&linkCode=asn&hvpos=2o1&hvexid=&hvnetw=g&hvrand=3718913602023949120&hvpone=&hvptwo=&hvqmt=Personnally I couldn’t touch a keffyeh as people wearing them in France are 1° 2nd-generation Muslim immigrants who are basically “would-be Palestinians" 2° leftist activists (Trotskyites, anarchists, etc) 3° neo-Nazis, and none of those people are precisely role-models for me :-) On the other hand, chèche/tagelmust (I’m leaving aside girls using them as fashion accessories) are used by young white conservative Christian males from the well-heeled parts of Paris, or by authentic soldiers. Hence my (obvious) preference. But let’s be clear : Westerners wearing a chèche in a Western context, do it “leisurely", not “professionnally" (cf my previous post). I can’t imagine anyone associating a chèche used in that way, to terrorism. Even in America.
- 30Mountain Evan ChangJanuary 14, 2013 at 5:26 pm
Who knew hipsters were wearing something so practical…
- 31MatthewJanuary 15, 2013 at 2:55 am
I have to say, the Kefiyah looks really stylish and can you look awesome, male or female, if you wear one. Obviously the Kefiyah is just a piece of clothing, but the big problem I would have wearing one is they make everybody who wears one look like a Palestinian activist. Obviously if I was visiting the Middle East, I would do as the Romans do and just wear one if I wanted to dress like a local, in a hot desert climate, but they just seem so inherently political…
- 32Daniel KimJanuary 18, 2013 at 5:40 pm
If it is adjusted properly, it can serve as a set of blinders to cut out peripheral vision. That, and the tendency to muffle ambient sound, can make this an accessory to enforce work focus.
Joke? No. I used to do this kind of thing with a towel when I was in college. I called it the “turban of focus", and it made me look like a complete fool. Still, I could keep at my studies when I had it on.- 33GreydogJanuary 18, 2013 at 7:21 pm
Good post. I hadn’t concieved of the general usefulness of such a piece. In times past, the Scots wore long wool cloth wraps that served many purposes, though they were not so much head wraps as body wraps.
DenisParis, how are the longer Taureg scarves or the French soldier type wrapped/tied? They have much more cloth, and look different when worn.
- 34CTJanuary 22, 2013 at 7:49 am
Great. Now all we need is an article on how to ululate.
- 35Grant SchooleyJanuary 24, 2013 at 4:38 pm
Thanks for the tutorial Creek. I work on a farm in Montana and will be working on a fruit orchard in California this summer. I am pale skinned and will use this over the summer to help prevent sun damage :-). Cheers!
- 36Ian SJanuary 25, 2013 at 7:51 am
If you don’t have a 3×3′ piece of cloth then try this…
T-shirt Ninja Mask
http://www.youtube.com/watch?v=LAZ7fB8PJk4Not exactly the same thing but pretty close IMO.
- 37FlynnMarch 16, 2013 at 6:51 pm
@ Eric This dance?: http://terminallance.com/2012/10/23/terminal-lance-231-the-dance-of-our-people/
- 38stanApril 1, 2013 at 3:02 pm
When I was in the sandbox I never could bring myself to wear the same headgear as those who were shooting at me. I always just wore two big bandanas, one over my mouth and one as a do rag. Just me.
- 39SoniaApril 26, 2013 at 2:01 pm
Great tutorial… thanks for sharing it!
- 40JTMay 24, 2013 at 8:58 am
First tried one of these about 10 years ago as protection from the sun here in SE Arizona. Amazing that it kept me cool in searing 100+ degree desert temps.
- 41emtdragon383October 13, 2013 at 4:52 pm
Love mine I work offshore and it keeps the sun off when I work the deck of the boat for hours chipping and painting.
Leave a Comment
Name *
E-mail *
Website


Posted on October 16th, 2013
How to Use a Fire Extinguisher | The Art of Manliness


How to Use a Fire Extinguisher
by Brett & Kate McKay on January 23, 2013 · 38 comments
in Manly Skills, Survival
Fire extinguishers. You pass them all the time as you walk the hallways at work or school, and hopefully at home too.
But no matter how many times you’ve seen them in your day-to-day life, you’ve probably given little thought as to how you actually use one. Maybe it never crossed your mind, or maybe you assume it’s so simple it’s not something you need to learn.
Well, it’s true that using a fire extinguisher isn’t rocket science by any stretch, but there are a few basics you need to be aware of – and probably aren’t. According to FEMA, the majority of Americans don’t know how to use an extinguisher, even if they have one in their home. This is a dangerous knowledge gap. Fires double in size every 60 seconds, so you don’t want to be fumbling around in an emergency situation, reading over the instruction manual as a small flame on the stove grows into an inferno.
Today we’ll talk about some guidelines for choosing an extinguisher and storing it in your house, and then discuss how to use it.
The Right Fire Extinguisher for the Right Fire
Fire extinguishers come in a wide variety of types — each one designed to put out a different kind of fire. Classification systems have been developed to help users know what sort of extinguisher they’re working with. Because the majority of our readers are based stateside, I’ll be focusing on the system used to classify extinguishers in the US.
 | Class A – Ordinary solid combustibles like wood, cloth, and paper products. |
 | Class B - Flammable liquids and gases. |
| Class C - Electrical fires. (Do not use water to put out this kind of fire – you could get electrocuted!) | |
| Class D - Flammable metals. | |
| Class K - Oils and grease fires. (Never use water on a grease fire – it will cause the flames to explode and spread.) |
Most fire extinguishers for homes and public spaces are classified as Class ABC extinguishers, meaning they’re suitable for putting out wood and paper fires, flammable liquid fires, and electrical fires. ABC extinguishers use the dry chemical monoammonium phosphate as the extinguishing agent. You can buy an ABC extinguisher for about $30 -$60 on Amazon or at your nearest hardware store. Get the biggest one you can comfortably handle to maximize its discharge pressure, time, and range.
If you’ve worked in a commercial kitchen, you’ve probably seen Class K extinguishers. The extinguishing agent in the Class K variety is a wet potassium acetate. (Interesting fact: Before the introduction of potassium acetate, sodium bicarbonate powder was the extinguishing agent of choice for grease and oil fires – that’s why baking soda can work in a pinch).
Class K extinguishers are used in commercial kitchens because they’re more powerful for dealing with grease fires and the chemicals are less likely to damage the cooking appliance when used. But for small grease fires in a home kitchen, an ABC extinguisher will likely get the job done. An ABC is still going to damage your stove though, so if it’s a very small fire, try to smother it with a pot lid or wool blanket first, before you resort to the extinguisher.
Where to Put a Fire Extinguisher in Your House
Your office or school very likely already has fire extinguishers in place. But it’s up to you to get ones for your own home. Some states require that you do so by law, but even if yours doesn’t, they’re an essential safety item – your second line of fire defense after smoke detectors. A fire extinguisher can keep a small incident from turning into a dangerous emergency.
You should, at minimum, have one ABC extinguisher per level of your house. It’s best to have one near each of the rooms where fires are most likely to break out – the garage and especially the kitchen.
Store extinguishers where your kids can’t get to them, but they’re still easy to access – you don’t want to be looking around and digging through a closet when every second is crucial. Don’t place them near stoves and heating appliances, or behind curtains and drapes – places where fires may start and quickly spread; if you can’t reach the extinguisher because the thing that’s on fire is right by it, you’re in trouble. The best location for your fire extinguisher is mounted near a door – your escape routes.
Once you’ve gotten an extinguisher or two to protect your castle, try to check it periodically to see if its pressure is still in the green zone, the seals haven’t been broken, the hoses are intact, and it hasn’t been damaged by things like dents, leaks, or rust.
How to Use a Fire Extinguisher
Alight. So you’re familiar with the different kinds of fire extinguishers and where to put them in your house. It’s time to get down to how to actually use these suckers. If you chance to encounter a fire, mentally go through this checklist of questions before attempting to put it out with an extinguisher:
Are you taller than the fire? Fire extinguishers are designed to put out fires in the incipient stage. That’s fireman talk for when the fire is just getting started. When it gets past the beginning stage, a fire becomes too large to fight with a portable extinguisher.
How do you know if the fire is still in the incipient stage?
Just give the flame the once over to see if it’s taller than you.
It is? Hightail it out of there and call 911. Your fire extinguisher will likely be no match for the flames.
You’re still taller than the fire? Proceed to the next question.
Do you have the right fire extinguisher for the type of fire? Remember, extinguishers are designed for certain fire types. If you’re facing a grease fire, a simple A extinguisher (which contains only pressurized water) won’t put it out.
Is the fire extinguisher pressurized? Check the gauge on the extinguisher to see if it’s fully charged and pressurized. If the needle is in the green, you’re good. If not, you won’t have enough pressure to put the fire out. Forget it and get out of there.
Get in Position
If you can answer “yes" to all three of those questions, you’re ready to put out the fire with the extinguisher.
If possible, position yourself with your back to an unobstructed exit so that you can get out quickly if you need to. The discharge range for extinguishers can run from 6-20 feet (know your extinguisher’s range beforehand), and you want to be far enough away to not be in danger of being burned, and close enough that the discharge will be effective.
PASS!
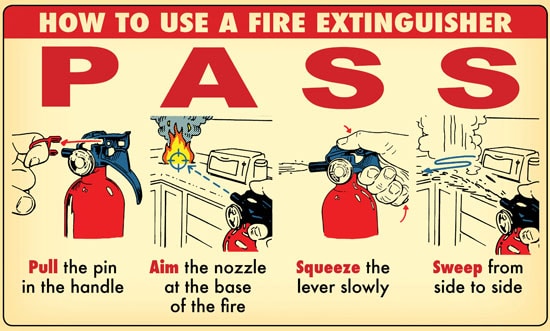
To employ the extinguisher with proper technique, just remember the acronym "PASS."
- Pull the pin.
- Aim the nozzle at the base of the fire. Hitting the tops of the flame with the extinguisher won’t be effective. You got to smother the sucker at its base.
- Squeeze the trigger. In a controlled manner, squeeze the trigger to release the agent.
- Sweep from side to side. Sweep the nozzle from side to side until the fire is put out. Keep aiming at the base while you do so. Most extinguishers will give you about 10-20 seconds of discharge time.
Slowly back away. Even if the fire appears to be extinguished, don’t turn your back on it. There might be unseen hot spots or hidden fires that can ignite into a large flame at any moment. You want to be on guard for that.
Once you’ve used a fire extinguisher, even if you didn’t deplete all the pressure, you must get it recharged. Do so as soon as possible. If it’s a disposable extinguisher, throw it away and replace.
If you can get some hands-on training with a fire extinguisher (some emergency services/community organizations offer classes), it’s highly recommended that you do so. But now you know the basics. Next time you see a fire extinguisher in the hallway, you can give it a nod of confidence as you PASS it by.
Have you ever had to use a fire extinguisher? Share your fire extinguisher stories and tips with us in the comments!
Illustrations by Ted Slampyak


{ 38 comments… read them below or add one }
- 1AndrewJanuary 23, 2013 at 9:46 pm
Please not that a Class K fire is a subsection of a Class B fire.
There are different extinguishers for Class K fires as they are not likely to cause as much damage, and are more powerful when dealing with Grease fires. Class K extinguishers are generally permanent fixtures in a kitchen. Class K extinguisher can not be used on any other type of fire (even Class B) (Class ABC + K fire extinguishers do not exist.
Don’t forget that if the fire is quite small (e.g. within a pot) it is rarely a good idea to use a fire extinguisher unless you want to buy a new stove. Smother a small fire with a pot lid or fire (wool) blanket.
- 2Joey EJanuary 23, 2013 at 9:46 pm
Yep. Worked in a chemistry lab for 10 years. Things happen.
The biggest thing that makes a difference, IMO, is having a chance to practice. It’s like with sports — when you do something enough times in a drill, you react more calmly and efficiently when it comes to “game time."
- 3Brett McKayJanuary 23, 2013 at 9:48 pm
@Andrew-
By “Class ABC + K" I meant a Class ABC extinguisher AND a Class K extinguisher.
- 4AndrewJanuary 23, 2013 at 9:59 pm
@Brett
Owning a Class ABC and a Class K extinguisher seems like an unnecessary cost. The all around Class ABC extinguisher will be more than effective on a small kitchen fire (Class B extinguisher will work on Class K fires, but a Class K extinguisher will not be effective on a Class B fire).
A home owner would be better off spending the cost of one Class K extinguisher on one or two more ABC extinguishers for other areas of the home (such as in the basement near the hot water heater, and most definitely near any bedroom in a basement as there are fewer emergency exits)
- 5Brandon HJanuary 23, 2013 at 10:03 pm
I used to have a state (TX) fire extinguisher license, serviced them in refineries for a living and did extinguisher training.
The only thing I could think to add (forgive me if I just missed reading it) is that you should put the fire out from the base up, not the top down, to prevent re-ignition.We used to light and put out a 30 foot long oil trench fire over and over for training. Good times.
- 6Brett McKayJanuary 23, 2013 at 10:07 pm
@Andrew-
Looking into what you said in your first comment, you’re right. Will amend the post to reflect that. Thanks for feedback.
@Brandon-
Yup, we mentioned hitting the fire at the base in the text and illustration.
- 7MattoJanuary 23, 2013 at 10:53 pm
Great article Brett – it’s something that you don’t think of until you need it, then you REALLY need it.
Love the idea of gauging the progress of the fire by whether it’s taller than you or not. Very quick and easy to do/remember. I also like the advice of buying the biggest one you can carry – the small extinguishers are worse than useless in my book, due to the tiny run time.
Just regarding the use of the extinguisher – I was always taught not to aim it directly at the fire then squeeze the trigger, but aim it to the side to start and sweep the spray into the fire. The rationale was if you hit the base with a big blast, it could actually further distribute whatever was on fire. By starting “off target" and sweeping in, you could control the situation a lot better. I’d be interested to hear your thoughts on whether that’s a legitimate concern or not.
Thanks again for another great article.
Cheers,
Matto- 8AndrewJanuary 23, 2013 at 11:17 pm
@Matto
That is correct, aiming at the fire could result in spreading the fire. Where you aim will vary depending on the kind of extinguisher you are using, but aiming at the side or top of the fire initially is a good idea.
When using a Class A (not ABC) extinguisher, which contains only pressurized water, one will spray the water in a fine mist (restricting the flow with a thumb) at the top of the fire.
When using the other Class of extinguisher (ABC or BC) aim at the side and sweep across the bottom of the fire. The same is true for a Class K extinguisher, but more often than not they are a fitted system, and all one can do is pull the pin. the rest is done automatically.
- 9GeoffJanuary 23, 2013 at 11:42 pm
Great work guys!
I really dig the “How To" articles.
Keep it comin’ in 2013!Best
- 10Aidan GallagherJanuary 24, 2013 at 2:28 am
Useful article but I would also add yelling fire to warn others and so help can be called for and giving the extinguisher a quick blast before going anywhere near the fire. Much better to find out the extinguisher isn’t going to work before you enter the room than once you are next to the flames.
- 11jkJanuary 24, 2013 at 2:51 am
Besides the ABC categories, there is a difference in extinguishing agent. You should be aware of that, because different agents have different properties, such as duration of the blast, blast-force, and damage or health issues.
The older systems, but still widely in use, are CO2 extinguishers. The provide a short, powerful blast, good for liquids, as long as you do not blast directly into the liquid. However, on glowing embers, it has only a temporarily effect. Be aware of coldburns, hold it by the grip. You can recognize these extinguishers by the flaring nozzle.
Than there are powder extinguishers. Very effective, low in weight, long blast, but mostly devastating to electronics and metals. You it in your house or on your car, and you’ll have a extinguished fire and a total write-off! Inhaling the powder is not advised!
The most useful types are foam extinguishers: long blast, good extinguishing properties, some are biodegradable, even usable on electrics and grease. They are somewhat more expensive, but worth while in your home, car or boat. They can also savely be used to extinguish burning clothes on people. Do not try that with CO2 or powder!It is also advisable to have a fire blanket at hand (just a few dollars at IKEA’s), good for kitchen- fires and burning clothes.
Do not extinguish a gas fire with an extinguisher: cut of the source, or leave it to professionals. If you do not cut off the source, the risk of explosion is very high!
Lastly: an extinguisher is for small starting fires only, or for buying time. Do not attempt a put aut a big fire, like a burning building, you’ll get in trouble! Even a burning car requires more than a few extinguishers, use is only to get out the oassengers, or to stop a starting fire.
- 12ChrisJanuary 24, 2013 at 6:57 am
I’m active duty military and fire safety is a persistent training scenario for us. We are required to memorize which extinguishers classes are used for which types of fires. So we came up with a memory aid. Here it goes:
Class A fires generate “A"sh- wood, cloth, paper.
Class B fires go “B"oom- like fuel tanks.
Class C fires, think “C"onduit like for electrical wires.
Class D fires have “D"ents in the metal.
Class K fires are simply “K"itchen fires like grease.Hopefully this will help readers out there remember the proper extinguisher classes to be used for the various types of fires.
- 13sugapabloJanuary 24, 2013 at 8:21 am
Tell you what…I’ve been in a room where one accidentally went off, and I’ve been doused with one directly. They’d make an awesome weapon. No joke. You feel like your lungs are collapsing. In a pinch, indoors, you could easily disable someone with a fire extinguisher..
- 14JohnJanuary 24, 2013 at 8:24 am
Great article! One thing I would like to add is make sure to regularly service your fire extinguishers. The powder in a Class ABC extinguisher will settle over time and eventually solidify within the extinguisher, even while the extinguisher gauge indicates pressurized. It is recommended to do this yearly. There are many companies that will do this for you, or you can do it yourself. Simply pound on the bottom of the extinguisher with a rubber mallet.
If your extinguisher is properly serviced, you can hear the powder moving when you turn the extinguisher upside down. If you cannot hear or feel the powder moving, then the powder has solidified and it is time to service or replace.
- 15ShellJanuary 24, 2013 at 8:39 am
Item of note:
While this is a well written instruction, it’s no replacement for hands on training.
Many fire departments have weekend classes where they’ll run you through the various fire and extinguisher types – and let you use them. If your local FD of VFD doesn’t have training classes, a nearby industrial training school may have a fire range.
There’s a lot of “finer points" you’ll pick up from hands on training that you won’t get from even the best written instruction.
Putting out fires isn’t only a good idea, it’s also a whole lot of fun (in a controlled environment) and a training session is a great way to spend a Saturday morning!
- 16Jamie HankinJanuary 24, 2013 at 9:27 am
If you are in an auto accident and/or your car catches on fire, remember to shut off the ignition before you tackle the fire. If you leave the key in the on position, your fuel pump will continue to operate, feeding the fire you’re trying to put out. Eventually, your extinguisher will be empty, but the fuel pump will keep going. Voice of experience here.
- 17chrisJanuary 24, 2013 at 10:51 am
A tip and a response to the question…
Tip: Before using for auto fires, beware of hybrid vehicle fires. if you come upon a scene of a hybrid car fire, you can’t tell if the engine is running. It’s possible the driver put it in park or pulled over and simply jumped out (upward on a hill, it would appear like it was in park). Therefore, approach it from the sides and NOT the front or the rear.
Response: I’ve used extinguishers twice – both kitchen fires.
I have one in my home and one in my car.
- 18MarkJanuary 24, 2013 at 10:53 am
Once a year our Boy Scouts use them during a training meeting on disaster preparedness. After all, Be Prepared, right?
- 19Salvador CurielJanuary 24, 2013 at 10:53 am
Where can one get their extinguisher pressurized if the needle is on the red?
- 20DrewJanuary 24, 2013 at 11:53 am
First time I ever used an ABC extinguisher was at my last high school job, at a Gas Station… Fun already, eh? Some probably well-meaning idiot threw his cigarette butt in the garbage next to a pump before stomping it out on the ground…probably because smoking a lit cigarette next to a gas pump didn’t seem like a very bright idea!
The garbage can was flaming up when I got to it (I had seen it smoldering from inside the store and immediately shut off the pumps and grabbed the extinguisher).
It was relatively small and easy to put out, seeing as the oxygen it needed to burn was coming from the top, where I was spraying the extinguisher.
Salvador, call your local Fire Department (NON-EMERGENCY! – NOT 911!!!) if they don’t do it, they can recommend a place nearby.
- 21bilJanuary 24, 2013 at 1:04 pm
As John noted above, the powder sometimes cakes up. A fireman friend of mine told me it was a good idea to bang a powder extinguisher on it’s side before pulling the pin, since that can loosen the powder.
- 22James CJanuary 24, 2013 at 1:13 pm
I have had way too much interaction with fire for a non-firefighter.
I crushed a backyard trash-can fire with a water hose. It was significantly taller than I was, but, by attacking it at the base, and working methodically I contained the worst of it before the fire dept arrived, at which time they told me that by acting fast and decisively I had saved the garage behind the trash cans, and likely the cars in it.
Chalk one up for manliness.- 23John ParkerJanuary 24, 2013 at 2:02 pm
Thanks for sharing this how-to with fire extinguishers. Never know when my shenanigans will call for knowing the proper way to use, allowing me to scot-free of all harm!
- 24johnJanuary 24, 2013 at 10:27 pm
I’m a career firemen, and while fire extinguishers are useful its important to appreciate the power of fires in buildings. If you are inside, any fire that is “taller than you", you should most likely be bailing out on. I’d use waist high as a cut off point. The other thing is make sure someone is calling 911 and getting others out of the building before or while the you attempt to put the fire out. I’ve been to a number of very good fires that an occupant attempted and failed to put out. Even if you think you’ve put the fire out, empty the extinguisher. There is no reason to save it, you’ll need to recharge it anyways. Make sure the fire department is still coming for two reasons. 1.) (hopefully)unlike Joe Homeowner, this isn’t our first fire. We’ll be able to ensure its out, hasn’t damaged anything in the house (such as electric or gas utilities) and the fire is actually out. The fire may have entered void spaces and could still be burning, leading to us being called back to the house later (hopefully with you safely outside). Believe me, those fires cause a lot of property damage. I’ve also arrived at fires to find people badly burned or with smoke inhalation from trying to fight fires themselves. If you have doubt, bail out and wait for the fire department.
The article is well written and a good how to, but I’d like to see more on judging whether or not to fight the fire and what to do when its out. I don’t want anyone to get a false sense of security and get hurt, I see it happen a lot.
On a side note: for most fires people have in the kitchen like frying or burnt food. All you need is a pot lid and an oven mitt. Put the lid on, turn off the stove, and let things cool down. Same with the oven, keep the door closed and turn the heat off, it’ll smother itself.
- 25Roger TJanuary 25, 2013 at 8:18 am
When I was a kid, our dad got a kitchen fire extinguisher and sat us all down to instruct us in how to use it. Problem was, he never instructed my mother, so when a stovetop oil fire flared up one day, and just tugging on the extinguisher didn’t pull it down, she grabbed the pan of flaming oil and tried to run out of the kitchen. Of course in her panic she slipped, falling into a pool of flaming oil.
As I watched her struggle with the extinguisher, all my ten-year-old mind could think was, “Mom, you’re doing it wrong" – she wasn’t throwing the catch to release the extinguisher from its base. By the time I got there to demonstrate, she was lying in flames. Fortunately, the catch released and the extinguisher worked perfectly. She got some 2nd and small 3rd degree burns, but we all survived.
When I got an extinguisher for our kitchen and instructed the kids in its use, I told them that story, and insured my wife knew how to use it (she did, having learned long before she met me.) Thus, when my daughters were doing some frying and the oil bubbled onto the burner and flared, they were ready. I heard the excited shouting from the kitchen and ran downstairs to see a smoking mess and my eldest daughter holding the extinguisher and beaming at me in frantic excitement: “I remembered how to work it, Dad!" In both situations, I dread to think what the outcome would have been had there not been a cheap kitchen fire extinguisher on hand. Make sure they’re in place, guys – it’s the least a man can do for the safety of his home and loved oned.
- 26chrisJanuary 25, 2013 at 9:15 am
@John Great points on judging the size of the fire and having someone call the FD. Just because I can put out the visible fire doesn’t mean it isn’t burning elsewhere.
- 27David HumbleJanuary 26, 2013 at 6:20 pm
working as a professional chef I’ve been around lots of fires, mostly grease and oil, the of gas leak and then others in a non professional setting.
The most fun I had with a fire extinguisher was a deep fryer that super heated and went up. it was quickly and easily dealt with. much easier than using the big ansul system.
for most fires in a kitchen we use salt. I find it easier to clean up that baking powder, you usually have more salt than baking powder as well. don’t ever think about using flour in place I’d baking powder, our anything starchy. that’s as bad as water on grease.
Practice is number one. I’ve used a few different types of fire extinguishers, been trained professionally as well. I would strongly recommend checking the fire extinguishers in my house monthly. I know how to use mine and I know how to kill both gas and electricity in my house. My better half does as well.
- 28WesJanuary 28, 2013 at 11:32 am
Regarding maintenance, be sure to SHAKE your extinguisher periodically. The solids will settle to the bottom, often forming a clump, thereby lessening the effectiveness of the extinguisher. This is especially true for those mounted in autos and boats. To check for this- grab your ext. and move it around. It’ll feel bottom-heavy. With one hand atop and one on the bottom, shake it around; side to side, upside down, etc. This should break up the solids. Think “over-size spray can without a rattle". Hope this helps. FYI, I keep one under the kitchen sink and one in the garage.
- 29J.J. VicarsJanuary 29, 2013 at 6:35 am
Never use one inside your car if it’s winter and you live in the Midwest. While working in a ‘commercial kitchen’ (I call it a grease pit) I let a buddy hang out in my car and have a smoke while listening to some tunes, probably something of mine I had just recorded. Being a 22 year old bachelor at the time the passenger floorboard was littered with the remnants of many a drive-thru breakfast and the ashtray was overflowing so when he didn’t notice that his cherry had fallen out guess what happened?
In the meantime yours truly had been trying for months to make time with this gorgeous waitress who kept blowing me off. Finally I got her to come out on break with me and hang a bit, listen to my latest musical masterpiece, blah blah blah. As we round the corner to the parking lot we notice that my car is filled with smoke. Opening the door reveals a small fire on the floor of the passenger side. Being young and dumb I run back in after shouting a basket full of ‘motherfucker’s and grab the fire extinguisher. How did I know that stuff doesn’t wash out. For the rest of that winter I drove from side of Indianapolis to the other damn near everyday with the windows down.
Yes, folks, it’s a good idea to understand fire extinguishers.
- 30JJJanuary 29, 2013 at 10:30 am
This is a quick legal thing to add.
A few years ago, a dorm at the college I was attending, had a fire break out. The guys on the floor quickly grabbed the fire extinguisher that was on the floor, as well as another floor, and tried to put out the fire. The fire department arrived and did quell the flame.
Once the fire was out and the guys who used the extinguishers were being questioned, and they were informed that it was actually illegal to use more than one extinguisher on a fire.
The logic being, that if it takes you more than one extinguisher to put out a fire, it is really beyond your control to contain it and you need to just get out of there. I’m not sure if this is a city ordinance, or if it goes to the state level. Just be aware of any legal repercussions for trying to play fireman when you are not one.- 31ChrisJanuary 30, 2013 at 8:40 am
I was a firefighter (fulltime and parttime) for about ten years, and this is a great article for people. The biggest thing I would add is to resist the urge to “test" your fire extinguisher’s function by shooting a quick blast. Doing so will bust the seal, and the propellent will slowly leak out, leaving you with a useless paperweight when you actually NEED to use it. Turning it upside down to keep the powder from caking is good though, as has been pointed out.
- 32EricJanuary 30, 2013 at 12:33 pm
Last week we got a few in for our office, and when I was placing them around the office, I barely noticed that there was a small plastic tie (the kind that lock) holding the pin in place. Obviously, you don’t want to be looking for scissors to cut off the plastic tie that you forgot to take off when you bought it. So you might want to take a second look at your extinguisher and make sure there’s no plastic surprise still attached.
- 33BrianJanuary 31, 2013 at 9:16 am
One other thing that I was taught about fire extinguishers is that you can shoot a cloud of powder between you and the fire to reflect some of the heat. This might allow you to better attack the base, or allow a safer retreat.
- 34NickFebruary 1, 2013 at 1:22 am
Good article. As others have stated, if you have a flaming liquid, or even a loose solid (hay was my most recent), the pressure from the stream could spread it.
Remember to call 911 before or while you’re putting the fire out. The fire department needs to check for extension to make sure it doesn’t flare up again.
Fires are destructive, firefighters may seem to be just as destructive. We try to be as low impact as possible, but tearing back sheet rock is kind of messy, but still cheaper than rebuilding a house.
- 35LeiaFebruary 9, 2013 at 2:13 am
I’m a trained Electrician’s Mate in the United States Navy and also was highly trained in the Navy’s version of firefighting. We classify the oil/grease fires in the deep fat fryers aboard ships under the Class Bravo (or B as you civvies call it) and we fight it with a chemical called Aqueous Potassium Carbonate (APC). As far as electrical fires, they send us Electricians (or “Sparkies", as the other Engineering rates like to call us) to go kill the power to whatever source is feeding the fire before the firefighting party puts it out with either water or Carbon Dioxide (CO2) extinguishers. For Class D (or “Delta") fires, which involve aircraft (I’m stationed on an aircraft carrier in San Diego), the flight deck firefighting party is taught to push the aircraft over the side. Interesting tidbits for you fellow AoM readers out there….
- 36Yeknath PoudelJuly 11, 2013 at 1:59 am
why can’t use water or other extinguisher on metel fire (D) fire ?
Why only allowed Dry powder?- 37GarrettJuly 19, 2013 at 8:29 pm
I got to douse a fire in my neighbor’s backyard before. It was VERY scary because my mother was visiting and she started screaming. I looked out the window and the tree line not 150 yards form by back door was on fire. I grabbed the garden hose and attached the there extra hoses in the rack. I ran out there and was met by my neighbor’s son who was at home alone. He is in 4-H and had goat pens with OSB shelters for them.
- 38Paul PAugust 26, 2013 at 11:04 am
Great article and so important to get the word out. Placement is also crucial as is having a plan on using an extinguisher. I always use the ones on my boat that are disposable for practice before discarding. Best to dump the pressure anyway before throwing away.
You have a nice selection guide, try our placement guide here.
http://www.gatewayfiresupply.com/Fire-Extinguisher-Type-Selection-Guide_ep_41.html
Leave a Comment
Name *
E-mail *
Website


Posted on October 16th, 2013
Essential Tools for your Toolbox


12 Tools Every Man Should Have in His Toolbox
by Brett on February 17, 2009 · 188 comments

Your girlfriend needs help putting some furniture together. Your wife asks you to install a ceiling fan. Your kid needs her bike fixed. Of course you have the tools to take on these jobs, right? For many younger men these days, owning a well equipped toolbox is something that only their dads do. Often when these men have a project, they have to go to someone else to take care of their handyman needs. But a man should be self-reliant. He should have the tools and know-how to tackle basic projects around the house.
If you’re one of those younger gents who just never got around to stocking a toolbox, below we’ve included a list 12 basic tools that we think every toolbox should have.
Before You Buy
A few things to remember before you head over to the hardware store and go on a shopping spree:
Fork over the money for quality tools. You can easily go to Wal-Mart and buy an entire 102 piece, Made in China, piece of crap tool set for $30. Fight the temptation. These chintzy tools will probably last you a few uses before they snap or break on you. Invest your money in quality, durable tools that will last a lifetime. If you have no clue about which brand to go for, Craftsman tools are a pretty safe bet. They’re durable and tough, and their hand tools come with a lifetime warranty.
One at a time. Rome wasn’t built in a day, and neither are great tool boxes. You don’t need to buy your complete set of tools all at once (unless of course you have the scratch to do so). Spread your acquisitions out so you don’t break the bank. Another good way to build your toolbox arsenal is to ask for specific tools for presents on different occasions. If you’re a young man just graduating high school, ask for some tools instead of money. That’s when I started my tool collection. I also know of a couple of (lucky) guys whose friends threw them a “Man Shower" before they got hitched. All of their buddies brought a tool or piece of camping gear to bestow upon the groom-to-be. Also, Christmas, your birthday, and Father’s Day are all great times to acquire tools.
Claw Hammer

A good, solid hammer can be used for driving nails into wood as well as small demolition jobs. My old man would use his hammer for damn near everything, much to the chagrin of my mother. Go for the classic 16 ounce hammer. It’s heavy enough for most basic home repair needs, but light enough for you to carry around without it being a nuisance. While your grandpa probably used a hammer with a wooden handle, you shouldn’t. Wood handles break easily. Go with something that has a long-lasting synthetic handle. Also, when picking out a hammer, you want one that has a good balance in your hand and isn’t head heavy. It’s a lot like picking out a golf club or a baseball bat. So go to the hardware store and try a few out before making your selection.
Flathead Screwdriver

Image by CBJason
A flathead screwdriver has a single blade that fits into the single slot of a flathead screw. Flathead screws have been around for a l o n g time, so it’s likely your great-great grandpa had a few flathead screwdrivers in his tool chest. While the Phillips screw has quickly taken the place of flathead screws in most projects, it’s still a good idea to have a few flathead drivers in your tool arsenal. In addition to driving in screws, flatheads can also be improvised for different uses like light prying, scrapping, and nudging. Quick tip: make sure the electricity is turned off BEFORE you start sticking a screwdriver in a light socket to pry out a broken bulb. Trust me.
Phillips Screwdriver

Image by milliped
Invented by Henry F. Phillips in 1936, the Phillips head screw has quickly replaced the flathead screw in most projects. A Phillips head screwdriver has a four star point at the end that fits into the corresponding screw’s shallow, cross-shaped depression. This design allows a user to apply more torque than is possible with a flathead screwdriver. The depression forces the blades of the Phillips screwdriver to slip out before any damaging over-torquing can occur. As mentioned above, Phillips screws have pretty much replaced flathead screws, so make sure you have a good set of Phillips screwdrivers in varying sizes.
Tape Measure

Image by redjar
Whether you’re building a gun cabinet or measuring to see if that flat screen TV will fit in your den, a dependable 25′ retractable metal measuring tape is a must. Plus, they’re fun for your kids. I remember my brother and I would take my dad’s measuring tape and extend the tape all the way out, lock it, and then watch it retract. It was double fun when the end would accidently pinch my brother’s finger, and he would start crying.
Crescent Wrench

Image by treedork
Of all your tools, this baby will probably see the most action. It’s like having 50 wrenches in one. The crescent wrench is an adjustable wrench with a sliding jaw that changes the width of the wrench. So you can use the same tool on different size nuts and bolts. Remember, when you’re using a crescent wrench, the movable jaw is located on the side towards which the rotation is to be performed. This reduces the chance of backlash.
Socket Wrench (aka the ratchet)

Image by john4kc
When you have a large project that requires you to tighten and loosen a bunch of nuts and bolts, it’s time to put aside the crescent wrench and reach for its more efficient brother. The socket wrench’s ratcheting mechanism allows you to tighten a nut without having to remove and refit the wrench after each and every turn. This can make your life a whole lot easier when you’re taking on larger projects. A 3/8-inch socket wrench with a couple of extenders and a set of sockets should do the trick.
Vise Grip (locking) Pliers

Image by jon m ryan
Vise grip pliers come in handy when you need an extra hand but only have your own two mitts to work with. Vise grip pliers are pliers that can lock in place. Some locking pliers use a mechanism that allows one- handed release of the locking mechanism; others require two hands to disengage. They are versatile tools that can be used as pliers, a pipe wrench, an adjustable wrench, wire cutters, a ratchet, or a clamp. Standard 5-10WR pliers are good for most stuff around the house and garage.
Needle Nose Pliers

Image by Oh my gil
An essential electrician’s tool, needle nose pliers are good for any household project which requires you to cut, bend, grip, or strip wire. Because of their long and skinny shape, they’re particularly useful for getting into small cavities. You can also use them to pinch your younger brother with.
Cordless Drill and Bits

Image by puuikibeach
A good cordless drill is an essential tool to have in your toolbox. It can be used for drilling holes into sheetrock or driving screws into a 2×4. When choosing a cordless drill, you want one with lots of power, which is measured by the amount of voltage in its battery. You can get drills that have batteries that go up to 18v. But when you increase voltage, you increase weight. That 18 volt bad boy weighs 10 pounds. 12 volts is a good size. It’s enough power to do most stuff around the house but isn’t too heavy. Also, make sure the drill you get has multiple speeds and is reversible. The reversible feature will come in handy if you need to take some screws out when your treehouse goes awry.
Crosscut Saw

Image by wick
The image of a fine handsaw has long been the emblem of a craftsman at work. A good general purpose handsaw is useful for trimming branches off your tree or cutting lumber for a project around the house. Crosscut saws are used to cut against the grain on a piece of wood. That’s exactly what you do when you trim a branch or shorten a 2×4. If you think you’ll be doing work that requires you to cut along the wood’s grain, get a rip saw as well.
Level

Image by jkdigitalservices
Whether you’re hanging up pictures or putting a mantle over your fireplace, a straight line is absolutely crucial. You don’t want to put a bunch of nails in the wall, only to step back and see that’s it’s crooked. To get the job done right the first time, you need to use a level. There are some sophisticated laser levels available these days, but you can’t beat the satisfaction of finally nudging that bubble into place. Of course if you have the iphone level app, you’re all set.
Utility Knife

Image by eab aod
While it may not be the most exciting of the tools, your utility knife will never be found gathering dust at the bottom of your toolbox. Every project always provides plenty of things to cut and scrape, hundreds of tasks that cry out for the utility knife’s super sharp blade.
Alright. Now it’s your turn. Did we leave any tools off the list that you think should be in every man’s toolbox? Disagree with the ones that made it on the list? Drop a line in the comment box and offer your suggestions.


{ 186 comments… read them below or add one }
- 101SashkelaMarch 21, 2009 at 1:54 pm
Can I translate your article into Russian and published on my blog?
- 102NickJApril 6, 2009 at 12:41 am
While I’ve seen mention of pry-bars, and crowbars, breaker-bars and lead pipes (creative I’ll say) I haven’t seen mentioned a cats paw. Sure, they’re on the small side, but when trying to pry boards loose in your little girls playhouse, the smallness of it really lends itself to the close quarters.
- 103BanjeauApril 18, 2009 at 12:06 am
You forget the stud finder, and I don’t mean my wife. Every man has to hang stuff on the walls from flat screen TV’s to art, and these really help locate the supporting lumber behind the drywall. Other’s have mentioned the handyman’s secret weapons, duct tape and WD-40. By the way, WD-40 sprayed on your fishing lure will catch more fish— it’s primarily fish oil.
- 104BrownyApril 18, 2009 at 11:37 am
@ Steve Maslin “This is Rubish, If you live in a community with people you don’t need to own a tool kit per male. Living in community is a manly thing, sharing what you own etc, The art of manliness has gone down hill. Most of the blogs don’t help me one bit and are just trivial like this one."
its not very manly to mooch off your fellow man… grow up- man up- buy your own damn tools!
and too all the canadians in the house… i love the robertson screws / drivers but please stop crying about it whenever a driver is mentioned. philips- robertson- torx- nut driver- there are plenty of drivers out there know what ya need and get the appropriate tool…
- 105bonApril 24, 2009 at 3:17 am
Growing up in Tasmania we reckoned if you can’t fix it with fencing wire and/or an old stocking (use ‘em as fan belts for instance) then it couldn’t be fixed. these days you’d have to add “and a milk crate" because every tradesman in the country uses a milk crate for something.
- 106bonApril 24, 2009 at 3:21 am
about made in china tools etc. i agree with Ben that even when they’re “made to spec" etc. they ain’t as good. i get most of my tools from the “trash & treasure" “car-boot" junk sales – there I can find genuine Made in Germany/Australia/Sweden/USA/England quality tools . . . damn good they are too.
- 107W ShepherdMay 25, 2009 at 11:00 pm
- Am reviewing the ’10 essential tools’ list in May and had to go back to mid -February to find any mention of safety goggles/specs – these are well recognised as ‘Basic’ by experienced DIYers- and may perhaps be even MORE important for the in-experienced to avoid dust+grit -and chemical splashes.
-I think perhaps you should seriously consider re-vamping the list as the ’20 essential tools’ as most of the comments on omissions are extremely valid.
- 108label applicatorJune 22, 2009 at 2:10 am
The Avery Dennison line of labelers allows for a wide variety of different applications. Speeds of 30 meters (ALS206) or 40 meters per minute (ALS204) are standard but much higher speed models can be selected.
http://www.accentpack.com/products.htm?cat=11- 109Randy TJune 25, 2009 at 6:10 pm
WD 40 is an oily solvent. Pretty good for cleaning if an oily residue is OK. Its a poor lubricant unless you want an extremely light lubricant….like clock mechanism light. If you need lubricatiion then 3 n1 or a teflon lube is far superior to WD 40.
- 110Mark TJune 26, 2009 at 7:27 pm
Find the best Selection on Tool cases, Rolling Tool Cases, Tool Chest, Rolling Cabinets, Tool Boxes, Hard Shell Cases and Metal Tool Storage at http://www.alltimetools.com
- 111HowardJuly 6, 2009 at 12:32 pm
As long as you’re going to include a screwgun, I think the circular saw (battery powered or not) deserves a mention. A handsaw has its undeniable uses, but hard work can be made a bit easier with a circular saw, which can go against or with the grain of the wood.
- 112Ed FJuly 9, 2009 at 10:53 pm
The tool selection is right on. Now let me add a suggestion.
- Multi-tool. This baby doesn’t belong in the tool box, it belongs on your hip or in your pocket! (The problem with tool boxes is that they are a bit awkward and are not often there when you need them.)
I personally carry a Gerber 400 needle nose every day. (Just an example-I don’t want to get involved in the Gerber/Leatherman/other discussion) I carry it in a belt holster, except dress up times, then it goes in a pocket. (FYI It has gone through several metal detectors successfully. Even though it has a knife blade, it still looks like a tool.) I can’t think of a day that I have not used it at least once. The needle nose pliers are particularly useful for dealing with small objects. The only item I have not used for its intended purpose is the cork screw. Just a long shot, but I suspect that most Model 400 users are beer drinkers.
- 113MachinesJuly 30, 2009 at 1:05 pm
Radial drills are designed to drill a hole in a part that is too big to fit on a regular drill press. Radial drills have size designations that incorporate the arm length and the column diameter. The arm length of a radial drill typically ranges from about 2′ to 12′ or more. The arm measurement is not the arm length (even though it is called that), it is actually the distance from the face of the column to the center line of the spindle when the head is all the way out to the end of the arm. This means, a 6′ radial drill can drill a hole in the center of a 12′ diameter part.
- 114Old Car BuffAugust 4, 2009 at 8:26 pm
Look at your local farmer’s market or flea market for vintage tools. At least here in the midwest, the farmer’s markets that I hit always have someone selling reconditioned tools. The local guy will also rehalf your hammer, maul, hoes, shovels, etc for a VERY resonable price. Drop it off one Saturday, pick it up the next.
- 115senatorrosewaterAugust 9, 2009 at 7:18 pm
Channel Locks.
Invaluable.
- 116ejsilver26August 16, 2009 at 12:11 am
I have pretty much all of the tools listed in the article and the subsequant comments. I keep a fairly stocked toolkit and tool bench. I use foldking tool benches due to space limitations and portability, and have a small tool belt. However, with all that I have, I must say that the worst tool I ever had was my Cordless drill. It was an 18-volt, variable speed, wonder to look at and a marvel to hold.. untill the batteries died. I could buy a brand new drill for the same price. Forget it. I got a realy nice corded drill with a case of bits to be reconded with for less than the cordless model. More power, longer lasting and it’s even a “hammer drill".
I’d say, if you were going to start from scratch an buy a set of tools, go for all the items in the list and the comments, except get a chorded drill. Go get the best you can afford and only buy what you need for the job you’re doing. Next time, get some more tools for the next job. After a while, you’ll only need a few here and there and the ones that you have will last forever.
(Except screwdrivers… buy lots and medium quality… keep them everywhere… for later, “You’re welcome")
Eli
- 117NikAugust 23, 2009 at 7:17 pm
Just read through the article and all the comments.
The “Robertson" discussion interested me the most. In America, at least, pretty much anything requiring a hand screwdriver is going to be Phillips and occasionally flat-head. However, if you’re driving screws into lumber (probably 2.5″ or longer), you can’t do better than with square-drive (what I’ve always heard them called). So, yeah, you should have square-drive/Robertson drill bits, but in America at least, getting a regular old Robertson screwdriver would be a waste.
- 118elenaOctober 3, 2009 at 4:56 pm
SAFETY GLASSES! holy moly! sure, these aren’t technically a tool, but they are definitely essential.
- 119ReedNovember 3, 2009 at 10:20 pm
If you get a ‘standard’ vice grip, be sure to pick up a needle-nose version as well. That tool has saved me countless times. Great for unscrewing stripped screws and pulling carpet staples, etc.
- 120DavidDecember 15, 2009 at 1:17 am
I’m 24 and have been working for Sears (tools department) since I was 16. I have been collecting my tool arsenal since then and I have had all those tools way before the time I was 18. It’s sad that most young men my age don’t have the basics. Most of my friends still don’t have a decent screwdriver!
My suggestion is what about the standard rubber mallet? This tool has been one of the most used in my toolbox especially when I have to assemble things that require me not to scratch/mar a surface.
- 121CDecember 16, 2009 at 5:45 pm
I am a 15 year old girl and keep at least half that list either in my purse or on my bedside table.
- 122DougDecember 21, 2009 at 10:45 pm
I can’t imagine any woodworking or tile projects where a simple framing square or speed square or tri-square wouldn’t be necessary.
- 123greg hJanuary 29, 2010 at 4:24 pm
speed square
- 124DanielFebruary 19, 2010 at 6:59 am
Excellent list. Great idea about the first aid kit, and I’d like to reiterate about having a multimeter – it’s fantastic for many things. In the past few days, I’ve used it on two family members’ cars to diagnose various stuff (is the alternator charging the battery?)
Other than that, perhaps a portable 12v light… the kind that’s just a flourescent tube inside a clear plastic tube which has a hook on one end for hanging, and both a car cigarette lighter plug and alligator clips for directly hooking onto a battery.
Also having a head lamp (like cyclists wear) has been absolutely wonderful. Hands-free light wherever you look. Otherwise, if you wear a baseball cap, there are small ones to clip onto the brim. Make sure you choose a light with both red and white LEDs that you can switch between. Red light is great for use at night if you are a passenger in a car, going hunting, or otherwise need to keep your night vision ability working without waiting several minutes after using a white light.
Sunscreen – I live in Australia, so it’s critical here. You never know when you get a call from a gorgeous neighbour who needs something fixed and pronto – you won’t be thinking of your skin when you race out the door with your tool box in hand. You can smear it on if working outdoors, and even offer her some if she’s helping. I’ve helped women before and they’ve been very impressed that I’m prepared, I walk onto the scene, take charge of it and get it done – all while being efficient and safe. Even just checking the brake lights if you are hauling their trailer somewhere is enough to impress (seriously, this made one woman visibly hot under the collar for some reason! Hehehe).
Oh, and RAGS!!! Old t-shirts, towels, etc. Something to wipe your hands on, something to wipe a dip stick on, something to mop up small spills, etc.
- 125MikeMarch 2, 2010 at 10:15 pm
When it comes to utility knives and blades, I would go with stanley.
The blades are thick and the “steel" knives can take a beating.
DO NOT buy cheap blades!
I even have a few of those cheap plastic utility knives with the snap off blades. Ok for light work.A 3/8″ socket wrench is an overall good bet. Buy the 3/8″ first.
If you have the cash, get a 1/4″ and a 1/2″ as well.
Do not use a 1/4″ on anything that requires alot of strength. Even the best 1/4″ socket wrenches shaft can twist off.
1/2″ for the more heavy duty car bolts.6″ pair diagonal cutters.
6″ pair plyers.
6″ pair needle nosePair of lineman plyers. Not a must have.
Don’t forget superglue along with the duct tape.
A good brand of super glue is loctite. Keep it in the fridge.Wood glue.
Small bag of wood golf tees for repairing striped out screw holes.
Zip ties, never know when you may need one to keep somethig in place temporarily.
Small medium ball peen hammer has many uses. Not a must have.
One of those flat prybars. In most cases, they can easily be fit into a toolbox.
Hacksaw and extra blades. Easy to collapse the saw without blade and the blades theselves take tille room. Not a must have.
A good heavy duty canvas tool bag is a must have. They hold a good deal of tools and tend to be easier to carry.
Not for the toolbox:
Heatgun for heat shrink tubing, removal of window glazing etc.Most of what I own is Stanley, except for my tourqe wrench which happens to be a Craftsman.
You can never go wrong by buying Stanley or Craftsman.I have a smaller metal toolbox that holds my socket wrenches and ratchets.
That goes into a large plastic toolbox that holds the rest of my tools.
Heavy, but easy to keep the tools seperated.
I also have a medium sized Stanley bag that I use when I know that I will not need my socket wrenches and ratchets.Daniel “Oh, and RAGS!!!" I could not agree more. Especially if you are working on an automoblie.
Oh, speaking of automobiles, a 5 quart drip pan for oil changes, radiator flushes, brake bleeding, transmission fluid changes etc. Not for a tollbox of course.
The most imoprtant are safety equipement and commom sense.
Put anything in your toolbox only if it makes sense to you.
If you will never use it, your toolboxe does not need it.- 126SeanMarch 9, 2010 at 5:00 am
I noticed an earlier poster mentioned that a wooden handled hammer will offer the best shock relief over time. This is true, and why Vaughn still makes their California framing hammer with one, but most wooden handle hammers nowadays are garbage.
The one thing I would add to the list is a decent combination square.
- 127FloraApril 18, 2010 at 4:03 am
Let’s not forget – women like a man with a full tool box, who’s good with his hands and keeps his tools in good, clean working order x
- 128AlanMay 1, 2010 at 2:50 am
As a writer, my primary tool is a keyboard… However one tool which has only had a single mention, is awesome…
The Angle Grinder.
Nothing, but nothing, resists this bad boy.
Wood, any metal, concrete, it cuts like butter.
I once spent 2 days and 5 blades trying to saw off a fiberglass boat roof. Finally bought an angle grinder and it ripped through that sucker in 20 minutes.
Got a bolt too long? Something sticking out where it shouldn’t? Excessive sanding to do? You’ll be amazed how often you’ll be reaching for an angle grinder once you have one, On top of which, they’re dirt cheap. Just remember eye protection.
Seriously, you aint a man till you have your own ANGLE GRINDER!
- 129EdwardMay 1, 2010 at 6:24 am
Need a chainsaw.
- 130DougMay 1, 2010 at 7:20 am
I liked Chris’s suggestion about duct tape and WD40. Reminds me of a time I was describing the emergency kit in my car (jumper cables, flashlight, etc.). A woman then told me: “My emergency kit consists of a cellphone and an Auto Club card." I couldn’t argue with that.
- 131MattMay 1, 2010 at 9:15 am
Allan wrenches, set of standard and metric, think IKEA furniture.
- 132Brian SMay 1, 2010 at 9:37 am
Agree with the Allen Key set(s) and the hacksaw. As to what type of toolbox you want to tote all of those around in…your basic criteria are: enough volume to hold your basic toolset, enough internal divisions for a minimal level of organization, and it ought to be strong enough to stand on, if necessary. With 4 socket sets, 3 driver sets, 3 wrench sets, and specialty automotive, electrical, bicycle, AND woodworking tools; I’m ready to move up to a cabinet in the near future. I just went out to the garage and I’ve got ten separate tool boxes. Plus the drill, circular saw, jigsaw and grinder that each have their own cases. I might also mention that this collection was in part inherited from my Wife’s Grandfather, and those parts of the collection I obtained myself were purchased over the past 25 years. I look forward to passing on my tools to my son…and helping him start his own collection.
- 133dougMay 1, 2010 at 10:02 am
interesting lists here.
1. don’t buy a battery operated flashlight, get the crank type led ones. you will never be in the crawl space with dead batteries. about $12.
2. claw vs framing hammer? go with the framing. and remember when pulling nails that you get more leverage when you pull “sideways" . when you pull inline with the claw the fulcrum point is the center of the handle and the nail is about 1-1/4 away so the leverage with a say 12″ handle is 12/ 1.25 or 9.6 to one. when you pull sideways the fulcrum is the edge of the head so the nail is about a 1/2 inch from the fulcrum point so with the same 12″ handle your factor is 12/.5 or 24 to one.
3. can’t beat pipe wrenches, and you can not beat having a small one too. I have a 4″ one that is the “cat’s meow " when you shear off the head of a rusted bolt, if a 1/4″ of the bolt is left that little baby will grab and back it out.
- 134william BorgstromMay 1, 2010 at 10:43 am
Go to the PAWN SHOP FIRST. Tools galore–usually cheap-
- 135BBinKCMay 1, 2010 at 11:00 am
Good list. Instead of a toolbox I prefer a tool bucket. Just a 5 gallon pail with one of those bucket organizers. Everything is out and handy in the pockets around the outside and I can drop my cordless drill and other stuff for a project in the bucket.
One really handy item I have in my bucket is a folding handsaw made by Stanley. It uses Sawzall interchangeable blades and has a place to store them in the handle. It’s far more useful than a hacksaw and only costs about $10 plus a variety pack of blades.http://www.amazon.com/Stanley-15-333-8-Inch-Folding-Pocket/dp/B00002X21U/ref=sr_1_6?ie=UTF8&s=hi&qid=1272725955&sr=1-6
Costco has the Crescent 211 piece toolset for $100 (in store not on their website). It’s this one http://www.amazon.com/Crescent-211-Piece-Tool-Set/dp/B002YEH47M. Add a hammer,saw,level, tape measure, and a drill and you’ll be ready to take on a lifetime of projects. You’ll never be intimidated by the words,"some assembly required" again.
- 136johnMay 1, 2010 at 11:44 am
A couple of additions: Get a set of metric sockets to go with your socket wrench if you intend to work on any imported car.
Get a wire-stripper if you intend to replace the occasional wall-switch.
Buy screw-drivers, both flat-bladed or Phillips, in sets with various sizes. Nothing assures ruined screw-heads like incorrect driver sizes.
Last, get a small bench vice for your basement or garage work bench.
Maker sure at least one of you pliers incorporates a wire-cutter.
- 137BigJohnMay 1, 2010 at 12:18 pm
I can’t believe what I am reading here about Craftsman tools. They were once a standard for quality, that is no longer true.
When they moved production to China, they also cheapened up on the metallurgy and heat treat. The result?
Ratchets used to be virtually unbreakable, truly lifetime tools. Now, Craftsman ratchets are no better than the Walmart knock-offs. What good is a lifetime warranty if you have to keep taking them back, only to get another inferior one? When I bought my last set and started having to take them back, the counter person would just drop the ratchet into an overflowing box of them under the counter and tell me to go get another one off the shelf. It’s just not worth it.
Craftsman screwdrivers are another example. They used to be the best you could get for daily use. When they moved production to China, again they cheapened up the metallurgy and heat treatment. The excellent design of the handle with the ball on the end was developed for the best ergonomic application of force with the best chance of preventing blisters on the palm. Unfortunately, Craftsman screwdrivers with this feature are total junk. The first time you try to tighten or loosen a stuck screw, the flathead screwdriver will literally twist at the end. The phillips screwdrivers are even worse. Once a phillips driver is ruined, it will thereafter slip in every screw it touches, ruining the screw so that even a quality driver won’t work. Craftsman sells stronger screwdrivers for more money, but not with the good handles on them. Once I even turned the handle down in a lathe to put the ball on the end after getting blisters.
Craftsman is a brand that was ruined by cubicle-dwelling corporate empty suits. The chinese products at Harbor Freight are better than Craftsman (Chinese manufacturers are bringing their quality up).
Always buy Crescent brand Crescent wrenches, Vise-Grip brand vise grips, and ChannelLock brand slip joint pliers. Anything else is almost guaranteed to be made of inferior steel, with geometry designed by someone that never uses tools. Like the guy who wrote the article. He doesn’t make a living using tools, that is obvious.
- 138JCroweMay 1, 2010 at 12:33 pm
A couple of things in response to previous posts. WD-40 was originated as a water displacement formula, hence the WD…..if you are looking for the best penetrating oil, have a look at Kroil, the oil that creeps. It’s a great penetrating oil and good for cleaning gun barrels. On tool quality, my experience with Chinese made tools has been pretty dismal, but I have a friend who only buys them because he loses stuff so rapidly. For my money, have a look at Snap-on….very pricy and very well made. My philosophy on tool buying is to buy for life so I am currently buying Festool power tools. They will last longer than my body hopefully. That said, I still have my original Craftsman tools from the early 70s and some from the early 90s. I can’t speak for more modern stuff. Avoid the big box stores unless you want a choice between different brands of Chinese made tools. There are some good sources of other than Chinese made hand tools like Lee Valley out of Canada. Fun article.
- 139kalidasMay 1, 2010 at 1:02 pm
First of all, a sink wrench. Though you might not need it often, it is very very handy.
I worked maint. for 30 years and rarely was seen without one of my personal favorites, the small Channellock. The # 412 ( 6.5″). Those baby’s are great, and if you have either the # 463 or # 483 as a companion, you’re one bad hombre.
Also, a tiger saw is perhaps the king of “luxury" tools.- 140J.B.May 1, 2010 at 3:26 pm
Save yourself money and space by buying a Greenlee or Kline all in one screwdriver, square driver, nut drivers. They have models that are hardened bits and you’ll have 1/4″, 5/16″, and 3/8″ nutdrivers, a #1 and #2 flat and phillips bits along with a #1 and 2 square bit. in the same space it takes to hold one screwdriver. I’d stay as far away from Craftsman battery powered drill/drivers as possible. There are good ones out there but that’s not the brand. The now have sorry gears(just saw a new one last less than six months). When you buy screws these days, almost anything you want comes in dual drive for using phillips or square drivers on. I prefer them to everything on the market. Nothing beats a square driver. Safety knives, get a folding knife like the Shefields that have much sharper blades than the old Stanley type. Keep a look out for a set of battery powered tools. I often see good buys on good brands of these that come with a rotary saw, reciprocating saw, drill/driver with or without hammer feature with built in level, impact driver, and light, all using the same batteries, generally 2-3 to a set. I don’t often remove my screw holder from my drill since it will allow you to drive 6″ screws without needing to hold them. I keep a1/4″ hexX3/8″ square drive converter to run in hex bolts and screws with my driver. Keep a tri-square(some are aluminum one piece and very inexpensive or an adjustable tri-square with level. A wonderbar that you’ll use for almost everything. Grab a multi-allen wrench set in standard and metric. I keep cheap ones I buy at Harbor-Freight for non-professional jobs and professional models for well, professional work. One tool I’d hate to be without that can do what no other tool can do is a Dremel tool. Too many uses to name. For those who drive a pick-up, remember, a good tool box or two can turn that vehicle into a rolling workshop. I could literally rebuild my engine on the side of the road if I had to. I keep a puller in my pickup that will take off everything from the steering wheel to the harmonic balancer. I always have a coffee can full of this and that, nuts, bolts screws that I can take the bottom out, cut down the side and use that and a 4″ hose clamp for a piston installer. I can remove the knick knack holders on either side of the seat in the ext. cab and have room under them for spare belts, electrical fastener and fuse kits, and just about anything else that isn’t heavy so it won’t dent the metal from the inside out although my GM pickup has a heavy rubberized insulation that keeps that from happening. Look around on your vehicle and you’ll probably find there are all sort of dead spaces in your console and rear compartments. When buying needlenose pliers, get some from an electrical supply and they even have #12 gauge wire strippers in them. Get a good pair of diagonal cutters, again, from an electrical supply and they’ll cut most anything including pulling nails and screws. Throw in one of those tool kits with sockets of both types, end wrenches, pliers and screwdrivers and whatever else might be in them and you’re never without tools. You can move them from one vehicle to another. My wife depends on these things as we live in a very rural area and you can’t count on someone coming down the road to help. A good .45 ACP is another tool that’s good to have in the console. I keep a 400 watt inverter in what ever vehicle I’m driving so I can operate practically any power tool. Magnetic torpedo levels are cheap and accurate and life-savers in a small package. I have found the new armored tape measures last longer and are easier to hold. Before cellphones, my wife was late and I was about to go looking for her when she drove in. She’d had a blowout on a front tire doing about 80 and went off into a pasture, miraculously avoiding hitting a tree or rock or hole. She said she’d would have still been there had it not been for the 4 way lug wrench I throw into every vehicle. It allowed her to hold on end and stomp on the other to break loose over-tightened lug nuts. It was a new car to her or that wouldn’t have happened since I use pure nickel anti-seize on exposed lug nuts and install them with a torque wrench. I use cap nuts on my pickups. Since I’ve been speaking of vehicles, I want everyone to know that there are new styles of batteries that do not cause corrosion on the cable, battery connection. Last year I replace a set of Optima spiral wound batteries on my diesel pickup that were 8 years old and one was still good. I never had to clean the connections since they don’t corrode. I also buy batteries with top and side posts so using jumper cables is an easy chore. Don’t buy jumper cables. Make your own. You can find insulated replacement ends for just this purpose. Use #4 or better yet #2 welding lead wire(very flexible and will last your lifetime). Use welding terminals to attach them to the ends and you can have as long a cable as you need. I got hemmed in by a vehicle with a dead battery and vowed It would never happen again. I bought 60′ of wire to make a set of 30′ cables I can boost off a vehicle behind mine with and they’ll roll into a small space since they’re made of very flexible wire. Just keep one thing in mind. When you see an exceptional price on a good tool you don’t have but have needed, buy it, you won’t regret it and tools are always good barter.
- 141Lewis R.May 1, 2010 at 4:42 pm
Glock 17. The only tool you will ever REALLY miss if you go without.
- 142Joe BobMay 1, 2010 at 8:39 pm
Hey all peeps, this is a great article on TOP TEN tools. Love the article! Yes, I have my next 5-10 fav tools – but remember, this is top ten: i.e. what I will get for my fatherless neighbor kid who keeps barrowing my tools. After the top ten, THEN we can add the next most handy tools, such as gator wrench ratchet, flatbar, wire stripers, et al.
keep up the good work
Joe Bob
- 143Eugene "A manly man"May 1, 2010 at 8:48 pm
Real men have a ratcheting screwdriver with assorted bits, an S&K 1/4 ratchet (very fine gears), thread files, dead blow hammer, pin and punch set, wire brushes (steel and brass), and a ratcheting wrench set.
- 144Remington PhillipsMay 1, 2010 at 8:49 pm
I have found that a small prybar/crowbar is invaluable for remodeling projects around the home. From removing old tile and cabinets to replacing windows, having the leverage of a prybar is an energy saver. Not to mention saving wear on other tools which might otherwise look tempting to use for prying.
- 145glaciermanMay 2, 2010 at 12:27 am
Roll of electrical tape…a must have. 1)Obviously to fix broken wires. 2)Most importantly, to tape up deep cuts to stop bleeding, and almost eliminate the need for stitches….while you finish the project!!
- 146SmittyMay 2, 2010 at 2:25 pm
A crowbar/prybar, and Sawsall
Funny article, one of the best performing Western companies in Communist China last year was Snap On tools, one of our most EXPENSIVE brands-while they export to us junk tools. .
- 147Granny MillerMay 2, 2010 at 2:50 pm
Where’s the WD-40?
- 148Jive DadsonMay 2, 2010 at 5:04 pm
I worked at a high tech robotics company where the chief engineer, a bona fide genius and all-round good guy, called WD-40 “slow drying glue."
More tools… Diagonal pliers and a good pair of sheers.
- 149CoinMineMay 2, 2010 at 8:59 pm
This is a great list, well a start…
…for beginners, anyway.AND some very wise posts in this thread.
Please allow me to note:
Only one person mentioned a welder!! (semi-genius)
Only one person mentioned a puller!! (semi-genius)
Only one person mentioned solder !! (semi-genius)
[Solder now in the US cannot have lead. The new stuff doesn't really work]NOBODY mentioned:
Basin wrench
Tap and Die set!!!
Drill bit sharpener
Hand Drill!!! (what will you do without power, eh?)
Drill bit extender
Deburrer
Pipe cutter
Metal detector
Metal (paint) scrapers
Rasp!!
hydraulic or scissors (or both) Jack
Block, tackle and pulley OR
House jack (seriously, you may need to lift a wall, or portion thereof, to repair a foundation)…and I won’t even start on about machine shop tools.
I have been gathering up tools for about seven years now at auctions, garage sales and estate sales. (I started basic house rehab as a side project). Above are really rather basic and essential tools, nothing fancy.
Essentially, there is very little quality stuff made in north america anymore. Almost anything I have bought from Asia in the past 10 years has been absolute garbage in fancy plastic packaging and a colorful label.
Thankfully for me I live in a town where the very old military base shut down. The government workers would often steal tools, entire shops actually, and bring them home. As the old men die off their foolish heirs sell the tools at a song.
Most of these tools made in Chicago, Cleveland and Detroit in the 1920s – 1940s STILL work (though many are long worn). I literally have broken ‘tools’ recently bought at Home Depot, Harbor Freight, Sears etc upon first usage!
Some of the older tools I have I don’t know their usage, and I still can’t find anyone who knows. I have PERSONALLY witnessed, moreover, 10 different men try to repair a (semi-large) boiler made in the 1960s; nobody could fix it. Not only are decent tools getting scarce, but the *industrial knowledge base* is now fading.
Wish I had better news here. The bright side is some industrial arts co-ops are starting to form, to teach these lost crafts/arts.
Bottom line: Stock up NOW. Get prepared. Some of these tools are starting to become rare, and even basic tools of high quality are getting scarce in some series.
- 150Al SledgeMay 2, 2010 at 10:02 pm
I’ve been spoiled after collecting tools for over 40 years. The basic ones suggested are good except for the battery drill. The batteries will last maybe two years but replacement batteries are about the price of a new tool. A corded drill is better, but even better yet a corded hammer drill. Unless you use tools for a living (which you likely do not if you are reading this) but a cheap Chinese hammer drill. Then buy your extra tools as you need them. Wrenches should be quality, but the Chinese are getting better. Today I have a metal lathe, miling adapter, drill press, heavy welder and literally tons of tools. My neighbors call my house “man land", but my lady friends aso come over to use or borrow tools. I eventually bought my wife, daughters, and sons their own tools so they would stop misplacing mine!
But the best tool we have is the one between our ears.
- 151kitMay 3, 2010 at 12:53 am
For good quality made in usa or uk, germany or even japan these days, get ‘m at a flea market or garage sales.
Also, a full roll of duct tape is a good substitute for a rubber mallet.- 152LynMay 3, 2010 at 1:11 am
Well, fellas I’m a woman with a tool box and I definitely would add a sawzall., aka reciprocal saw. You can cut wood or metal with it, cut the screws with the stripped threads you can’t get out, cut holes in the wall, even prune trees with it. (There are cordless and corded models)
You manly men might prefer hand tools, but having the bulk of my strength between my ears, I prefer to let the motor do the heavy lifting. And speaking of lifting, a set of pipe clamps and pieces of pipe of various length and some ratchet straps. With the pipe clamps, the clamp pieces are bought separately; you slide them onto regular metal pipe from the plumbing section of your hardware store. These are powerful and can be used to hold pieces of wood together or apart – some types can be flipped around so they push outward instead of press inward and keep things in place until you can screw or nail it – works great to force warped wood to flatten. The ratchet straps are sold as tie downs for moving loads, and of course you’ll have to get your supplies home from the lumberyard. But they have another great function, as a gluing clamp for furniture repairs where you need strong pressure on irregularly shaped objects. For example, the other night I was lying on my old arts and crafts style sofa when I heard a crack! One of the doweled rails had popped out of the side frame. I got my carpenters glue and ratchet strap, and wrapped that puppy around the frame so that everything would pull together and dry in the right place and left it overnight. Voila! The nylon webbing didn’t harm the pretty oak finish.
Everyone should have a toolbox and know how to use it, manly or not.
- 153ErichMay 3, 2010 at 1:22 am
A plumb-bob. If you’re getting a level, you may as well have this too.
- 154DeeDeeMay 3, 2010 at 4:13 pm
Geez, what happened to the pipe wrench, tin snips, pry bar/wrecking bar and allen wrenches???
- 155KirbushMay 3, 2010 at 9:52 pm
I agree with the pipe wrench. A friend once told me, if you have to borrow a tool more than once a year, you should buy your own. Tools make a great investment. Personally my favorite tool is my backhoe.
- 156Ben GedaleciaMay 4, 2010 at 12:35 am
You can get all the tools mentioned for about 30 bucks in any of the weekend flea markets. Craftsman tools should always be bought on sight used, as they will last forever
- 157J.E.ChapmanMay 14, 2010 at 11:47 am
Those of us who own fire arms also should have a good set of hollowed growned screw drivers,my spelling may be wrong,but these screw drivers are a must when working on guns as the screws are different from your average standard screw.
- 158DougMay 16, 2010 at 5:31 pm
Disclaimer: I am spoiled – I grew up in and now I own a hardware store – I have used more tools than most people will ever see – After over 50 years using various tools for various purposes I have an advantage over all but a very small percent of the population.
That stated, the pictures in this article are with only two exceptions the worst examples of tools I can imagine. They look like used things you would find in some third world country.
Good grief! A claw hammer from a kiddie tool set? Screwdrivers so worn out you can hurt yourself? A tape measure that looks like the blade was run through a stove pipe crimper? An adjustable wrench that obviously was damaged by the use of a “cheater bar"? Needle junk pliers? Older clunky cordless drill? An assortment of obsolete utility knives?
There are literally thousands of tools in the modern world. To select only a dozen as the correct or basic set is pretty narrow thinking.
Then all the yardsale experts weigh in on when, where, what and how to buy tools…That’s real comedy!
I maintain that tools and the ability to use them are an indication of how any given society is doing. Ours is in a race to the bottom with the WD-40 & duct tape doofuses leading the way.
- 159JGAugust 3, 2010 at 3:23 pm
You need a brace and bit. this is like a cordless screwdriver, but without the battery. It uses pure manliness to bore holes.
You need a hacksaw. You may want to cut some metal.
You need a square or maybe two. I use one with the sliding metal ruler and the level vial.
You need a vise. this holds your work still. while youre at it, a set of clamps is a good investment.
You will need files, rasps, and a plane. these are for shaping wood and metal.
- 160MatthewOctober 10, 2012 at 2:15 pm
Nobody mentioned a pencil. Monumentally useful for accuracy.
- 161JeffOctober 19, 2012 at 7:35 pm
How about a pen sized flashlight when you need both hands to fix something in the dark or where light doesn’t reach.
- 162TarzanOctober 28, 2012 at 7:44 pm
Excellent list. Ear plugs and a respirator with changeable filters (for dust and fumes) is a good thing to have too. An oscillating saw is good for trim work, and a powered orbital sander will also come in handy. Cordless stuff is nice, but all it takes is a dead battery to put you behind schedule.
- 163Jim K.November 2, 2012 at 3:26 pm
Anybody have any suggestions on a good toolbox to hold all these tools? Something basic and bombproof like the old metal Craftsman toolbox my Dad has owned forever –padlocking hasp, one metal removable tray, no drawers, no plastic. i want to give my 12-year-old son his first toolbox for Christmas. Not impressed with what I’ve seen online so far.
- 164BillNovember 8, 2012 at 2:48 pm
@Jim K Just bought a Stack-On toolbox from Amazon. http://www.amazon.com/Stack-On-R-420-20-Inch-General-Purpose/dp/B000I0ZX3Q/
20 in., steel construction. Best of all, still made in the USA. A bit pricier than the cheap plastic stuff but this box should hold up well.
- 165DeLeonNovember 20, 2012 at 12:18 pm
I’m shocked I haven’t seen it yet. An old (Stanley or Older) Yankee driver of the 130-A spring return ilk, with a flat, phillips, 1/4 socket, 1/2 drive tip. I still use mine almost every day. I have bigger (131) and smaller ones. I can get it in areas a cordless will get bogged down in, and never needs recharged. They are made to such a standard, you just don’e realize that most are over 50 years old. They are real pieces of quality craftmanship. You can get these at Yard Sales and/or Flea Markets for under 10 dollars, the bits harder so to find, but e-bay always has a list, and some sights have tutorials on how to make your own. Millers Falls made one for Sears which will take the same bits.
- 166MikeNovember 25, 2012 at 12:58 pm
You forgot duc-tape and WD40
- 167DanDecember 30, 2012 at 9:02 am
An often overlooked tool is the square. If you don’t want to lug around a full-sized one, they also make speed squares that are about 1/4 of the size and cost about $3. Very rarely do I work on a project in which a square doesn’t come in handy.
- 168mcJanuary 7, 2013 at 8:40 pm
16 lb sledge hammer (Council Tool) – who needs a jack hammer when you have this bad boy…
Wheelbarrow (Sterling), shovel, garden hose, bag of lime, bag of washed sand, bag of portland cement…make your own mortar; while you’re at it, you’ll need a masonry trowel and a slicker…ahh masonry, the lost art…- 169MItchFebruary 15, 2013 at 10:09 am
You can still buy the old “Yankee" type drivers here: http://www.garrettwade.com/garrettwade-push-drill/p/69P01.01/
I EDC a Leatherman CORE and an Energizer 1-watt LED (1-AA) flashlite (added a leather loop to my Leatherman pouch) EVERYWHERE except to bed or in the shower.
Gotta have cable ties / tywraps in various sizes.
A 50/50 blend of acetone and ATF (automatic transmission fluid) is the BEST penetrating solution currently known to man.
- 170LayneMarch 5, 2013 at 9:47 pm
Line Pliers. Carry mine with me every where I go. A guy can do a lot with just a pair of jimmy’s.
- 171ChrisMarch 9, 2013 at 2:37 am
WD-40 does not contain fish oil. Go to their website, here is a quote from the FAQ:
Myth: WD-40 contains fish oil.
Fact:
Consumers have told us over the years that they have caught some of the biggest fish ever after protecting their fish hooks and lures with WD-40. We believe this legend came from folks assuming that the product must contain fish oil since it appears to attract fish. Sorry Charlie®, it just ain’t so.WD-40 Company has taken steps to respect and conserve the environment, and encourages its users to do the same. While WD-40 can be used to help protect fishing equipment from rust and corrosion, WD-40 Company does not recommend using WD-40 to attract fish.
- 172KaylynnMarch 19, 2013 at 12:07 pm
It is very good! When i was looking for stuff in here for my school project i used this for it!
Thanks,
Kaylynn Billie- 173ChrisMarch 24, 2013 at 2:07 pm
All of these tools are great and essential for any workshop, but I don’t carry around a socket set and screw gun in my toolbox. They are too damn big and heavy to carry everywhere. May I suggest a list of essential tools that can be carried in one small box.
Paring down to the necessary is a very manly skill, indeed.
- 174Narin CApril 12, 2013 at 8:15 am
Really great list, I’ve got most of these tools in my box already. Nowadays, I would have to add torx bits for socket wrenches since they seem to be everywhere now. That and a quality Cordless Dremel would let you tackle any work imaginable.
- 175Jeremy HarklessApril 12, 2013 at 11:48 pm
Black & Decker, Stanley, Milwaukee, Ryobi, DeWalt, Makita, Robt. Bosch,… What about a regular carpenter’s pencil?
- 176juliaApril 13, 2013 at 4:36 pm
Great list… I’m not a guy, but I have most of that in my toolbox. Love the suggestions in the comments too! Need to work on getting the rest of it, and then hide it from my dad :)
- 177Michael S.April 25, 2013 at 3:52 pm
Everyone missed a pair of side cutters.
- 178E.A. BurtJune 4, 2013 at 9:47 pm
I’m a younger guy getting into the world and I got myself a Leatherman wave a little while ago to start off my tool collection as the flagship tool, along with a can of WD-40 and a roll of duct tape for a little ceremonial effect with a Stanley tool bag. It feels like officially entering manhood when you begin your tool collection. This list is a good help for my next targets. Thanks much Brett.
- 179MikeJune 19, 2013 at 12:23 pm
Did someone already say ‘Junior Hacksaw’? A simple inexpensive tool that can sort a lot of problems. Get the old style bent metal type you have to spring the blade into, not the ones like a scaled down standard hacksaw.
- 180EliJune 26, 2013 at 12:19 am
No hacksaw and no bastard file? C’mon!
- 181TroyJuly 4, 2013 at 8:21 pm
I keep a pair of mechanics gloves and foam knee pads in my tool kit and automobile just in case I need to change a tire. The gloves also protect my hands from my sander and helps with my grip on certain items.
- 182Chris HJuly 28, 2013 at 10:38 pm
I just bought a really nice rolling tool chest because my boxes of tools have finally got out of hand. I liked your article, but was wondering if there was any particular order to what drawer gets what tools?
Thanks!- 183AdamAugust 6, 2013 at 11:21 am
The single most valuable tool? A prybar… get enough leverage and you can rotate Earth.
- 184AdamAugust 6, 2013 at 11:23 am
Also, who needs multitools? Get yourself a badass, well made folding knife. I got myself a Cold Steel Recon 1 tanto blade that I carry with me everywhere I go. I use that for damn near everything. Hell, I use it as a little pry bar when needed.
- 185SCRRRAugust 13, 2013 at 1:10 pm
wd40, ductape, a small hand whisk broom, sharpie or carpenters pencil
- 186lightnin'September 18, 2013 at 2:22 am
bic lighter, good multitool, flashlight.
Leave a Comment
Name *
E-mail *
Website
Previous post: Every Man Needs a Man Mentor


Posted on October 16th, 2013
How to Use a Wrench | Your Ultimate Guide to Wrenches | The Art of Manliness


Toolmanship: Your Complete Guide to Wrenches
by Brett on March 5, 2013 · 83 comments

It’s been three years since the last post, but welcome back to our Toolmanship series! The goal of this series is to teach the very basics of tool use to those men who never got around to learning how to be handy when they were growing up.
In this edition, we turn our attention to wrenches (or spanners for our readers who use British English). They’re an essential tool to have in your toolbox and are used to tighten and loosen nuts, bolts, screws, and pipes. Below we’ll take a look at the most common kinds of wrenches and how to use them.
General Wrench Use Guidelines
Select the right wrench size for the job. To avoid damaging your fastener or yourself, always select a wrench jaw size that corresponds to the fastener you’re tightening or loosening. Also, make sure your wrench’s jaw is in complete contact with the fastener before applying pressure. These two things will go a long way in preventing your wrench from slipping and you swearing about a bruised knuckle.

When using a wrench, it’s best to pull (see left image). If you do need to push, use the heel of your hand. That way if the wrench slips, you won’t bark a knuckle.
Pull, don’t push. When using a wrench, you typically want to position yourself so that you pull it instead of push it. This ensures you don’t bark a knuckle whenever the wrench slips off the fastener. If you do need to push a wrench, use the heel of your hand, that way if the wrench slips, you won’t hurt yourself.

Don’t use a “cheater bar" to gain more leverage. You risk damaging the tool or injuring yourself. If you need more leverage, get a longer wrench.
Don’t add more leverage with pipe. You may have seen your dad put a longer piece of pipe over his wrench to gain more leverage when tightening a fastener. You should avoid using “cheater bars" for several reasons. First, they can damage your wrench by bending the handle or jacking up the head. Second, because of the added torque you get with the extra leverage, you risk rounding your fastener if you don’t have the right wrench head for the job. Finally, there’s a chance the cheater bar will slip off the wrench’s handle while you’re turning, causing harm to you or others. If you need more leverage, use a longer wrench. If you have a particularly stubborn fastener, apply some penetrating oil (like Liquid Wrench) to the thread, wait a few minutes, and then try loosening.
Don’t hit a wrench with a hammer. Unless you have a special “strike face" wrench that’s designed for being hit with an object, don’t take a hammer to your wrench in order to get more power to turn a stubborn fastener. You risk damaging your wrench.
Don’t use a damaged wrench. If the handle is bent or the jaws look wider than they’re supposed to be, don’t use it.
Buy quality wrenches. Good wrenches last longer; cheap wrenches slip more easily. Personally, I’m a Craftsman fan. They’ve got a lifetime warranty on all their hand tools. If a wrench ever bends or breaks, you can take into a Sears or Ace and they’ll replace it for free, no questions asked (some sales associates might give you guff). I don’t have any affiliation with Craftsman whatsoever — it’s just what I use.
Types of Wrenches and How to Use Them
Adjustable Wrench aka “Crescent Wrench"

This should be your first wrench you buy if you’re just starting your tool collection — one big and one small. An adjustable wrench has one fixed jaw and one adjustable jaw which allows you to use it on a wide variety of fastener sizes. The jaws are typically smooth and flat and designed for gripping square and hex nuts. The head of a crescent wrench is usually angled at 22 1/2 degrees to the handle so that the wrench can be flipped over to provide two different gripping positions in tight spaces.
How to Use a Crescent Wrench
While a crescent wrench is designed so that you can apply pressure on both the fixed and movable jaws, ideally the bulk of your work should be done so that pressure is only applied on the stronger, fixed jaw. Too much pressure on the weaker, adjustable jaw can cause the wrench to break and you to bark a knuckle. When placing the wrench on your nut, the adjustable jaw should be located on the side towards which the rotation is to be performed. This puts the pressure on the fixed jaw. Below is a nice little illustration showcasing this method:

Also, when you place your crescent on a bolt or nut, make sure the adjustable jaw is snugly adjusted to the nut or bolt in order to prevent the wrench from slipping and rounding the nut or bolt.
Open Wrench

An open wrench is a nonadjustable wrench that comes in a variety of sizes. You usually buy them in sets (in both metric and standard SAE sizes), though you can buy them individually if you want. There are a few advantages that open wrenches offer over adjustable wrenches. First, because both jaws are fixed, you don’t have to worry about breaking an adjustable jaw. Second, they’re really handy to have when you’re tightening and loosening a bunch of nuts and bolts of the same size because you don’t have to readjust anything whenever you put wrench to bolt. Makes tightening and loosening much faster than with an adjustable wrench.
How to Use an Open Wrench
Select the right size open wrench for the nut or bolt you’re loosening or tightening. Reposition the wrench on the fastener after each turn.
Box Wrench

A box wrench has an enclosed opening that looks like a ring. The enclosed opening minimizes the risk of damaging your fastener. This kind of wench is typically used on heavy-duty jobs. Box wrenches usually have a six-point or twelve-point recess and are best used on hex-head fasteners. The twelve-point recess allows you to change the position of the wrench on the nut with only a small handle movement. Some box wrenches have an offset handle which allows for knuckle clearance over obstructions on a flat surface. You’ll also find box wrenches with a ratcheting mechanism which allows for more efficient tightening and loosening.
How to Use a Box Wrench
Not much to it. Select the right size opening for the nut or bolt and start tightening or loosening. Reposition the wrench on the fastener after each turn.
Combination Wrench

You’ll typically find open and box wrenches on the same tool in the form of a combination wrench. One end will be the open-end wrench; the other end is the box wrench. Both ends generally fit the same size nut and bolt.
Socket Wrench

When you’ve got a lot of fastening to do, it’s time to put aside the crescent or open-end wrench and reach for their more efficient brother, the socket wrench. A socket wrench is a hand tool that has a ratcheting mechanism on the head which attaches to various size sockets via a square nub. You can buy sets of sockets that fit every conceivable fastener size (metric and SAE). If you’re just starting your tool collection, buy a socket wrench with a 3/8-inch-square driving mechanism and a socket set with mostly six-point hex sockets — the twelve-point variety can damage nuts and bolts if you apply too much torque.
The biggest benefit of a socket wrench is the ratcheting device. The ratchet device holds in place when you pull in one direction and releases when pulled in the opposite direction. This allows you to quickly tighten a fastener without having to remove and refit the wrench after each and every turn.
The long ratchet handle provides you some nice leverage so you can get plenty of torque to loosen and tighten a bolt or nut. If you need less torque, use a nut driver (see below).
How to Use a Socket Wrench
Make sure to get the right size socket for your fastener. Because a socket wrench provides so much torque, it’s easy to round-off a nut or bolt if it isn’t the right size.
Nut Driver

A nut driver looks sort of like a screwdriver, but has a socket wrench on the end. They’re typically used when less torque is needed when tightening or loosening a nut or bolt.
Allen Wrench (aka Hex Key)

You’ve probably gathered a nice collection of allen wrenches if you’ve bought furniture from IKEA. They’re those small little hockey stick looking things that come with all the hardware for your bookcase. Allen wrenches are used on screws and bolts with a hexagonal socket in the head. You can buy a set of allen wrenches in a variety of sizes to match any job you may encounter. My set of allen wrenches has come in handy more than I thought it would. I’ve used them to change out rollerblade wheels for Kate and on a bunch of projects for Gus.
Pipe Wrench

Pipe wrenches are used to tighten and loosen threaded pipes as well as for killing unsuspecting socialites in a spooky mansion’s conservatory. A pipe wrench is an adjustable wrench — the top jaw moves up or down — and has toothed jaws for gripping onto pipe. The jaws on a pipe wrench are designed so that the top jaw (aka the hook jaw) rocks a little bit in the frame of the wrench. Whenever you apply forward pressure on the handle, the top and bottom jaws come closer together.
Pipe wrenches come in different sizes and are measured by the length of the handle. A 14″ pipe wrench will suffice for most household plumbing work. RIDGID is known for their quality pipe wrenches.
How to Use a Pipe Wrench

Choose the appropriate size wrench for your job. When placing a pipe wrench on the pipe, you want to maintain a small gap between the pipe and the back of the hook jaw. Allowing the back of the hook jaw to come into contact with the pipe reduces the gripping action of the wrench. A one-half-inch gap between the pipe and the back of the hook jaw will do the trick.
Because of its teeth and strong grip, pipe wrenches can leave marks in whatever you’re tightening or loosening, so don’t use a pipe wrench on your nice plumbing fixtures. Save them for when you’re working under the sink. Also, you shouldn’t use a pipe wrench on nuts and bolts. You’ll damage the fastener.
A Wrench Set That Will Cover Pretty Much All Your Needs

If you’re looking for a wrench set that will cover most of your needs, you can’t go wrong with the Craftsman 154-piece Mechanics Set. My in-laws got me this for Christmas the year we bought our house. It’s a giant, amazing box filled with every conceivable socket you’ll ever need (in both metric and SAE sizes), ratchets in 1/4, 1/2, and 3/8-inch drive sizes, 12 combination wrenches, 21 nut driver bits, and 22 allen wrenches.
This is a great Christmas, groomsman, of housewarming gift for a young man.
Further Reading:
Toolmanship: Screwdriver
Toolmanship: Handsaw
Toolmanship: Hammer


{ 83 comments… read them below or add one }
- 1allswaggaMarch 5, 2013 at 9:54 pm
Solid article! — Rule of thumb never buy cheap tools.
- 2Nick P.March 5, 2013 at 10:03 pm
Brett, I am happy to see the return of this series! It is amazing how many younger guys are not fortunate enough to grow up in an environment that allows them to learn about tools and how to fix things. The amount of money I have saved through doing some of my own car repairs, maintenance, and around the house stuff is amazing. The best part is the feeling of manly satisfaction that comes from using a great tool to do something with your own hands.
- 3JudeMarch 5, 2013 at 10:25 pm
No mention of torque wrenches! I appreciated reading this, I recently built a wrench collection organically without putting much particular thought into it, which is probably how most people get their tools. If I don’t have the appropriate tool, I’ll get one (or if it’s a one-time thing I’ll come up with something else).
- 4JacobMarch 5, 2013 at 10:43 pm
damn good article. much appreciated as i’m a big fan of the crescent wrench, not only for its usefulness, but also because my hometown is their hometown, too!
- 5ChattyMattyMarch 5, 2013 at 11:50 pm
Unless you’re working with 4-sided nuts, a crescent wrench’s only REAL use is as a last ditch self-defense weapon-the bigger the better. If you need a certain size wrench once, buy it, you WILL need it again someday.
- 6PedroMarch 6, 2013 at 2:40 am
It’s worth mentioning that Craftsman hand tools don’t have a lifetime warranty, they have a FOREVER warranty, as in, no need for proof or purchase, if it says Craftsman on it, and it breaks, return it and you get a new one. If you find a broken Craftsman wrench in your Grandpa’s attic or at a yard sale, you can send it in for free replacement.
Power tools and some special /precision tools have a different warranty, but all your standard tools (wrenches, screwdrivers, hammers, etc) are covered. That alone put them miles ahead of other brands in my book.- 7DanoMarch 6, 2013 at 6:16 am
a rule of not using a cheater bar or pipe is absurd. if you’ve ever worked on a car in a region where it snows, there will be nuts and bolts that will come off no other way. buying a 36″ long wrench for one bolt or nut is just asinine. Perhaps you should cover how to safetly and properly use a torque enhancing addition instead of just saying “never".
- 8simonbMarch 6, 2013 at 6:23 am
Good article. I grew in a single parent family where money was sometimes tight, fixing things yourself was par for the course. It did lead to self-learning a good set of practical skills, such as learning how to use tools by building my own bicycle from a couple of old ones and a box of parts given by a neighbour. Still good to tune up those skills by reading something like this.
- 9PatrickMarch 6, 2013 at 6:34 am
I’d love to see you strip a car down without going for a breaker bar at least once!!
- 10ChrisMarch 6, 2013 at 7:14 am
Slight word of warning about the Craftsman tool return policy – not ALL of their hand tools are elligible for the free replacement. My wife wanted a set of screwdrivers for her craft toolbox, so I was looking at some Craftsman with “ergonomic" (read cushy) handles. In vers small print on the card it mentioned that these had a limited warranty. She wound up getting the plain handled drivers with the lifetime warranty. Read the fine print!
- 11Ray CorkranMarch 6, 2013 at 7:20 am
Growing up I was always wrenching on something, pedal bikes, dirt bikes, neighbors go-karts then onto old Jeeps and Air-cooled VW’s. Taking it for granted that everyone knows how to use basic hand tools and some specialty ones. Older and wiser (did I really just say that?) I realize that not everyone had a mechanically handy roll model in their life, such as a father, cool uncle or neighbor to watch and learn from. While this article is basic for many, it’s enlightening to many more… Well done!
- 12KevinMarch 6, 2013 at 7:24 am
Love reading these types of articles but besides the rule of never using a “cheater" bar, I have one disagreement I feel even more vehemently about. And that is to buy an adjustable or Crescent wrench first. While these are fine for small, around-the-house jobs, they should never be used on anything that requires any amount of torque and they should never be relied upon as a first choice for anything. I have actually thrown them away after seeing people using them for the wrong job. The tool along with its misuse is the prime culprit in rounded nuts and bolts. Money is better spent on a basic set of combination wrenches. Skip the adjustable garbage.
- 13Dustin InksterMarch 6, 2013 at 7:49 am
I have a Craftsman set similar to the one above, and I’d recommend to anyone who owns one to make it a personal mission to keep up with all the pieces and make sure each is returned to the specific slot where it goes. If, heaven forbid, you lose a piece, immediately purchase a new one to replace it. Make keeping it in order a big priority. It will increase your confidence in your ability to handle tasks if you know that you will have everything you need where you can easily find it.
On the issue of cheater bars, I am inclined to agree that some tasks would be tough without them. Still, I would argue that going for one should only be a last resort after you have completely run out of liquid wrench, PB blaster, and WD 40, and even then, only when you are wiling to potentially sacrifice that tool.
- 14AleksMarch 6, 2013 at 7:57 am
There are things to cut costs on……..tools aren’t one of them! Great point.
It’s useful to know how to use a cheater bar, but also know when enough is enough. On the farm I’ve used breaker bars countless times but it’s always to loosen NEVER to tighten.
- 15RichMarch 6, 2013 at 8:04 am
It should be noted that “Crescent" and “Allen" are brand names that have become synonymous with the tool.
Also, an adjustable wrench – or Crescent wrench – should be your LAST tool of choice. The very nature of the adjustable jaw allows for movement and slippage. It’s a light duty tool, at best, for when the fastener doesn’t require much torque. You’re always better off with a wrench sized specifically for the fastener.- 16EricMarch 6, 2013 at 8:04 am
A caution with box-end wrenches: They can “stick" onto the bolt head, especially if you’re fudging the size a bit. I lost a part of a tooth when the wrench suddenly “let go" of the bolt when I was trying to reposition it. If you have to apply a force, think about what will happen if your force is suddenly unopposed. I was pulling a wrench directly toward my face, and shouldn’t have been surprised when it hit me in the mouth.
Another thing, some deep-well sockets in common sizes are handy. I think I’ve run into more situations where I needed a deep-well then situations where I needed to fit a socket into a smaller space.
Finally, a socket adapter for a (second-hand) bit brace is a handy add-on, as is a socket adapter for a power drill.
- 17MikeMarch 6, 2013 at 8:33 am
I was just explaining to someone this weekend about how it’s important to not buy crap tools, because if you take care of them they will last a lifetime. I have a few of my grandfathers tools, which also bare the Craftsman logo. I just wish they were still made in the US, but isn’t that everything these days.
Patrick: Craftsman sells breaker bars, theirs are okay to use!
- 18DavisDMarch 6, 2013 at 8:38 am
Craftsman tools may be a great starting point for someone who is just beginning or for very infrequent home/garage use. They are also one of the most readily available items on craigslist so save some money and don’t buy them new. Everyone has different preferences though. For myself, and perhaps any legitimate garage or industrial application the word “craftsman" doesn’t exist. This could lead to a rather in depth study but I just want beginners to be aware.
- 19NathanMarch 6, 2013 at 8:40 am
It’s always a great idea to get a breaker bar. If you have a couple of adapters then a breaker bar should serve you well in getting extra leverage you need. It sure makes changing the oil on your car a lot easier.
- 20Arlen PayneMarch 6, 2013 at 8:42 am
We recently had some young men on our property to do some light work that involved taking down a swing set. I was amazed at how many of them did NOT know how to use either a wrench or a screw driver, it was sad to watch. Now, when it came to video games, they all had it down.
I also love craftsman tools, though some of the new ones are not a dependable as the old ones. Can’t beat that warranty for sure.
- 21Justin MorkenMarch 6, 2013 at 8:54 am
Good article, but I also came to say that the ‘never’ clause for breaker bars is silly. They have their place. Go to any auto-shop and you’ll find a breaker bar in their arsenal. Some nuts will come off no other way.
- 22Wim BoereeMarch 6, 2013 at 8:55 am
Good article, enjoyed the read, though I was familiar with the wrenches before, since I fix my own bikes and restore motorcycles (as a hobby).
- 23Brett McKayMarch 6, 2013 at 9:11 am
There’s a difference between a breaker bar and cheater bar. Breaker bars are designed for sockets to loosen particularly stubborn nuts and bolts; a cheater bar is just a random pipe you put over the handle of any wrench (adjustable, socket, box) to give you extra leverage. The former is safe; the latter not so much.
- 24ArpMarch 6, 2013 at 9:36 am
ChattyMatty’s got the idea…..at work, we use a different term for the Crescent wrench – the Universal Nut Rounder! Seriously, though, it does come in handy on very large items, for example 1″ and larger pipe fittings, where you don’t want to break out the monkey wrench.
Re: cheater bars and the Craftsman warranty. Maybe you can see where this is going……..
,,,I was trying to get a smallish bolt out of a vehicle using a 20-inch long breaker bar, and Craftsman 1/2 to 3/8 drive converter. After plenty of PB Blaster, and even a few applications with the torch, I finally opted for a 3 foot long cheater bar. I sheared the drive converter in half. Went back to Sears, and got a new one, and within 5 minutes, I sheared it again. Went back the next morning and got another one. Finally, I borrowed an impact wrench from work, and got the bolt out. Yay Craftsman warranty!
- 25Matt "Hype Mann" HerrmannMarch 6, 2013 at 11:23 am
I have to agree with the rule to never buy cheap tools. Paying the extra money for a great set of tools will save so many headaches over the long run. Along with that, an 18″ breaker bar is essential in any tool box. Especially if you’re working on anything that’s lived for more than five minutes in the “rust belt."
I do have to disagree with the advice in the “cheater bar" section. Sometimes a cheater bar is a necessary evil, and I’ve had stuck bolts laugh at penetrating oil. The issue is when the nut or bolt has rusted, or the wrench is the wrong size.
How about an article on loosening rusted bolts?!
- 26Steve CMarch 6, 2013 at 11:36 am
I say 6 point box wrenches or a six point socket unless there’s a reason they cannot be used.
Open ended wrenches should only be used where it’s impossible to get a closed head on it.
- 27Jim CollinsMarch 6, 2013 at 12:01 pm
Esteemed Readers, Brett, and Kate,
A note on romance: While I was courting my wife she decided I was the guy when I welcomed her to use my tool set. Neither her father nor her first husband would have dreamed of it. She and I share a love of tools of all sorts as an expression of an esthetic value – form proceeds from function.
She looks good greasy and cleans up nice.
Jim Collins
- 28GaryMarch 6, 2013 at 12:01 pm
I think the section on pipe wrenches was a little unclear, though the illustration gets it right. You want to be sure that the back of the hook jaw does come in contact with the pipe as you apply forward pressure. As mentioned, this pressure brings the jaws closer together, effectively squeezing the pipe. If the pipe is not touching the back of the hook jaw, you run the risk of squeezing and deforming the pipe, smashing it into an oval shape. Allowing the pipe to come into contact with the back of the jaw prevents that outward pressure from damaging the round shape of your pipe.
- 29Jacob MorganMarch 6, 2013 at 12:20 pm
Agree with not buying cheap tools. The best source I’ve found for top notch tools is harryepstein.com. It is a tool store in St Louis that specializes in high quality tools, especially American made tools. The origin of each product is in the description. They also carry new old stock, closeouts, etc. They sell mail order and the couple of times I’ve bought from them it was a good experience.
Regarding cheater bars, once had to use a five foot gas pipe on the end of a 3/4″ breaker bar. It happens. Just make sure no one is in the way.
- 30Captain AmericaMarch 6, 2013 at 1:05 pm
I’m surprised these kinds of items need to be on the website.
I guess children aren’t being taught this stuff. Why not?
- 31Matthew W.March 6, 2013 at 1:09 pm
Thanks for the tip about the crescent wrench and its adjustable jaw. No one ever told me that before.
- 32ArielMarch 6, 2013 at 2:30 pm
Very useful article!
- 33Matt JohnsonMarch 6, 2013 at 2:46 pm
Are there any good American made wrench sets? I’ve been trying my best to avoid buying Chinese made products now for years.
Regards,
Matt
Minneapolis- 34Joel MMarch 6, 2013 at 3:12 pm
I know this is general tool use but I’ve heard from friends who have taught me how to work on my car that you don’t want to use adjustable wrenches because as they get older they loosen up and will round your fasteners. I prefer snap on or matco tools to craftsman.
- 35ChristopherMarch 6, 2013 at 4:14 pm
Best wrenches or spanners (Australia term) is Stahlwille better than Snap on. Used in the aerospace industries.
http://www.stahlwille.com.au/industries/apprentice-tools/Cheers!!!
- 36Pat RMarch 6, 2013 at 4:36 pm
A wise man once told me:
“You buy the tool, the job is free"It might be nice to get into the pros and cons of 12 point vs 6 point rather than go on about crescent wrenches. That being said, make sure you buy the metric crescent wrench, too ;)
One word on stuck/rusty fasteners: If it ain’t budging, don’t risk rounding it off unless you have the RIGHT tool! If I have a nut that is rusted on and I can feel it about to round off, I’ll reach for the Snap-On before the Craftsman. There is a difference, not much, but it is there.
If you have time, spray some PB Blaster (or true penetrating oil of your choice – NOT WD40) on the nut and let it sit a day or two. Spray a little more on right before you try to bust it off. A little heat doesn’t hurt, either.
When I know I’m starting a big job the next day, I’ll pull a car in and soak the nasty looking bolts in PB Blaster overnight. Makes the disassembly the next day a breeze.
- 37zev goldmanMarch 6, 2013 at 5:12 pm
I will not buy Craftsman tools anymore since they are now made predominately in China with some being made in a large number of other countries.
They are not the tools they once were and with Sears Holding Company being forecast as a strong bankruptcy candidate this year the warranty could soon be worthless.- 38PhilMarch 6, 2013 at 5:31 pm
I’d say that a kit like the one above would be about 95% of everything you need for basic maintenance on most cars.
Motorcycles throw a wrench in things (pardon the pun) by always needing one size larger wrench or socket than your kit (*any* kit – this is a universal truism) came with.To round out the kit, I would add:
1) a set of T-handle allen/hex keys – these are a LOT faster and easier to use than the L-shaped ones unless there’s no vertical clearance around the screw.
2) a set of Torx and allen/hex socket adapters. Very very handy.
3) the location of your nearest hardware store with bulk fastener bins. Great for replacing the screw you stripped out or the nut that you dropped down the drain.And as a tip for non-tool-people, the 1/4″ socket will hold all of the interchangeable screwdriver bits that come with your kit (not as tightly as you’d like, but enough to work if you’re careful and patient).
- 39PhilMarch 6, 2013 at 5:36 pm
Also: do not be tempted by cheap hand tools from Harbor Freight.
Those are the tools you buy to lend to your neighbor so they will stop borrowing tools from you.
Those are the tools that you buy because you will need to use them ONCE and do not care nor expect them to survive the use.Go shop around your local pawn shops some Saturday if you need cheap tools. Sure, they’re probably all stolen from some poor guy’s garage (my dad started engraving all of his to make getting them back from the pawn shops a lot easier), but they’re likely better quality than what HF has.
- 40dead_elvisMarch 6, 2013 at 7:09 pm
Regarding thoroughly stuck/corroded fasteners – give ‘em a shot like you’re trying to tighten them prior to applying your favorite penetrating solvent. A judicious hit with a rubber mallet on the fastener in question can help, too (in the case of screws, a whack on the end of the driver handle works wonders). If all else fails & you haven’t rounded off the head yet, it’s time to break out the heat wrench. Be judicious – you don’t want to ruin the temper of the metal; starting a fire will probably ruin your day, as well as your own temper.
- 41RickMarch 6, 2013 at 8:25 pm
Sorry to put a fly in the ointment of an otherwise nice article, but the crescent is big no-go in my book. I have 45 years experience with tools. I still have 95% of the Craftsman tool set that I purchased in 1970–many many cars, many machines, many a bruised knuckle, and happily many an expensive repair bill averted.
Rule #1: If you’re doin some serious bolt/nut turning, the Crescent wrench is the LAST wrench you should reach for. Always go box, closed-end, socket, or even pipe wrench or vice-grips before resorting to the Crescent.- 42TacMarch 6, 2013 at 9:10 pm
A couple of notes:
1) Cheater Bars are an absolute ‘last resort’, rather than a ‘never’. If you’ve ever tried to take the outer wheels off of a tractor you know that the lug nuts will laugh at even a 3/4″ Socket wrench….that’s when you sometimes have to literally jump on the 4 foot cheater bar to break them loose….but do it very carefully. For most auto uses, the cheater bar comes out because the wrong tool is being used, the user has very little forearm strength, or someone screwed up before. Case in point, you should be able to break your lug nuts loose with a T-handle lug wrench, and your drain plug with a normal-sized 6pt box end wrench (I prefer the box size…and mine’s a 15mm). Of all the nuts on a car, those should be the easiest to deal with, because they’re removed consistently, and the drain plug is lubed up very well every single time you change the oil! The screw up is when someone is either being incompetent, lazy, or enthusiastic….and they put these back on with an air hammer….and ratchet them down to an insane amount of torque. As a final note, since oil changes are the most common PM, Don’t overtighten the drain plug! Most modern cars have an aluminum oil pan, and overtightening it will possibly crack it or strip the threads….and cost you a lot more money.
2) Adjustable Wrenches are the B**tard stepchildren of the toolbox. They’re always around, and always not wanted. I find that they’re good to keep in the kitchen drawer for that one nut you need to deal with and you don’t want to go out to the garage to get the proper tool, or if you’ve got a motorcycle they’re good for the tool bag as they cover a variety of options in an emergency. Certainly you should have one around….an 8″ adjustable wrench is like a pair of 10″ channel locks (or the 16″ ones that dad always keeps in his toolbox beside the 22oz ball peen hammer just in case something needs a bit more ‘engineering’)…..sometimes you just need it, but most of the time proper tools will take its place.
- 43WillyMarch 6, 2013 at 9:29 pm
Never buy a tool you can make,
(I’m a blacksmith.)
I use a Crescent wrench for … well I can’t find the dang thing, probably gave it away.
Cheater-bars have a place in the “off " never the " on " function, as noted by another poster. Fire is my favorite tool.- 44MariusMarch 6, 2013 at 11:45 pm
Torque wrenches aren’t mentioned much in the article, but should be — especially if someone is planning to do work on a car.
I’ll note that torque wrenches from Craftsmen do not carry the normal Craftsmen warranty. Also, torque wrenches should be stored backed out to their minimum/lowest torque setting.
- 45loganMarch 7, 2013 at 2:13 am
i only use MADE IN USA tools, if you want a quality wrench DONT buy chinese made.
- 46BillDerbergMarch 7, 2013 at 8:00 am
Cheater Bar:
A longer extension of the standard ratchet wrench is called a “Breaker Bar" which is a cheater bar. Sometimes these are definitely necessary!- 47Dallas StormsMarch 7, 2013 at 8:02 am
great article, though i also use the old cheater bar from time to time, especially recently, I’ve had shops tighten lug nuts so tight that i cant get them off with my impact (325 lb-ft) unfortunately, it can round stuff off, most recently a lug nut that i had to cut off the vehicle with an angle grinder. picked one up from harbor freight for $9.99 that lasted exactly long enough to do THAT job, then quit on me, which was perfect. one note on box end and combo wrenches, if you’ve got a nut or bolt that is tight, go for six pt. rather than 12 pt. 12 pt. is really good for rounding off heads. as for penetrants, skip the PB blaster and WD-40, and order some Aero-Kroil from amazon or Kano labs. I got some from Rolls Royce, here in Indy and it is hands down the best penetrant I have ever used. smells though, like the stuff they used to pour on vomit in elementary school to dry it up. Happy wrenching!
- 48MattMarch 7, 2013 at 8:29 am
One of the first things I learned about my first two big and small adjustable wrenches, while convenient, is that they can be very sloppy. They will round off nuts if used improperly or for prolonged periods of time, due to their propensity to slip. This can result in bloody knuckles. A six-point box end is always the best choice for safety if the situation allows it, usually eliminates any chance of stripped nuts.
Also, the round end of the ratchet wrench is not a hammer.
- 49HjalmarMarch 7, 2013 at 8:59 am
Marius is right. Get a torque wrench. Tighten by the numbers. Add thread-locker to ensure grip stability. My preference is blue Loc-Tite.
Do it right. Do it once.
- 50Phillip the BruceMarch 7, 2013 at 9:56 am
If one is on a very limited budget, the adjustable wrench will work on both metric and SAE (‘murrican) sizes.
Fine for light duty if used with caution – i.e., keep it adjusted. I often keep a bit of pressure on the spiral gear with my thumb.
Another legitimate use, if your project is at a distance from your tool box, and you don’t want to lug the box or make several trips to find the right ‘real’ wrench, take the crescent and use it to measure the nut, then compare with the proper open end wrench.
Also agree with Kroil – a true penetrator.- 51Jacob MorganMarch 7, 2013 at 10:03 am
Wilde tool is an American company that still makes tools here. They used to make the stuff that Craftsman and other companies rebranded. Now with all of them chasing cheap crap from China, Wilde is starting to sell tools under their own brand. They don’t make open end or ratchet wrenches, but they make pipe wrenches, all types of pliers, screw drivers, etc. Wildetool.com is their site. Harryepsein.com is an on-line distributer.
- 52skoobieMarch 7, 2013 at 11:40 am
Wow, so much strident dogmatic opposition to adjustable wrenches!
1.) Not every project involves high-torque automotive fasteners.
2.) Not every project happens in the garage, right next to your 36-drawer deluxe tool chest.Like every tool, the adjustable wrench is right for some jobs and wrong for others.
- 53RobMarch 7, 2013 at 11:59 am
Wrench sets are great to have, I use a socket wrench whenever i can because i love the ease ratcheting provides. My father bought me a full craftsman set while I was in college and started cycling frequently.
While I love my socket wrench set the hex wrench set stays in the kit most of the time because I have to allen key multitools. Having a whole set in one folding tool is really handy and sees more use than any other tool in my house with the execption of box cutter. Making adjustments on a bike or compound bow, putting together furnitrure, etc.
- 54daveMarch 7, 2013 at 12:21 pm
growing up on a dairy farm and operating the same one today I find the ignorance of tools a disgrace, I’m self taught, have overhauled diesel tractors and do all my own repairs a must to survive. Yes it is Manly but it is also a necessity, if your going to have all you work done by “professionals" you will be broke and feel stupid to boot.
how about a riff on welders and cutting torches?
PS
no disparagement to professionals, boy do we need them- 55Ron SwansonMarch 7, 2013 at 12:42 pm
Good basic article on tools. A tool is like a woman. You can associate with cheap sleazy ones that bring temporary enjoyment, and don’t cost much. Or you can invest in a good solid relationship that gives you lasting satisfaction. So it is with your tools. The choice is up to you.
- 56EdMarch 7, 2013 at 2:41 pm
Normally I fully agree with everything you guys post, but you got something wrong–pulling vs. pushing a wrench. You are NEVER supposed to pull a wrench, it will knock out your teeth. Pushing it–you might scrape a knuckle–but you have your teeth still.
- 57BrentMarch 7, 2013 at 4:47 pm
The only tools that I will use while working on an engine is a Snap-On. Though they are costly, the qualtiy surpasses Craftsman by at least 20 times. If you ever get a chance, talk to a Snap-On rep and demo a screwdriver with a grease covered handle compared to a regular screwdriver with no grease. You will get about a half turn more with the Snap-On.
- 58TimMarch 7, 2013 at 5:28 pm
Richard Trethewey on This Old House mentioned on one show that when using a pipe wrench you should get a “three point bite" with the pipe touching the back of the jaw so it isn’t forced out of round.
Also, when working on most engines etc. the first thing I use is liquid wrench by spraying the fasteners I think I’ll be removing before I start working. This gives it a head start on soaking in and if I don’t remove all the fasteners I thought then worst case it will be easier next time.
- 59GDSMarch 7, 2013 at 8:14 pm
Ha, ha! Don’t use a cheater bar… Because there’s some risk involved? I think your inner attorney must have reared its ugly head for a moment, Brett. The manly approach to a cheater bar (or a knife, fire, automobile, etc.) is to be aware of the risks involved, don’t be reckless, and learn to do it properly. Have quality tools. Use the right size wrench for the job. Use a pipe not too much wider than the wrench handle. Apply force to the pipe close to the wrench at first, and gradually move outward.
- 60minutemanMarch 7, 2013 at 9:58 pm
I would agree with the anti crescent wrench comments, but it depends on application. I am a professional technician in a power plant and for the type of work I do a top quality adjustable wrench is a most useful tool. I can fix most problems I encounter with a few screw drivers and an adjustable wrench I carry around in my pockets. If I can’t do it with those few things I have a big honkin’ rolling tool box and the tool crib to fall back on. This is, however usually low torque stuff like pneumatics and control stuff. In automotive type apps, I agree that adjustables should be avoided.
- 61JeffCMarch 7, 2013 at 11:31 pm
Yes, it is sad that young men don’t know how to use simple tools. The reason? Mostly, it’s fatherlessness.
- 62mmMarch 8, 2013 at 6:04 am
Nothing wrong with cheater bars,or using adjustable or crescent wrench, there is always a better tool for the job but you don’t have it.
- 63NickMarch 8, 2013 at 9:59 am
Hey Brett great article, but you need to add if possible it is always better to use the open side of a combo wrench, due to the better surface area on the fastener. Also I have the same craftsman set you recommend, but mine have developed spots of surface rust on all of the wrenches and sockets. Any advice on how to get rid of it?
- 64TravisMarch 8, 2013 at 7:53 pm
Something I learned from my father, an auto mechanic, was to use 12-point box wrenches or sockets if you come across a sticky nut/bolt. That way, if you happen to round the corners, you might still be able to get it loose with a 6-point. Speaking from experience, I found this to be especially handy info when when it came to removing spark plugs during a DIY tune-up.
- 65mrridenMarch 9, 2013 at 5:20 pm
I am horrified! There is a “right" tool for every job abs it is NEVER an adjustable wrench! NEVER!
- 66John BennettMarch 9, 2013 at 8:45 pm
A wiser person told me when I was frustrated with of all things a copy machine. ‘" A poor craftsman blames his tools." Has always stuck with me. Hey, whatever tool works, use it!
- 67ChattyMattyMarch 10, 2013 at 12:57 am
Pat R… I checked my local tool shop and asked for the metric Crescent wrench but they didn’t have one. He tried to sell me the Whitworth version!
- 68GarethMarch 10, 2013 at 9:26 pm
Thank you for the straightforward, practical advice and helpful illustrations. .
- 69JordanMarch 11, 2013 at 11:30 am
I just bought a whole bunch of wrenches, hex-key set and socket set to work on my car. I was able to save hundreds of dollars by buying some tools, and the parts I needed to replace from O’Reilly’s. Also, I need several wrenches on film shoots for professional tripods and lighting equipment, etc. Every man should have a good set of wrenches.
- 70IanMarch 11, 2013 at 6:19 pm
Not a Snap-on vendor. Buy Snap-on wrenches if you do more than just assemble and install your ceiling fan.
Story time: as a mechanic, I used Craftsman wrenches. I came across a hex nut that was rusted to an alternator assembly. “No problem," I thought as I grabbed my trusty Craftsman 15mm, which I then proceeded to destroy because of the rusted nut. I grabbed our Master Tech’s Snap-on 15mm, and within seconds the nut was loose (and replaced). I bought Snap-on from that day forward.
- 71EricVMarch 12, 2013 at 9:12 am
Its worth mentioning that 12 point sockets are pretty much more trouble than they are worth. Easily twice as likely to strip nuts as 6 pointers, with the only benefit being they can be used on square heads which are pretty uncommon these days (usually only seen on transmission/differential drain/fills). Kobalt from Lowes also carries an exchange warranty similar to Craftsman with tools that are comparable quality these days. Snap-on 80 tooth ratchets are an amazing creation though.
- 72EdwardMarch 13, 2013 at 10:58 pm
There should be an article for special tools and practices on the removal of broken fasteners or studs I.e. using heat, easy outs, double nutting, welding a nut, etc. I’m a diesel mechanic and resort to these methods and tools. It’s a good thing to know when your in a bind
- 73Rob RoyMay 6, 2013 at 3:57 am
Great article! My dad is awesome with any kind of tools. He do almost all the repairs at his mansion, backyard and garden by himself. Too bad he had never “forced" me to get his knowledge as a kid so I haven’t grew up with this.
But what man is a man without knowledge of simple crafting or the most basic tools? So I very appreciate this one.Knowing the Crescent Wrench could have spared me an hour of searching and buying different wrenches at the hardware shop. (I needed to loose a nut of my computers motherboard, which was very small and hard to grab, this very tool gave me the right leaverage even in small and inconvenient areas).
This article goes right to my bookmarks for future reference!
- 74harlanMay 17, 2013 at 5:51 pm
i have an old cresent wrench that is at least 3 ft long. it was used to tighten down forms that would incase cement pipe. The pipes would be from 12 ft to 18 ft.
Is it worth anything.
Harlan
- 75TimMay 25, 2013 at 2:03 pm
Kobalt tools are manufactured by the same company as Craftsman and also carry a lifetime warranty. They are much more reasonably priced than Craftsman.
- 76FredJune 3, 2013 at 12:40 pm
First my disclaimer: I am a safety professional in the oil and gas industry. Cheater pipes are a big battle that I face with the employees. There are 2 reasons why that are not allowed to be used. 1.) It violates OSHA’s general duty clause, and the OSHA inspector WILL get you for the modification of a tool. 2.) It violates the manufacturer’s warranty.
With that being said, the lever is one of man’s oldest inventions. There are instances where you need increased torque, but the head of a 36″ pipe wrench may be too big to fit on the equipment. This is where the challenge lies. Why haven’t any tool companies engineered a device to add leverage to a pipe wrench or a crescent wrench? These companies would gain a lot of money, but I have a feeling they’re worried about the liability of a cracked skull should something fail.- 77MikeJune 19, 2013 at 12:14 pm
A word on using crescent wrenches I got from my earliest practical teacher, a factory engineer I worked alongside in my holidays; I learned a mass of practical skills from him.
Use it with the fixed jaw facing the direction you are turning it. This puts the greater stress on the fixed jaw, and helps it last longer, and be less likely to slip. The picture above is showing the wrong way.. No big deal nowaday with modern alloys, but it does make a difference.
- 78MikeJune 25, 2013 at 9:10 pm
As an industrial electrician and crane mechanic, my 8″ crescent wrench has a place in my Klien Tools backpack. I also have a few ratcheting combination wrenches in there, but my Crescent brand metric adjustable wrench is my go-to wrench. The newer ones are built to tighter tolerances and even include a laser etched scale to indicate size.
Also, you don’t need a cheater bar. The box end of a combination wrench will hook nicely over the open end of a smaller combination wrench to give you all of the illicit leverage that you need to break stuff.
- 79Deep InyaJune 29, 2013 at 4:11 pm
I maintain large flying cranes for a living (CH54B) I regularly use crescent wrenches. I also use cheater bars that are 4-5 long. You can’t break a 600 ft-lb nut without a cheater bar.
- 80Deep InyaJune 29, 2013 at 4:12 pm
edit – unless you have a sweeney tool.
- 81RobSeptember 3, 2013 at 5:28 pm
I would like to point out that most of what you have posted about as "wrenches" are actually spanners. In most parts of the world your adjustable or crescent wrench is actually a shifting or adjustable spanner or “shifter"colloquially. As are all your open and closed end spanners…. yanks ;)
- 82LiamSeptember 12, 2013 at 8:04 am
Bret I just want to thank you for referring to these “wrenches" as spanners at least once. As a Brit it’s rather annoying to have Americans use English as a language and then go on to incorrectly spell words or use the wrong word entirely, colour for example, without at least acknowledging that in England that’s not how it’s spelt or said. However you Bret have acknowledged our islands language, so once again thank you.
- 83KyleSeptember 17, 2013 at 10:01 pm
Cool article, but I would like to point out a couple things. Being that I have done demo work in industrial facilities, I have found cheater bars to be necessary to persuade doggedly stubborn bolts. Also, some wrenches can have special round tapered pointy handles used for lining bolt holes up. These are called Spud wrenches. Spud wrenches can be open end or crescent.
Leave a Comment
Name *
E-mail *
Website
Previous post: What Is a Man? The Allegory of the Chariot
Next post: How to End a Conversation


Posted on October 16th, 2013