

How to Build a Better Sawhorse | The Art of Manliness


Strong, Durable, Collapsible, and Versatile: How to Build a Better Sawhorse
by A Manly Guest Contributor on August 16, 2012 · 22 comments
Editors Note: This is a guest post by Ethan Hagan from One Project Closer. Check out some of his other manly contributions to AoM like repairing drywall and building a workbench.
As I continue to expand my workshop, I quickly discovered the need for some good sawhorses. Sawhorses are great for setting up a temporary workspace, out-feed (on my table saw), and more. Now you can slap some sawhorses together pretty quickly and they’ll work just fine; Brett shared a fast and easy sawhorse design awhile back if you’re looking for something nice and simple. But I didn’t want to compromise on features. So I scoured the internet for ideas, and eventually decided on this design called the Shopdog.

These are not the easiest sawhorses to build. However, they are extremely strong, durable, collapsible and versatile. The versatility comes from the fact that the cross member can be modified depending on the application. For instance, cutting V notches into the top makes it easy to support round pipe. Stapling carpet over the top is perfect for protecting woodworking projects. Best of all, if the cross member gets messed up, all you have to do is swap in a new piece of 2×4. I’m confident that you won’t find a better workshop sawhorse anywhere else. Now here’s how to build ‘em.
Tools & Materials List
These are the tools and materials I used to build the sawhorses. The total cost for each sawhorse is less than $20, and a big chunk of that is for the locking tie-down. If you can find a suitable alternative, I’ll bet you can get the price tag under $15 which is cheaper than most of what you’ll find at the Big Box stores!
The Shopping List
- (3) 8 foot 2×4′s
- (2) 3/8″ x 3-1/2″ carriage bolts
- (6) 3/8″ washers
- (2) 3/8″ nuts
- (10) 2-1/2″ wood screws
- (1) 6′ locking tie-down
Tools
- Compound miter saw (must be capable of bevel and miter cuts)
- Jigsaw (or handsaw)
- Drill/driver
- Square
Step 1: Cut the Lumber for Individual Components
To keep these instructions as clear as possible, I’ve labeled a couple of pictures and listed the necessary cuts. Remember that you’ll need to cut miter and bevel angles on the top and bottom of each piece while maintaining a consistent length. All my legs measure 40″ long, but you can change that to whatever length you prefer.
The cuts I list below assume the work piece is on the right-hand side of the miter saw, same-side up.
- Leg 1 & 3 Top: 25° miter right, 10° bevel right
- Leg 1 & 3 Bottom: 25° miter right, 10° bevel left
- Leg 2 & 4 Top: 25° miter left, 10° bevel right
- Leg 2 & 4 Bottom: 25° miter left, 10° bevel left
- Lower Supports: 32″ and 28″ long with 10° miter cuts on both sides
- Upper Support: 24-1/2″ long with 10° miter cuts on both sides
- Cross Member: 36″ long, straight cut on both sides.
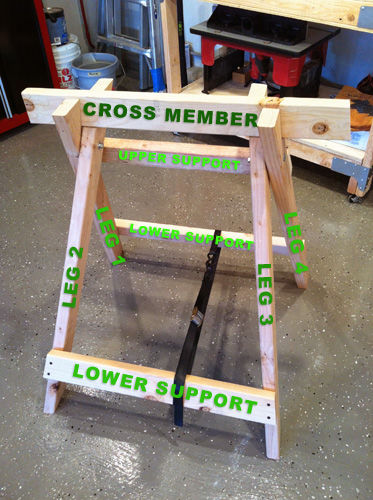


Once the legs are cut, they should look like this.
Step 2: Cut the Notch
The cross-member needs to sit parallel to the ground (for optimal support), and that requires making a compound cut to notch each leg. Unfortunately, you can’t complete the notch with just a miter saw, and here’s where the jigsaw come into play. If you’re looking closely, you’ll notice the cross member sits proud (higher than the legs) and this is because that little extra space helps protect the legs from saw blades.

First, mark your cut on the “inside" of each leg. The first line will be straight down and perpendicular to the top edge. Mark the line by setting your square on the top of the leg and scribe a line starting at the corner. This line should measure 3-1/8″ (just shy of the actual height of a 2×4).
The next line is perpendicular and will continue all the way to the edge of the 2×4. It should measure 1-1/2″ long.
Flip the leg over and repeat the process.
Next, turn the 2×4 on end and draw a straight line between the two sets of markings. It’ll be angled at 10° which matches the top.
You can make the first cut with your miter saw set to a 25° bevel and 10° miter. Be careful as the depth of this cut is different on each side and you don’t want to cut too deep.
The second cut needs to be done with a jigsaw, and I used some scrap for additional support. Again, be careful because the depth is different on either side, and you’ll need to angle the saw to complete the cut.
Notch all four legs on their inside edge using the same technique.
Step 3: Drill Bolt Holes
Next, you need to drill a hole for the carriage bolt which acts as a hinge to collapse the sawhorse. Drill the hole 6″ down, centered on the 2×4. I found it easiest to drill through both legs at the same time. In order to position the legs correctly, put a piece of scrap 2×4 in the notch.
Step 4: Insert the Carriage Bolts and Washers
Slide the carriage bolts through with two washers in-between the legs to allow them swing. Put on a third washer next to the nut, and tighten it (but not too tight).
Step 5: Attach Cross Supports Using Wood Screws
Now it’s time to attach the three support pieces. I suggest drilling pilot holes to avoid splitting the wood since the screws are so close to the end grain. I placed the lower support 6″ up the leg and the upper support about the same distance down from the top.
Step 6: Install the Strap
To firmly sandwich the cross member between the legs, use a locking strap (or ratcheting strap) to pull the legs tight.
Final Thoughts and Pictures
I’ve been using these sawhorses since January, and I love ‘em! Like I said, they’re not the easiest to build, but they’re worth it.
____________________________
Ethan Hagan is the primary editor at One Project Closer. Ethan spends most of his days shadowing real contractors on actual job sites and most of his nights writing about the experience. To see what I mean, check out their expert guides like How to Build a Shed Ramp and How to Solder Copper Pipe. If learning and interacting with pro contractors sounds like something you’d enjoy, sign up for OPC email updates.


{ 22 comments… read them below or add one }
- 1Patrick HAugust 16, 2012 at 3:10 pm
This is a superb idea. Literally one of the most ingenious ideas I’ve seen on AOM or anywhere. Keep up the great work!
- 2CraigAugust 16, 2012 at 4:30 pm
Does the 10° bevel really help? It seems like it’s decorative instead of functional.
I don’t have a miter saw capable of beveling, but I like the look of these sawhorses.
- 3PaulAugust 16, 2012 at 4:35 pm
This looks like what I have been wanting but have not had the time to search for it or think it out myself. I have wanted something that folds or comes apart easily for storage. I wanted something strong since I currently have plastic saw horses. I have also been thinking of a way to extend the cross member and basically make the sawhorse wider and this design would make that very simple. Instead of a strap I am thinking of something attached to the inside of each leg that when lined up I can slide a bolt or a pole thru to keep them standing.
- 4GregAugust 17, 2012 at 7:27 am
I like the folding nature for compact storage. I plan on making some for myself and for my two sons who now have a place of their own and will find then useful. Thanks AofM
- 5EricAugust 17, 2012 at 7:40 am
Nice design for a sawhorse. Simple, strong, folding. I think I found the sawhorse design for the horses I want to build.
@Craig: I don’t *THINK* you’d need the 10 degree bevel. I suspect it makes the saw horses slightly more stable, but as long as you’re not racking them from side to side a lot, you’d probably be OK. I’m planning on making some of these without that bevel myself.
@Paul: I would think if you could find some tow strap hooks (like the ones here: http://tinyurl.com/94becvo) you could use some rope to make something cheaper than the locking tie down. Plus you’d still have a way to store the top cross member when the horse is collapsed.
You’d just tie one end of the rope to one hook, and then with the horse setup and ready to use, you could use a couple of half hitch knots on a second hook to get the rope to the right size. It wouldn’t have to be expensive rope, just some that doesn’t stretch much. Worst case, if it stretches, untie the knot and shorten it up a little.
But very nice horses. And $20 a pop for good sawhorses isn’t that expensive. The cheap plastic ones at the big-box home stores aren’t that much cheaper and they aren’t as nice.
- 6EricAugust 17, 2012 at 8:02 am
I think I’ve found the design I want for my sawhorses. Solid, strong, simple, collapsible. Very nice.
@Craig: I don’t *THINK* you’d need the 10 degree bevel. From the looks of things, that helps with stability. But as long as you’re not doing a lot of racking of the horses from side to side, you should be OK without the bevel. For what it’s worth, when I build these, it will be without the bevel.
As for a cheaper version of the locking tie down straps – if you can find similar hooks at a local hardware store, you could use some inexpensive rope to make something similar.
Basically, you’d make a rope version of the tie down that isn’t as easily adjusted. To adjust it, you’d need to untie knots. But assuming you can get rope and hooks for a reasonable price, it would be less than the locking tie down straps. That’s probably what I’ll do when I build them.
- 7NoWayAugust 17, 2012 at 8:30 am
Flippin’ awesome. A folding arm on the inside of each leg that notches onto the opposite lower support would keep a nice sturdy base instead of the strap. Strap’s easier though.
- 8EmilyAugust 17, 2012 at 1:06 pm
I just made some sawhorses as my first-ever woodworking project but I wish I’d seen this first — stackable?!? Boggles the mind with how much sense it makes.
- 9MichaelAugust 20, 2012 at 2:31 pm
To those looking at the straps as a major expense, I present to you
http://www.harborfreight.com/set-of-2-1-inch-x-12-ft-lashing-straps-67386.html
Bah-dah-bing!
- 10JeffAugust 20, 2012 at 3:41 pm
What is the finished height when using 40″ legs.
- 11IanAugust 25, 2012 at 1:53 am
A piece of rope would is a simple substitution for the locking tie-down. I recommend a trucker’s hitch or an alpine butterfly + taut-line hitch.
- 12BradleyAugust 26, 2012 at 11:04 pm
I recently built my first set of saw horses using a design I found in a woodworking book, and I am really not happy with them. These saw horses look great! I’m definitely going to have to make a set! My dad is a contractor, so I’ve seen some well built horses, but I’ve never seen anything collapsible that’s as well built as these.
- 13AndrewSeptember 20, 2012 at 9:46 am
Easiest way to replace the tie-down. Drill a ~3/8″ hole in the center of each lower support; thread an appropriate length of 1/4″ rope between the two holes; knot each end; voila!
- 14PatrickOctober 28, 2012 at 10:51 am
I was a framer and sider for many years and sawhorses where a problem. Our solution was to make a very simplified version that didn’t require any bevels and took about 5 minutes to make. Then we just left them on the scrap pile rather than haul. But these are worth hauling around!
- 15WesNovember 20, 2012 at 8:37 am
These are nice and the guy that designed them sells the plans which are very good for about $5 dollars. They aren’t difficult to figure out but the plans help tremendously and even have a nice set of templates with the plans these can be put together rather quickly. Search the lumberjocks website for shopdogs. That’s what he calls them and again it’s always nice to give credit to the person that designed them.
- 16Mr. NutterDecember 11, 2012 at 3:13 pm
Great design. I made a couple of these out of some scrap 2×4′s and some old rope. You need to make all of the exactly as instructed for it to work properly. For an added manly flair try a trucker’s hitch using a regular rope to bind the cross member.
- 17RobApril 7, 2013 at 9:54 am
I find them fairly stable but a bit unwieldy and take a lot of room in my van. I may cut the legs down a bit. If you really want compact horses the folding metal ones are your best bet. For at home use these are great.
- 18BrewDogApril 23, 2013 at 1:25 am
From my calculations the finished height would be 39.765″ or roughly 39 3/4″ tall
This is based on the fact that a 2×4 is 3.5″ tall and the notch is only (3 1/8″) 3.125″. So it sits 0.375 (3/8″) proud, or above the support height. The support height is based on trigonometry, calculated by the website below. If you are desiring a certain height use the website and enter your desired height – .375″ and you’ll be golden.
- 19PaulOJuly 9, 2013 at 8:21 am
Just built some last night..The 10 degrees did complicate things a little but it does provide a nice sturdy base..Throw the rope ideas out the window the tension on the strap REALLY provides the horses stability and I think you would be hard pressed to achieve the same tension with a taunt rope…You don’t need the plans but I did have one measurement that was slightly off… the bottom support ended up being 28 3/4 which made sense to me because after you deduct for the width of the 2-2X4s(3″) and the 4 washers(1/4″) seemed right…Anyway that’s my 2 cents…Thanks a bunch for the measurement I love them.
- 20shaardulaJuly 17, 2013 at 7:27 pm
craig, 10 deg bevel prevents the SH from rocking along the length of the crossmember.
Without 10 deg it looks like an H from front. With a 10 deg bevel it looks like an A.
Intuitively if we poke H on the top of its left leg it will tip over. With A, the angle on the right leg will resist tipping.
- 21shaardulaJuly 17, 2013 at 7:45 pm
also 10 deg sounds about right.
too much bevel will reduce the effective length of the cross member.
i’m guessing to prevent the table from tilting under direct verticle load, the end of the cross member must not extend beyond the ground part of the leg. otherwise we have a fulcrum.- 22DonJuly 28, 2013 at 10:09 pm
When drilling the holes, placing scrap of 2×4 under the “upper" leg keeps them both on the same plane under a drill press, but should an additional prop be placed under the bottoms of both legs so the hole is 10 degrees from perpendicular and thus parallels the floor and beam, or doesn’t it matter?
And, when making the miter cut of the notch bases, you state the depth is different on each side. I thought they are both 1 1/2″. I don’t understand.
Leave a Comment
Name *
E-mail *
Website
Previous post: Be Your Own Boss: 37 Side Hustle Ideas
Next post: Heading Out on Your Own — Day 16: Create a Budget


Source: www.artofmanliness.com