

Showing all posts tagged "Cb Homepreps Homesteading"
Urban Prepper Bug Out Bag pdf
Posted on November 1st, 2013
The Best Projects and Gear to Set Up Your Secret Lair

Some people call it their battlestation, others call it their command center. In honor of Evil Week, we're going to call your home office setup your secret lair, and here are some of the best DIY projects and gear you can use to keep it safe, secure, and stocked for whatever nefarious plan you may cook up next.P
Set Up a Surveillance SystemP

Almost all of us have laptops with webcams or USB cameras attached to our computers. They're great for talking to friends via Skype or Google Hangouts, but they're also useful for keeping tabs on your computer, or on your entire secret lair when you're not around. We've shown you how to turn your webcam into a surveillance system before , one that will turn on when it detects motion and stream video to your smartphone, all without the person in the room realizing it. All you need is some software (in our guide we used iCam and WebcamXP ) and you're ready to go.P
If you prefer an on-demand, completely free alternative, you can do the same thing using Google Hangouts , or with Apple's FaceTime (although both tutorials are a little old, so your mileage may vary). The beauty of all of these methods is that you can keep tabs on your lair itself, mount a webcam in the corner of your room to make sure no one's there when you're not, or put one in a window to keep an eye on your property. Check in anytime, from anywhere.P
Set up Exterior Security MeasuresP
Once you've set up surveillance, you'll probably want some additional security for the places you can't stick a camera. Perhaps this Arduino-based motion sensor that texts you whenever it's tripped is a good addition to your secret lair. Alternatively, you could build a remote tripwire alarm (as seen in the video above), or use a DIY pressure plate to tell if someone's walking around where they shouldn't be. If you need to protect something specific, you can turn this $2 tag into a motion-sensitive alarm for your valuables . Oh, and don't forget to secure the door! Preferably in a manner that's not easily hacked , quickly picked , or broken into . Consider something tricky to get into, like this DIY passcode door lock , or this hack that locks or unlocks your door with a text message .P
If you need a bird's eye view of your lair, or you just want aerial superiority, why not get your own drone? You could go out and spend hundreds on a Parrot AR Drone , but building one can be fun too. This Instructables project has instructions and part designs, all of which can be 3D printed. There's even a DIYDrones subreddit , and DIYDrones.com is the definitive resource for amateur drone-building of all types, from aerial drones to ground rovers.P
Encrypt Your Files and Set them to Self-Destruct When NecessaryP

You certainly don't have to encrypt all of your files , but if you have a folder labeled "world domination plan" or a file on your hard drive called "The List," you may want to keep them secure and away from prying eyes, if you know what I mean. We've shown you some cloud storage services that take privacy seriously if you're looking for a safe place to get your files offsite, and even how to add encryption to Dropbox if that's your cloud storage service of choice.P
If you'd rather keep your files local, download TrueCrypt or GNUPG and encrypt them on your own. You can even go the nuclear route and enable whole-disk encryption by turning on FileVault in OS X or BitLocker in Windows (if you have it avialable, otherwise TrueCrypt will encrypt whole volumes as well). If you're using Linux, full-disk encryption is also rolled into the OS, although it goes by different names. TrueCrypt can even be configured to show different files based on different passwords, and another tool, DriveCrypt , can be configured to auto-wipe your data if it's being brute-force attacked or the wrong password is entered too many times, kind of like an auto-destruct feature.P
If you really can't risk those files getting into anyone else's hands, consider encrypting your entire system and setting up a decoy OS for anyone else who tries to use it. Even more extreme measures include a self-destructing SSD that erases your data at the flip of a switch, or a thermite self-destruct system that destroys the hard drive before it can fall into enemy hands (Seriously—do not do this. We're mentioning it for fun and so you can see the videos. It is extremely dangerous, and thermite should only be handled by professionals.)P
Prepare for EmergenciesP

Your secret lair is more than just your nerve center, it's the place you go in case of emergency. Keep a few items on-hand to fix your broken gear or hunker down if you have to. The Sweethome recommends this toolkit for household repairs, and this Rosewill toolkit is well loved over at Newegg for computer and electronics issues.P
Also, consider a lockbox or small fireproof safe for your important documents. You don't have to put your world domination plans or doomsday weapon schematics inside, but if something happens, you'll be happy you did and you can grab them and take them with you. I have an older version of this fire and waterproof safe for my most important documents, and it's small enough to grab and carry if there's an emergency and you have to get out.P
Finally, you don't have to stock your lair like a panic room (although that would be cool), but definitely keep some power and supplies on hand in case of an emergency. We've shown you all types of kits for all types of needs , but a good solid emergency kit is a necessity—one that includes a first aid kit and a bug-out bag (with important documents, supplies, money, and a few other basics inside—this 72-hour kit is a good start ). You may even want a portable power station like this one in case the lights go out. Pack a solid external battery pack , like the previously mentioned Limeade , as well. We've even tested a disaster-proof NAS that will keep your data safe in the event of fire or flood. If you have to bug out, grab your DIY battery-powered go bag and take the juice with you. Don't forget an emergency radio: This one is $40 , but it's hand-crank, solar, packs a flashlight, can charge your cell phone, and is AM/FM/NOAA Weather certified.P
Once you have your space under surveillance, your data safe and locked down, and you're ready to ward off intruders, your evil laid will be complete. You can retreat into it at any time, and if there's an emergency you know you'll be able to shelter in place with all the equipment you need to survive, or get out quickly with your important files intact. A few simple upgrades to your workspace—we mean evil lair—will transform your plain old desk into your personal world domination headquarters, one befitting the modern, busy, brilliant evil mastermind.P
Photos by Nick Criscuolo , Jenn Deering Davis , Intel Free Press , Cory Doctorow , and Brendan Riley .
P
Posted on November 1st, 2013
Turkey & Stuffing Jar Meal
Turkey & Stuffing Jar Meal
Thursday, October 31, 2013
Turkey & Stuffing Jar Meal

Posted on November 1st, 2013
Different Loadouts for Different Days
Different Loadouts for Different Days
What the heck am I talking about? Well… Let’s start with some clarification of the term, just so we’re all on the same page:
From urbandictionary.com :
Equipment, ammunition, tools, and clothing used by a person (typically on active duty in the armed forces).
Loadouts can change depending on time of day, season, terrain, and personal preference.
Related to my article about the amount you might spend to solve a problem this idea fell out of my search for the perfect bag. I cannot find one, by the way. I have been looking for a long time, and there’s no such thing. When I was in university I had the perfect bag. Turns out I just had the perfect bag for me in university. And, it only seemed that way because I was doing the exact same thing every day for a number of years. Now I perform a number of different activities. I might be walking around, stopping in coffee shops, writing, researching, photographing, etc. I might be doing a show and tell for a client, or prospective client. I might be at a client’s location trying to solve a problem for them. I might be travelling for a client for one of a number purposes. Each of those activities requires a different loadout, and, for the variety of loadouts I have, I use a few different bags.
My Every Day Loadout
This is what I have on me all the time. Sometimes I think of this as my stealth loadout.

My Show and Tell Loadout
This is what I usually take to client meetings.

My Networking Loadout
I never want to get caught out missing a tool, or the right connection.

Did I mention that I consider my car to be one of my bags in some circumstances.
Comments are closed.
Posted on October 29th, 2013
Strategic Terrorism - Call to Action
Posted on October 23rd, 2013
prepper resources

Posted on October 23rd, 2013
How to Create 5 Makeshift Survival Lights When Power is Out and You’re in a Pinch


Power’s Out and in a Pinch? How to Create 5 Makeshift Urban Survival Lights
by A Manly Guest Contributor on October 22, 2013 · 10 comments
Editor’s Note: This guest post by Creek Stewart first appeared at willowhavenoutdoor.com.
It’s impossible to be perfectly prepared for an imperfect world. Sometimes you just have to go MacGyver and solve common problems by using the resources you have on hand and a little ingenuity. I’ve always said that the ability to improvise is one of the most important survival skills.
This article is a collection (not all my own I’ll admit) of a few creative, makeshift lighting solutions you may have to deploy as a last resort if the grid goes down. You just never know when one of these innovative ideas might shed some light into your darkness.
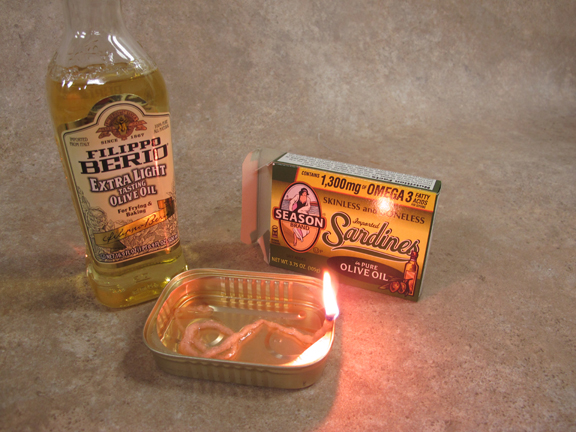
Shining Sardines
Sardines are an excellent survival food. They have a long shelf-life and are full of protein and fats. Maybe you have some sardines packed in your emergency food storage. If not, consider them.
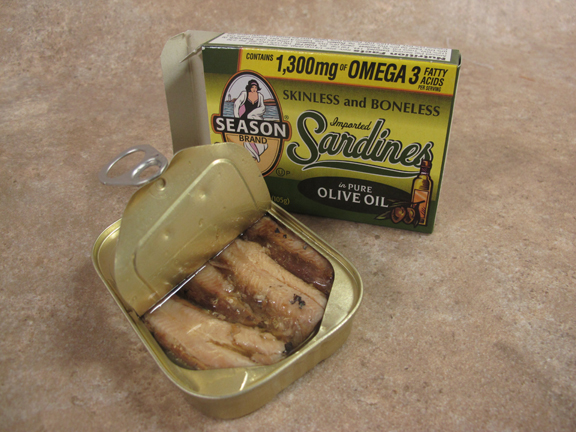
Oil lamps have been used for hundreds of years. From rendered whale blubber to modern kerosene lanterns, oil lamps are excellent “off-grid" lighting solutions. What do sardines and oil lamps have to do with each other? Quite a lot, actually, if your sardines are packed in olive oil.
Once you’re done munching on those tasty bites of fish, place a natural fiber wick into the remaining oil and slightly over the edge of the sardine container. The wick, in this case a cotton string from a mop head, will absorb the oil. Once the wick is fully soaked, simply light the end. A sardine lamp with just a little bit of oil will burn for many hours. Sure, it’ll smell like fish, but that’s what you get for not including emergency candles in your “bug in" supplies. Running low on oil? No problem, just top it off with some more olive oil from the pantry – or any cooking oil for that matter.


Glowing Crayolas
Games and toys are excellent items to pack in an emergency kit – especially if you have small children. Simple toys such as crayons and coloring books can help keep their mind off of the misfortune that caused the lights to go out in the first place.
But if you’ve focused only on toys and no essentials, like candles and flashlights, then you may have to sacrifice some of their least favorite crayon colors and make some Crayndles. I made that word up. Crayons are basically colored wax. If you’re in a hurry, just break the point off and light the paper label at the end of the crayon. As the wax melts, the paper becomes a wick and one crayndle will last about 30 minutes. Not too bad.

You can also get a little more creative and sandwich a natural fiber wick (like a shred of t-shirt material) between three crayons that have been stripped of their labels. Bind everything together with two short pieces of wire; paper clips work well. Then, simply light the wick. I got one of these to burn for about an hour. Not too bad for a 10-second makeshift crayndle.


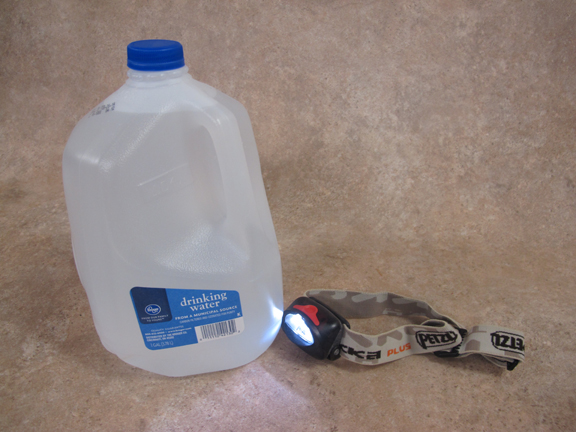
Blazing Bottles
If you’ve listened to anything I said in Build the Perfect Bug Out Bag, then I know you at least have a headlamp packed in your 72-hour disaster kit.
Yet as nice as headlamps are, they aren’t always the perfect lighting solution. Ever tried having dinner or playing cards across the table with someone who’s wearing a headlamp flashlight? It’s really annoying and gets really old, really fast. You get blinded every time they look at you.
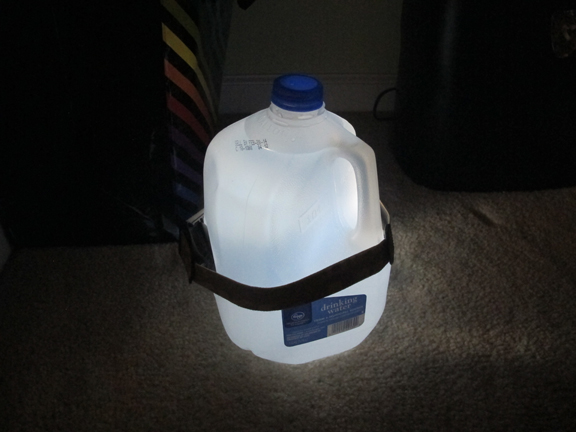
Instead, set a relaxing mood that’s perfect for cards and a sardine dinner using a headlamp and a water-filled clear plastic gallon jug (or any clear container filled with water). Invert the headlamp around the bottle so that the light shines toward the CENTER of the bottle. The water diffuses and diverts the light – making a nice, mellow, glowing lamp that will help set a perfect mood during any disaster “bug in."
Beaconing Bacon
If you’re like my mom, then you have a jar in the cupboard where you pour and keep excess bacon grease. This grease makes the perfect improvised survival candle. Jam in a natural fiber wick and light. It’ll burn as long as any comparably-sized candle. See this post about how to make a bacon grease candle.
No bacon grease? No problem. If the electricity is out, then the bacon in the fridge is going to go bad anyway, so you might as well use it for something. Tear off the fatty pieces and jam them in a jar around a natural fiber wick, and this will burn like a candle as well. The fatty bacon pieces will melt just like wax. Mmmmm, smells like bacon. TIP: Smear the wick with bacon fat first!

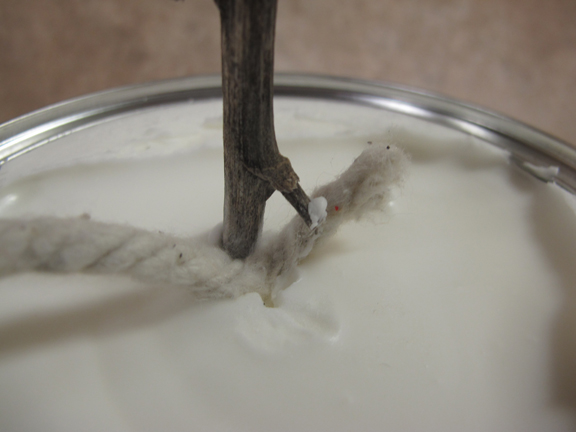
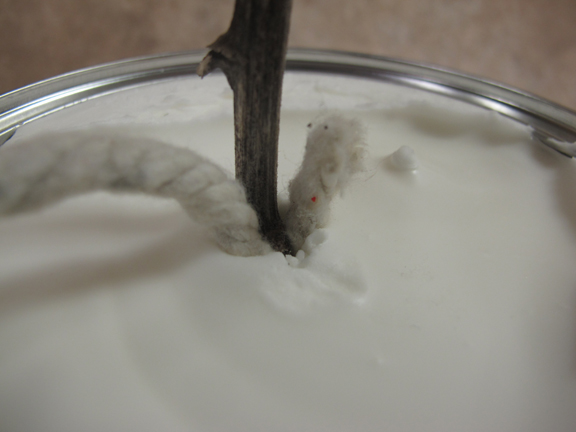
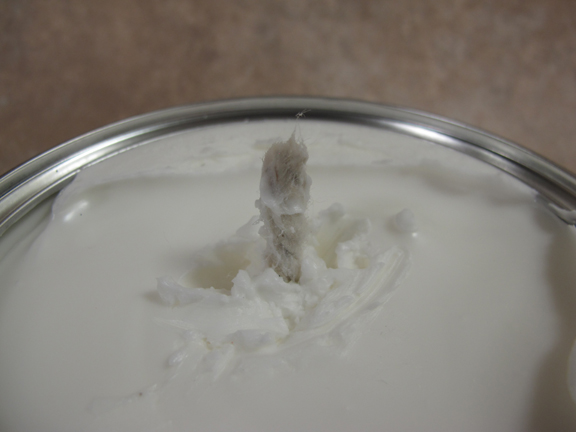
Kindling Crisco
But what if the electricity is off for more than 30 days straight and you need a light source that will shine for at least a month?
No problem, Crisco’s got your back.
Press a natural fiber wick (like a cotton t-shirt shred or a mop strand) using a forked stick to the bottom of a can of Crisco and you’ve got one of the longest burning emergency candles on the planet. Yum, doesn’t that make you hungry? Fried chicken anyone? I’ve heard reports of these burning for more than 30 days straight!
Note: Smear the top of the wick with Crisco to get it to burn better.


Conclusion
What’s the lesson here? Make sure you have non-electric lighting solutions in place just in case the grid goes down. If your solutions are battery powered, you will also need extra batteries as well. Oil lamps, flashlights, candles, and glow sticks are great emergency light sources. Don’t resort to smashing bacon fat into a jar with your bare hands unless you absolutely have to.
Note: Candles have a bad reputation of causing house fires. Makeshift improvised candles are even more dangerous. Use only as a last resort, burn only on a non-combustible surface and keep close watch on any makeshift candle. A house fire can turn a “bug in" scenario into a “bug out" scenario really fast.
Remember, it’s not IF but WHEN.
-Creek
__________________
Creek Stewart is a Senior Instructor at the Willow Haven Outdoor School for Survival, Preparedness & Bushcraft. Creek’s passion is teaching, sharing, and preserving outdoor living and survival skills. Creek is also the author of the book Build the Perfect Bug Out Bag: Your 72-Hour Disaster Survival Kit. For more information, visit Willow Haven Outdoor.


{ 10 comments… read them below or add one }
- 1GeraldOctober 22, 2013 at 7:01 pm
if you are make a light with Fat etc.
you can also use 2 wicks.Look up “hindenburg light" on Wikipedia, they were made with scrap-fat-tallow and 2 wicks. Brighter then single Candles and used in folding lanterns etc.
http://www.youtube.com/watch?v=izesz7uuP-Y
Also think about big jars etc. as a windbreak and you can also improvise reflectors and lanterns from used Cans for even more effective lighting.
- 2Tom MackoOctober 22, 2013 at 8:31 pm
This kind of stuff always interests me. Funny enough I just listened to the podcast with Creek Stewart today. Definitely going to put together a bug out bag, good list of things to consider here.
- 3Clay WilliamsOctober 22, 2013 at 8:38 pm
If you have time, or at least, think you have time. Try melting candle wax and take the wife’s cotton rounds for whatever they use them for and douse them with the candle wax. Let’em dry, strike a match, and poof….. instant fire starter.
- 4AZDuffmanOctober 22, 2013 at 8:43 pm
I just started keeping bacon grease but thought I was weird for doing so, maybe not so much!
- 5Dan VogelsongOctober 22, 2013 at 9:10 pm
I’m a huge fan of the Water-plus-bleach lamps for indoor lighting in third world countries. It’s very similar to the Blazing Bottle above, but doesn’t use an electric power source. http://www.youtube.com/watch?v=_zMAWztZ6TI
A tip for those interested in Bacon candles, but think they may get sick of the smell after a bit – mix a bit of cinnamon to the ball o’ fat. The cinnamon will overpower the bacon, making it smell like Christmas. That, and other random candle-making tips, lovingly stolen from Michael Bunker’s Surviving Off Off-Grid
- 6SteveOctober 22, 2013 at 9:19 pm
Brilliant!
- 7LukeOctober 22, 2013 at 9:34 pm
is it safe to burn crayolas in an enclosed area with children?
- 8JimOctober 23, 2013 at 2:32 am
Another easy one people may not think about are those solar outdoor path lights a lot of folks now have. Just pull them up, and use them inside during the outage. You can always put them back in the ground the next day.
- 9hardwigOctober 23, 2013 at 3:14 am
You never know when the zombie apocalypse begins, so you better be prepared :)
- 10JohnOctober 23, 2013 at 5:58 am
heheh – “Extra Light" olive oil. :)
Leave a Comment
Name *
E-mail *
Website


Posted on October 23rd, 2013
How To Jump Start a Car | The Art of Manliness


How To Jump Start a Car
by Brett & Kate McKay on September 11, 2008 · 120 comments
in Cars, Manly Skills

You’re walking out of your apartment and notice a good looking gal with the hood of her car open, looking at the engine with desperation. You go over and ask what’s wrong. The car battery is dead, and she’s late for class. She asks you if you can give her jump. You look down at the ground, kick some rocks, and offer to call AAA instead.
You have no clue how to jump start a car.
Every man should know how to jump start a dead car battery. You never know when you’ll need this knowledge to aid a stranded damsel in distress or help yourself. While jumping a dead battery is super simple, you’d be surprised by the number of men who have no idea how to do it. Even if a man has learned how to jump start a car before, it can be easy to forget what cables go where. Positive on negative? Ground the positive cable on the car with the good battery? Red cable is negative?
To help you avoid looking like a putz when asked to jump start a car and to help prevent you from shocking the hell out of yourself when you do it, here’s the rundown on how to jump start a dead car battery.
How to Tell if Your Battery Is Dead
Before you try jump starting a car, you need to determine that the battery is the reason the car isn’t starting up. If you turn the ignition and hear the engine cranking, a dead battery isn’t your problem and jump starting it won’t do a darn thing. However, if you turn the key and the car does absolutely nothing, then there’s a good chance you have a dead battery on your hands and jumping it may be your ticket to getting back on the road.
How to Jump Start a Car with Cables
Note: You should always carry jumper cables in your car with you. You never know when you’re going to need them.

1. Make sure both cars are turned off.
2. Connect one end of the red (positive) jumper cable to the positive terminal on the stalled battery.

3. Then connect the other red (positive) cable clamp to the positive terminal of the good battery.

4. Connect one end of the black (negative) jumper cable to the negative terminal of the good battery.

5. Then connect the other black (negative) cable to a clean, unpainted metal surface under the disabled car’s hood. Somewhere on the engine block is a good place. Unless you want to see flying sparks and a possible explosion, do not connect the negative cable to the negative terminal of the dead battery, .

6. Start the car that’s doing the jumping, and allow it to run for about 2 to 3 minutes before starting the dead car.
7. Remove cables in reverse order.
8. Keep the jumped car running for at least 30 minutes to give the battery sufficient time to recharge itself.
And you’re done. Give yourself a pat on the back for a manly job well done.

Unfortunately, jumper cables will not bring inanimate objects to life. Including hot model women you build in your lab.
Remember:
The hardest part of the job is simply remembering where to put each cable. Many a man has broken out in a sweat wondering if he is about to make a wrong move and toast himself to a crisp. Here’s the good news: It’s probably impossible to electrocute yourself from jump starting a car. The battery might give you a big shock, but the voltage is too low to penetrate your skin and put you down for the count.
But no one wants to be on the receiving end of a zap, no matter how mild. So come up with a mnemonic device to help you remember which color goes where. I personally think: red=blood=life=positive/black=death=negative.
How to Jump Start a Car Without Cables
If you have a standard transmission car, you can jump start that bad boy without using cables. Here’s how you do it:
1. Find a stretch of clear downhill road.
2. Fully depress the clutch and put the car in first gear.
3. Turn the ignition to on.
4. Take your foot off the brake and start rolling down the hill, leaving the clutch fully depressed.
5. Coast down the hill until you reach 5 or 7 miles per hour.
6. Release the clutch quickly. You should feel the engine turn and start. If it doesn’t start the first time, depress the clutch and release it again.
7. If you don’t have a hill, get some of your buddies to give you a push and follow the steps above.
Got a story to share about when knowing how to jump start a car came in handy? Were you able to help a little old lady? Did you have to do it in subzero weather in the complete dark? Drop a line in the comment box and share it with us.


{ 119 comments… read them below or add one }
- 101ElleDecember 17, 2012 at 9:05 am
Thank you so much for these clear directions, with pictures.
Although I am not a manly man, instead being a womanly woman, I was forced to assume this role (oh for an accent circumflex to throw over the “o") this morning. Although terrified, with the help of my daughter, I was able to carry out this procedure.
Normal life resumes.
- 102Julian KnightDecember 31, 2012 at 10:35 am
Hi, pretty good instructions thanks.
Just one thing though – although a car battery will not electrocute you, it CAN and WILL give you some VERY serious, even life-threatening burns. This is because there is very little RESISTANCE in a car battery, it can deliver all of it’s power very quickly. A shorted car battery makes a very effective electric fire albeit for a short time, it is more than enough to burn out the car wiring and plenty to burn your skin off.
Don’t take risks, remove metal jewelry before messing with the battery and take your time.
- 103KamronJanuary 9, 2013 at 11:02 am
I drove my car for weeks with a useless starter, all I did was park it on a clear slope (its manual).
- 104ChrisJanuary 24, 2013 at 12:46 am
Yeah, I dunno whose idea it is to put the black clamp onto a metal surface under the hood and not the battery cause that does not work. I had to clamp it on the negative end of the dead battery or else Id be stuck there. I didn’t see any sparks fly. Spare yourself the time. just do it the regular way of going positive to positive and negative to negative.
- 105Jules PillarsJanuary 24, 2013 at 1:22 pm
I recently (1-22-13) had to jump my car, I used the above mentioned positive to positive, negative to metal, my Taurus did not start, negative to negative, sat for another 6-10 minutes, started up.
- 106Dan CJanuary 28, 2013 at 4:31 pm
The reason to do negative to metal is to keep the spark (from the final connection) away from the battery which could cause it to explode sending skin melting sulfuric acid in your face and eyes. most of the metal in your car is grounded so its the same as attaching the cable to the battery without the danger of blowing it up. Make sure the metal isnt painted, just try a couple different places until you get a good connection.
- 107JRamJanuary 28, 2013 at 10:51 pm
Actually Dan, if you connect the negative end to the battery instead of the metal surface (electric ground) you can damage the car.
When you step on the gas pedal of the good car, the voltage in the battery terminals increases from 12V to 15V because the alternator kicks in. This could damage the car’s computer or burn a fuse, which you would later have to replace.
Also, when you jump start a manual transmision car, you do it on 2nd shift, not 1st. And you have to turn the key all the way and let go SLOWLY of the clutch. You can also do it going in reverse, but you need to be a very skilled driver.
- 108AlFebruary 20, 2013 at 11:06 pm
Well thank you AoM for great instructions. However I am still docked points because I did not consult the guide first and fried my set of cables, having my fiances car running when I started the process. I know how stupid I was, only wirking with Jump Boxes at work. A 20 dollar waste and life lesson learned. Thanks again!
- 109BrandtFebruary 22, 2013 at 8:18 pm
To Jules with the Taurus, the reason it didn’t jump off with the cable connected to metal under the hood is that you probably didn’t have a good connection. That connection must be to a solid, unpainted surface (bare metal). If you can find a bolt fastened to the body of the car, and it has gunk and paint on it, use the cable connection to scrape it off.
- 110Jesse SFebruary 25, 2013 at 1:17 pm
It’s a good Idea to mention that not all jumper cables are created equally. If you have a heavy-duty vehicle that draws heavy duty power on start-up, heavy gauge cables are needed. A jenky set of bargain basement cables can easily overheat if used in too demanding a situation. Same goes for the vehicle donating the electrons. Don’t expect someone’s Festiva to effectively jump your cement truck.
- 111Evan JFebruary 28, 2013 at 4:49 pm
Thank you JRam – never bump start in a low gear unless you don’t mind if you twist off a drive shaft or watch the whole transmission fall out behind you. My ’71 Dodge stalls all the time when cold and I don’t want to keep the (manual) choke out, so usually it’s just a quick out and in with the clutch in 2nd or 3rd (or 4th if it stalls while I still have some speed). If you’re battery’s totally dead, you might have to spin the alternator for a while, so you’ll need to do it in a higher gear unless you have some strong friends pushing or a nice hill to help you out.
- 112Old oApril 3, 2013 at 9:53 pm
Good Ground, Bad Block, Reds Together.
- 113somaApril 25, 2013 at 2:48 pm
Very good description of steps,very clear and easy to follow.
- 114nickJune 11, 2013 at 6:02 am
just so everyone is 100% clear…#5 when you clamp it to an unpainted piece of metal…it has to be a part connected to your frame(thus your tires)…aluminum or sheet metal will not work. the black is your ground and passing the connection through to the tires grounds your car.
- 115JerAugust 16, 2013 at 12:13 pm
It’s been said already by JRam and Evan, but it bears repeating. If you’re popping the clutch to start your car, do it in 2nd gear, and just barely feather the gas a little. I’ve seen guys crack gears popping too aggressively in 1st.
- 116LukeSeptember 15, 2013 at 5:05 am
Use 2nd gear if roll starting a car!!!
Cannot stress this enough, 1st gear will spin the engine too fast if you get the car up to a decent speed. Use 1st only if you have limited space and are push starting it.- 117ChristinaSeptember 30, 2013 at 12:06 pm
Thank you! I just jumped started my car on my own using my mother’s car, I’d never done this before. Positive to positive, negative on the good battery and negative to ground on my stalled car. Worked like a charm. :)
- 118MattOctober 15, 2013 at 6:51 pm
I had to park my stick-shift ’98 Ford Escort for about a month on any hill I could find so that I could bump start it. It was always awkward explaining it to any passengers I offered rides to. Turns out that the cable on my negative terminal was corroded about 80% of the way through the cable. Enough to run the car but not enough to start the car off the battery.
- 119MattOctober 15, 2013 at 6:55 pm
My dad and I had to jump-start our family’s minivan using a set of borrowed jumper cables. I hooked up my end, red to positive, black to negative. Without double checking my dad’s side, he tried starting the minivan. All of a sudden the insulation on the cables started smoking and melting all over the cars. Turns out my dad is an idiot and flipped the black and red on the dead minivan. He effectively wired two car batteries in series with no resistance!!!
Leave a Comment
Name *
E-mail *
Website
Previous post: 3 Man Killers: Power
Next post: Soda Review: Which is the Best Root Beer?


Posted on October 17th, 2013