

Showing all posts tagged "Cb Wealth"
Mums make lists ...: Save Money on Laundry

My grandma believed that if you looked after the pennies the pounds would look after themselves.
And when it comes to laundry she was right!
Not convinced?
Well add up your spend per load ... not just detergent but conditioner, stain removers et al & the power for the washing machine, dryer & iron.
Even getting good prices on bulk buys, you can easily spend £1.30 / $2.00 per load.
Then multiply that out per month and year.
And then across your "laundry life".
Do you know what that adds up to? Near enough £20,000 / $30,000.
Crazy, crazy, crazy numbers!
And if you think I am exagerating, here's the breakdown....
| ITEM | UK£ | US$ |
| Laundry Detergent | £0.24 | $0.36 |
| Conditioner | £0.08 | $0.12 |
| Washing Machine | £0.43 | $0.65 |
| Dryer | £0.30 | $0.45 |
| Iron | £0.15 | $0.22 |
| Dryer Sheets | £0.08 | $0.12 |
| Stain Removers | £0.05 | $0.07 |
| Per Wash | £1.31 | $1.96 |
| Per Month | £33.00 | $49.00 |
| Per Year | £393.00 | $588.00 |
| Over Adult Life | £19,650.00 | $29,400.00 |
£0.24 / $0.36 per wash is the recommended retail price for the UK's two biggest detergent brands even if you buy a big 50 wash family pack. A 40 wash bottle of one of the UK's cheaper fabric conditioners costs around £3.40, that's £0.08 /$0.12 per wash.
And if you pay around £4.50/$6.75 per stain removal spray per quarter ... not the cheapest but less than half the price of some of the popular "oxi" brands, and you average 7 washes a week that's another £0.05/$0.07 a wash.
See how it's adding up and that's before you even get onto the power!
If most of your washes are 40c/104f you can easily spend £0.43 /$0.68 per load just on the washing machine - the vast majority of that is the power required to heat the water.
So how on earth do you save money on laundry?
Well these are the tips that are working for me, plus some that other mums swear by ...
Save Money on Laundry
- Use Less Detergent ... keep reducing how much detergent you use little by little in every wash and see what you can get away with without reducing results. We have very hard water and grubby kids clothes but only use just over half the recommended amount. Just that can save £36 / $54 a year - that doesn't sound much but over your "laundry life" it's £1,800 / $2,700!
- Always Buy on Sale ... never buy any laundry products that aren't on sale - if you shop around you should be able to get your fave brands for half the recommended price
- Experiment With Cheaper Brands ... some cheaper brands are definitely a false economy, you end up using more and they don't get things clean but there are some good ones. I use an own brand which works out about 7p/11c per wash. Check out all the online reviews you can find before buying and mix it up with a detergent you know works until you're confident in it.
- Make Your Own Detergent ... I haven't tried this yet but it can be a great way to save money whilst still getting a greener product ... Jess @ Practically Functional has a borax free recipe
- Use Less Conditioner for a Softer Wash ... ever had that experience where you keep adding more conditioner and the laundry just gets stiffer and crustier? I now use the tiniest drop of conditioner from an enormous 5 litre bottle which I get on sale - it works out about 1p/1.5c per wash. That's a £1,000 / $1,575 saving over your "laundry life".
- Use Vinegar Rather than Conditioner ... vinegar is great at softening fabrics particularly towels - again you only need the tiniest amount
- Ditch the Expensive Stain Removers ... I confess I've become a bit obsessed about removing stains and have found you can get most out with dish liquid & biological (enzyme based) detergent ... and the trickier ones can be cleaned with either bicarb (baking soda), hydrogen peroxide or rubbing alcohol which are great general cleaners so much more cost effective
- Lower the Temperature ... most of the electricity for running the washing machine goes on heating the water and washing at lower temperatures can cut the cost per wash by half which will save you thousands over your "laundry life" ... personally, I do think you have to be careful about washing at lower temperatures - the germs in towels, tea towels and underwear are not killed at lower temperatures
- Wash Full Loads ... you use the same amount of electricity to heat the water however much you put in the machine so making sure you do a full load will save money ... most of the time this goes without saying, I can always ... big sigh ... fill the machine but we have a few fiddly things that aren't happy in with the rest of the wash that I am trying to get better at hand washing
- But Don't Overload ... unfortunately if you really do shove too much in ... (oh for a bigger drum for my towels!) ... it just won't get clean as it really needs to move around
- Dry Outside ... not possible all year round, and in the winter you need the heating on to dry inside but even if you just cut use of the dryer by half you can save £45 / $68 a year which over your "laundry life" is £2,250 / $3,375 and that's not counting the money you can save on ditching extras like dryer sheets which can be fully of nasty chemicals
- Just Don't Iron! ... I am a total convert to the just don't iron school of laundry ... get everything hung up or folded away neatly as soon as it's dry and let the creases drop out ... only iron things when you need them if absolutely essential ... this will save hours a week, not to mention your sanity and thousands over your "laundry life"
I don't know about you but I can think of better things to spend that money on than laundry!!
Grandma was right ... look after the pennies and the pounds will look after themselves.
P.S. Are you struggling to keep on top of the housework?
If you are, you'll love my other easy housework posts and my monthly mailer of super simple tips that help you conquer the housework before it conquers you ....
See On


More Money Saving Tips
...
| | | | |
| | | | |
| | | | |
| | | | |
| | | | |
| | | | |
| | | | |
| | | | |
| | | | |
| | | | |
| | | | |
| | | | |
| | | | |
| | | | |
| | | | |
| | | | |
| | | | |
| | | | |
| | | | |
| | |


(Submissions close in 4d 9h 30m)
Posted on July 27th, 2014
Home Wind Power: Yes, in My Backyard! - Renewable Energy - MOTHER EARTH NEWS
Home Wind Power: Yes, in My Backyard!
Considering residential wind power for energy self-sufficiency? Find out whether a home wind turbine is right for you.April/May 2013

Related Content
The Living Sustainably and Independently, Ready for Rough Times, Hands-on, Solar-Powered, All You Can Grow Workshop Wrap Up
Cam enjoyed a recent workshop he held at Sunflower Farm, and the participants seemed to enjoy it too...
The Great Blog Smackdown
Cam responds to a negative comment about a previous blog.
Wind Power For Your Own Backyard
Information and advice from the Small Wind Certification Council on creating wind power in your own ...
Are Wind Farms Making People Sick?
In a recent study, researchers found that watching videos about wind farm-related illnesses made par...
So maybe you’re thinking you want to generate your own electricity, and home wind power has crossed your mind. After all, who really enjoys paying a utility bill? Small wind energy is renewable, non-polluting, and, in the right circumstances, can save you money.
But is home wind power a good choice for you? The answer may surprise you, because living in a windy area is not necessarily the most important factor. In fact, many properties are not a good fit for installing a wind turbine even if they have a lot of wind (for reasons we’ll get into). On the other hand, if you want to go off-grid and produce your own electricity, you almost certainly want to consider installing a home wind turbine, even if your location is not notably windy.
Off-Grid Residential Wind Power
Here’s the deal: For a home wind turbine to be worth your investment, you really need to live on an acre or more. That’s the guideline from the U.S. Department of Energy’s Guide to Small Wind Electric Systems, a free publication for homeowners. Living in a rural area helps, because if you’re in a residential neighborhood, you’re likely to run into conflicts with zoning and local homeowners associations. Additionally, you’re more likely to find a high average wind speed in wide open spaces far from windbreaks such as buildings and trees. Altogether, while installing a small wind turbine in a city or suburb is certainly possible, you’re much more likely to have the right conditions for home wind power if you live well outside city limits.
That’s the case for Cam and Michelle Mather, who live on 150 forested acres in rural Ontario. The Mathers live in an off-grid home powered by solar panels and their micro wind turbine, a 1-kilowatt (kw) Bergey Excel 1. On such a large property, they’re nowhere near their closest neighbors, so there’s no one who might be upset about the noticeable — but not unpleasant — wind turbine noise or the very visible 100-foot tower in the couple’s yard.
What’s surprising about the Mathers’ situation is that their local wind speeds are not ideal, yet home wind power works beautifully for them. “Technically, if you look at wind maps, we’re in a bad location for wind, but we wanted to be off-grid for environmental reasons," Cam says. The biggest issue with the Mathers’ property is that they have too many trees, and even though their small wind turbine is easily 40 feet above the tree line, the landscape slows down the wind. Wind still makes sense for them, though, because they’re off the grid, so their only electricity is what they produce and then store in batteries. They started with solar panels, but adding a wind turbine to the mix made the whole system much more stable and efficient — a major benefit when you’re solely responsible for generating your own electricity.
Posted on July 27th, 2014
Freezer Cooking Recipes: $0.24 Microwavable Pasta Lunches
Freezer Cooking: $0.24 Microwavable Pasta Lunch Packets
March 7, 2014 By Jazmin Rode 20 Comments

I’m a fan of easy freezer cooking recipes, convenience and inexpensive meals. So I combined all of these qualities and turned them into a metaphorical super soldier of sorts and came up with this:

Yep, the price you see is indeed accurate. These freezable pasta lunches come in at just $0.24 per serving. Not only are they insanely inexpensive (can you even buy a pack of gum for $0.25?), they offer convenience and endless possibilities for variety to spice up your work lunches.
Do the work once and you’ll be able to fill your freezer![]() with over three weeks worth of tasty lunches to bring to work.This was music to my husband’s ears, since he was getting pretty tired of taking leftovers or sandwiches to work every day.
with over three weeks worth of tasty lunches to bring to work.This was music to my husband’s ears, since he was getting pretty tired of taking leftovers or sandwiches to work every day.
Here’s how to make your own:
Cook the pasta in a salted pot of boiling water until al dente. I cooked up two boxes of pasta, so I needed two pots. Or you can just skip the extra effort and use a large stock pot![]() . Then drain.
. Then drain.
Stir drained pasta with olive oil to prevent sticking. I used a little over 1 tsp. of Olive Oil![]() for each box of pasta.
for each box of pasta.

Place pasta in an even layer on a cookie sheet![]() . I used one cookie sheet per box of cooked pasta. My pasta overlapped a bit, so I had to snap a handful of pieces apart once frozen.
. I used one cookie sheet per box of cooked pasta. My pasta overlapped a bit, so I had to snap a handful of pieces apart once frozen.
Place in the freezer for two hours. If you have a small freezer like me, use a small wire shelf from the dollar store to be able to freeze two sheets at once.

While the pasta is freezing, mix together your sauce and let it cool completely before packaging up. You’ll see two types of sauce in this post, but since I way over estimated how much I needed, I’m only accounting for the cost of one sauce – the broccoli alfredo sauce.
Recipe to come soon for the broccoli alfredo sauce.
UPDATE: The broccoli alfredo sauce recipe has been posted.
Remove the frozen pasta from the freezer and transfer to a large bowl. If some of your pieces are frozen together, gently snap them apart. I opted to mix my pastas together even though they were different varieties.

Tip: Larger pastas are easier to freeze and less likely to stick together. If some of them do stick together, it’s a lot easier to snap them apart than a smaller pasta.
I used zippable sandwich bags and small 2-oz. cups w/lids (like this![]() ) to package up my pasta lunches. If you prefer not to use the cups, you can freeze your sauce in ice cube trays. Since most ice cube trays hold 1-oz. per cube, you’ll need to use two ice cubes for each bag of pasta.
) to package up my pasta lunches. If you prefer not to use the cups, you can freeze your sauce in ice cube trays. Since most ice cube trays hold 1-oz. per cube, you’ll need to use two ice cubes for each bag of pasta.
It’s important to work quickly when packaging up your pasta so it doesn’t thaw.Place one cup of pasta into each bag. Try to remove as much air as possible from each bag, fold over once if your bags are large enough and seal. Place them into the freezer immediately.

Then package up your sauce cups. Each cup holds two ounces. I just used a regular spoon to scoop in my sauce. Place lids on cups and transfer to the freezer.

** if you’re using an ice cube tray for your sauce, you’ll have to add the frozen cubes to the bags of pasta later.
I’m storing my pasta in a basket on the top shelf of my freezer and just sliding in the cups in the leftover space on the side. Super easy to grab and go!

Now, About the Sauce
I know I touched on it above, but I’ll explain a bit more about my choice for the sauce. The reason I consciously chose the little cups to store the sauce was because I wanted my husband to have some variety with his lunch each day.
Keeping the sauce separate from the pasta allows me to save leftover sauce from our dinners in the cups and add it to our sauce stash. This allows for a much greater variety than if the sauce was packaged together with the pasta. He can just choose the sauce he’s in the mood for, grab the pasta, and go.
This is just an easy way to break up the monotony of essentially eating the same thing for lunch a few times each week.

Heating Instructions:
Straight from the freezer:
Lightly massage bag of pasta to break apart any pieces that are frozen together. Place pasta in microwave safe bowl. Remove frozen sauce from cup and place directly over the pasta (if you’re using sauce from ice cube trays, use 2 cubes of sauce). Microwave for 90 seconds. Then mix thoroughly, ensuring all pasta is covered in the sauce. Place back in microwave for 30 seconds. Let sit for one minute before removing from microwave.
*Microwave times may vary according to your microwave’s wattage.
When thawed:
Place pasta in microwavable bowl, mix sauce and pasta together and microwave for one minute or until thoroughly heated through.
I knew they were going to be inexpensive, but I was happily surprised to see that the cost per serving is just $0.24. To date, this is probably one of the cheapest freezer meal recipes I’ve posted. Though, my $0.59 freezer smoothie packets do come pretty close.


Posted on July 27th, 2014
How I Cut My Energy Bill By a Third with Tech and Common Sense
Last month my electric bill was $300. That was ridiculous. Something had to be done. By using gadgets, common sense, and a constant awareness of power consumption, I've made changes that will cut my power bill by at least a third. And that's not just temporarily—that's forever. And, I'm doing it without really sacrificing anything. P
I've always used more power than normal people because 1) I work at home on a 30-inch monitor and a 27-inch iMac, and 2) I have an assload of electronics. The 63-inch Plasma TV (larger TVs use more already, and plasma draws three times as much power as LCD), as well as water coolers, various NASes, and the need to keep some lights on during the day for my rabbits are a constant drain on the grid. But what could I do? Could I still realistically use all my devices when I wanted them, but still draw a lot less power? Yes. Here's how you can do it too. P
I'm going to start with common sense tips that require no extra equipment so anyone can start lowering their power consumption right now. But if you're serious about lowering your electricity usage dramatically, I'll discuss tools like the eMonitor that tell you exactly what's drawing power in your home down to the circuit level. Once you know exactly what's wasting money, I'll point out some advanced tips and equipment you can use to do something about it. P
The common sense stuff you can do right now P
Turn off your lights P
Go around your house and turn off all the lights you're not using, especially if you're using old style incandescent light bulbs (Edison's kind). Bathrooms, closets, and sometimes kitchens use incandescent lights because unlike compact fluorescents, they get up to maximum brightness right away. When all you want to do is take a leak or check the mirror, CFLs won't even be done going through their 5 minute warmup stage up by the time you're washing your hands. Another alternative is LED bulbs, which are dramatically more expensive upfront, but don't have the drawbacks of CFL and behave more like a traditional light. 1 P

Am I Washing My Hands Correctly?
Much like wiping, washing our hands is something that all of us hopefully do, but don't really …Read more
Point is, each 60 watt bulb uses 0.060 kWh (more or less, depending on your wiring) per hour, and you probably have somewhere between 2 to 4 bulbs in each bathroom and kitchen, which makes for 120-240 watts of wasted electricity per hour. In comparison, my 27-inch iMac takes about 130 watts with the screen on and everything powered up. Two (inefficient) lights use the same amount of power as a large computer! A laptop uses about 40 to 60 watts, in comparison, so you could do an hour's work by just shutting off a light. P
Moral: Turn off your lights when you're not using them. Tell your spouse, roommates, parents, pets and goblins to do the same, and show them exactly how much power they're wasting by not doing this. P
Unplug stuff you rarely use P
I have an exercise room with a treadmill and a TV inside. I don't use them nearly as often as I should, which means they could theoretically sit plugged in for weeks for no reason. Stuff like TVs and other stereo equipment still draw power when they're plugged in but off—which is called vampire drain—due to the fact that they have to still power their IR receivers for your remote control to work. You'll need to physically unplug these things from the wall to eliminate any power consumption when not in use. It might take an extra minute to find the cord, plug it in and switch on the electronics when I do use them—and an extra minute to unplug when I'm done—but it's worth it if they're barely used. P
Don't use your AC so damn much P
Your air conditioning power usage is a very nebulous thing, because unless you physically track how long your AC was on (including all the stops and starts), compare it to how much electricity your other electronics are using, then somehow correlate that with your bill at the end of the month, you're really in the dark. But trust me when I say that it's a lot. Depending on the weather, how much you use it and what other electronics you have, you could be paying more for AC than everything else in your house put together. That's insane. P
We've got five alternatives to running your air conditioner all the time, which include ice in front of a fan, turning off your heat-generating electronics, and generating a breeze into your home at night when the air outside is cooler. I'm not telling you to not use the AC at all, but walking around the house with fewer clothes on rarely hurts anybody. P

Five Effective DIY Alternatives to Running an Air Conditioner
If you don't have an air conditioner and can't take the heat (or you just don't feel …Read more
For the curious, I'll cover an actual way to measure your air conditioner's power usage compared to everything else a little later, with the eMonitor. P
Turn off your electronics, especially your computers, when you're not using them P
This point, just like turning off your lights, is a super obvious thing that all of us know, but don't religiously follow, because we're not electricity nazis. Unless you're torrenting at night, or hosting a Minecraft server for your friends, you don't really need to have your computer on when you're asleep. I know it's nice to not have to wait 5 minutes to get started in the day, but are those five minutes really worth keeping your computer on overnight and spending $1.85 a month? Actually, probably. P
But, when you're trying to shave off dollars from your bill, having a computer, a NAS, a couple laptops, and stereo equipment be on all the time can quickly add up to double digits per month for stuff you're not using. I'm not talking about not using these devices when you need them, it's the paying for stuff when it's not actually having any benefit that's the killer. P
Find out exactly what's using so much power 2 P
The basic method P
The cheap way of examining your electronics is to go around with a Killawatt or a Belkin Conserve Insight and plugging all your devices, one by one, into it and seeing how much power they draw. This is easy for something like a computer or a microwave, because you know exactly when they're on and off. But for something intermittent that cycles between drawing a lot of power and very little power, like a refrigerator or a water cooler, this is more difficult. But, using this, you can realize that—holy crap—my hot pot cooker uses 2,000 watts. Or that maybe it's really not a good idea to leave your TV on when you're not using it. P

The Batman method P
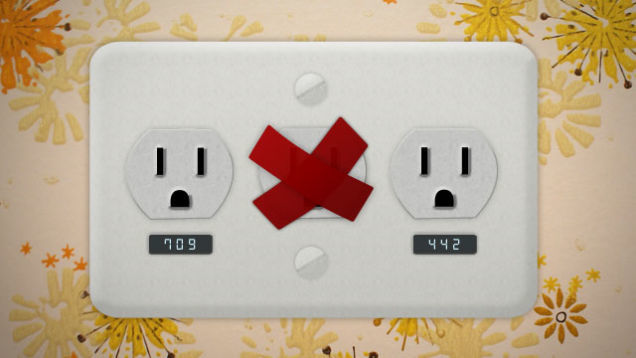
If you really want to get serious about knowing exactly how much power use is going on—and I mean the kind of serious you get when you get a $300 bill in the mail, get an eMonitor from Powerhouse Dynamics. P
Traditional smart meter solutions that hook up to your meter—which are difficult or impossible to install if you live in a multi-unit complex or an apartment—can only tell you how much power your entire house is using as a whole. That's better than no information, but it renders it hard to narrow down the energy hog to an appliance level unless you constantly go around with a Killawatt and measure. The eMonitor installs onto the circuit level, so you can get a room-by-room readout. The only way you could get any more detailed is if there were Killawatt type measuring tools on each individual outlet that fed wirelessly into a central place that consolidates all this data. As far as I know, this doesn't exist yet. P
 SExpand
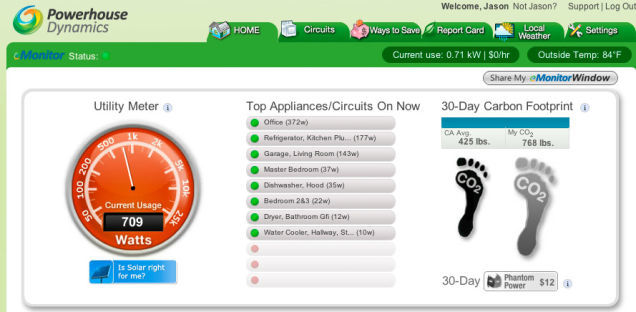
I'll explain the home screen of the eMonitor webapp. It's hard to make sense of it as a whole, so I'll break it down into pieces. P
You can see that my office is drawing the most right now, because my computers are on, as is my cable modem and wireless router. The refrigerator is in one of its higher power cycles, which explains why it's coming in at second, and there's a computer on in the living room, punching it up to 143 watts. Usually this idles at about 100, which includes a TiVo, another Wi-Fi router and a home automation system. Everything else is effectively unplugged. P
The other rooms have a small, constant power draw for things like clock radios, more Wi-Fi routers, appliances, security systems, and even this eMonitor setup. You could technically classify these as phantom power draws, but you're not going to unplug your clock radio every morning, and stuff like security systems are just things that you need to have on constantly. P
SExpand
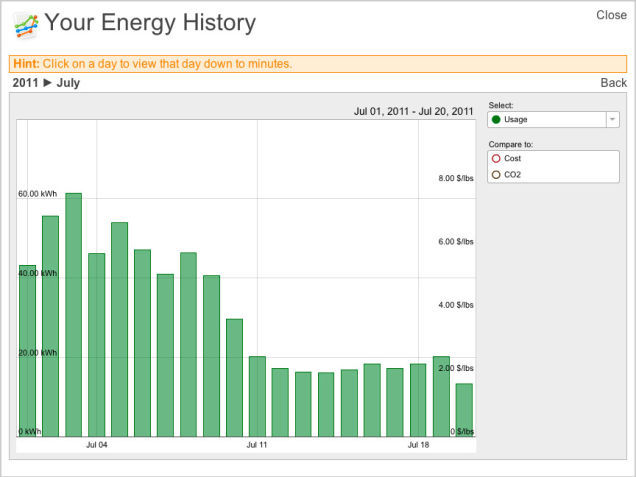
The second chunk tracks my last 30 days of power consumption. The living room and office are two obvious rooms with giant power usage, because my computers and my television are there, and that's where most of the day is spent. The AC, however, comes in third and fourth, because it's on two circuits. So together, it's used about a third of the total power for the last 30 days. And that's with me not turning on the AC at all for the last ten! I am ashamed of myself. That's the kind of wasteful behavior you can settle into if you stop paying attention. P
 SExpand
But the good news is that the bill estimate for this month is already dramatically less than last month, and I've only been trying to save power for about 10 days now. The first 10 days of July are still shameful, but I'm proud of the last 10. Part of that is me not using the AC, but it's also me eliminating useless power consumption. P
 SExpand
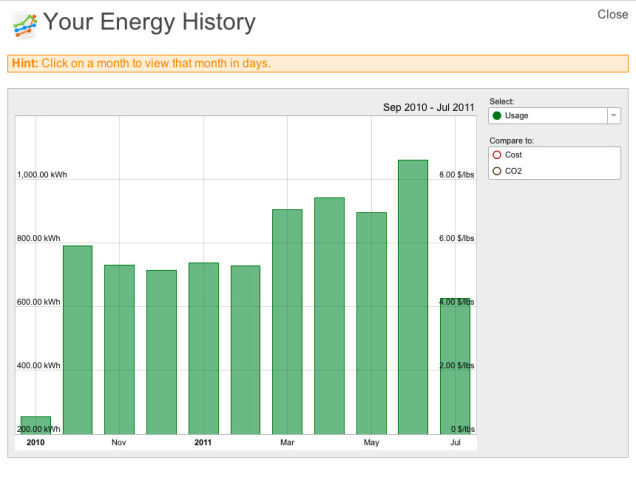
If I keep on this new low-energy diet, the August month will be the lowest I've ever had since the installation of the eMonitor at the end of September (which doesn't count). P
What's also great are the historical charts, which can also be shown on a circuit by circuit view to help you figure out what's sucking down the most juice. Each circuit can also be clicked on to see a historical view as well, or if you just want to monitor it closely in real time. The chart updates once a minute, but you can bypass that and go directly to your local eMonitor's IP address and see exactly what it's using right now via its tiny web server. P

Although the eMonitor is unbelievably powerful, it's also quite expensive. A 12 circuit monitor (what I have) will cost $688. A 24 circuit monitor, for large houses, costs $948. This is steep, but if you manage to cut down your power by $50 a month—and be able to keep it down, because you can set alerts and monitor when appliances use more than they should—you'll make that back within a couple years. It's also very useful for people who have solar panels, because it can keep track of your power generation as well. P

Trust me, when you're trying to cut your power use down, you'll be religiously monitoring the site throughout the day to keep a constant eye on what's using what. You'll also know exactly when the other people in your household start showering, watching TV, doing laundry or engage in any other electricity-intensive activity (and then yell at them for it). P
What do I do with all this information? P
Once you have the eMonitor installed, the first step is to identify devices in rooms that are using too much power while off. Start unplugging things and see how that affects the power consumption for its circuit. For example, some televisions and receivers and game consoles still draw a considerable load when powered down because they're keeping part of their circuitry on, even in the off state. You'll want to unplug these when you're not using them, or use the lamp timer or smart power strip methods I explain later. P
You can also start turning on electronics and seeing if something is insanely inefficient. Buying a new iron for $15 because your old one uses that much more in electricity in a year would be a good possible outcome. The mentality applies for the rest of the small-ticket appliances like hairdryers, toasters and coffee makers. P
You'll also be able to see how much power your lights are drawing compared to your other electronics, and you'll immediately want to swap out your bulbs for more efficient ones, which I explain next. P
The key is that once you know exactly what's drawing power in your house, you can start doing something about it. P
The technical solutions P
Switch your light bulbs to more efficient ones P
 SExpand
Like I said earlier, a 60 watt incandescent bulb uses 60 watts, or 0.060 kWh per hour, whereas the a compact fluorescent equivalent uses 13 watts, and a Philips LED bulb uses 12.5 watts. The chart should quickly outline the good and bad of each type of bulb. P
Notes
1 Average life for a GE and a Sylvania CFL bulb on Amazon. Wikipedia lists the average life as somewhere between 6000 to 15000, but the more common bulbs are 8000. And "average" life is the point at which half the bulbs at this age are dead, and half are still functional.
2 Average life for the Philips Ambient LED bulb, the one tested for this post. According to the Energystar website (PDF), most bulbs are coming in at about 25000 hours, with some at 50000 and a handful down at 15000. Like CFL, this is the point where half the bulbs would likely be dead and half would not.
3 There are CFL bulbs that are dimmable, but they are four times as expensive, and do not dim well. Complaints on Amazon say they're maximum brightness, down to about 80%, and then off.
4 Energystar rebates exist for LED lights, and you can search the site with your local zip code to see if your power company has any. Mine did not.
P
For most instances, you're going to want to go with a CFL, because it's cheap, drawing only slightly more power than an LED, and has a reasonably long life. An LED wins out in the cases where you're replacing an incandescent in the bathroom, where you want the lights to come on at max brightness instantly, or when you want to be able to control your brightness from a dimmer. But if you're talking living room lamps or dining/kitchen lights, where you'll physically be there for a while, a CFL works just fine. Those of you lucky enough to rebate the price down from $45 a bulb might find the 3x long lifetime and slightly decreased power consumption worth it for rooms where you want to keep the light on all the time as well. P
Here's a simple calculation that illustrates my point. If you keep a 60 watt bulb on for 12 hours a day, every day of the month, it would cost you about $2.77. A CFL used under the same conditions would cost $0.60. The difference there is already enough to cover the purchase of a new bulb, for just one month's use. P
You should also think about whether you really need 100 watt bulbs everywhere. I, for one, know how satisfying it feels to install one, fill up a room and really blow my retinas out. But unless you're performing delicate visual work all the time or trying to illuminate a large room, you can most likely make do with a 60 watter. Even 75 watt bulbs are plenty bright most of the time. P
Use a lamp timer to keep stuff on only when you need it P
I have two water coolers, one in my office and one in the kitchen so that I can have hot or cold water at any time. But if I think about it, how likely is it that I'm going to be in both places at the same time? Or, that I'm going to need cold water while I'm asleep? P
Take a $10 lamp timer ($6 if you use it for non-grounded, two-prong plug items) and you can specify exactly what times of the day you're likely to be using this. For the office cooler, I'm only really going to need water from it between noon and 5PM. For the kitchen cooler, it's 7AM to 9AM, then 6PM to midnight. By doing this, I've shaved 80% use time off one and 66% off the other. Sure, it takes a little more power to get the water to optimal temperature when they first start up, but that's less than keeping it on the entire day. P

You can extrapolate this lamp timer usage to appliances that you use every day and don't want to unplug all the time, but only need part of the day. Are you going to use your internet connection while you're asleep (if you don't Torrent)? Put your cable modem and router on a lamp timer. Do you ever really watch any shows your TiVo records from 2AM to 9AM? Or need your stereo when you're at work or asleep? Take a look around your house and see what devices you use every day, but only for parts of it, that would be annoying to unplug manually. P
Use a smart power strip that knows when to turn everything off P
If you think about it, there's little reason for your Xbox, PS3, receiver or subwoofer to be on when your TV is off. Likewise, why would your computer speakers, external USB backup drive, and monitor need to be on when your computer is not? Grab a smart power strip, like the Belkin Conserve Smart AV, that kills power going to five other devices when the main device—your TV or computer—is shut off. If you often listen to music with your receiver on and your TV off, you could make that the primary device as well. P
And if you're forgetful, you could combine this with the lamp timer method to make sure that your "main" devices—the ones that kill everything else—are off when you go to bed. P
An alternate method is to get a power strip with a remote, like these two Belkin models, which gives you the plug/unplug functionality without physically going and doing it. P
Use a charger that knows when your devices have had enough P
You could also use a special Conserve Valet that charges four USB things at once. This thing knows when your device has drawn enough power to fill up, and then automatically cuts off the charging to eliminate phantom power drain. P
I've found that the Valet is not that, practically speaking, because when you're charging your phones, iPods and Kindles, you expect them to be charged when you unplug them, whether it's 3 hours later or a day later. But if you're vigilant about charging your devices, this is a decent solution to only draw as much power as absolutely necessary. P
Do I really need to do all these things? P
Installing an eMonitor and knowing exactly how much power each gadget in your house uses may be a little extreme if your electric bill is already reasonable. The eMonitor is expensive, despite its comprehensiveness, and I wouldn't expect many of you to actually install it. But, with a $20 Killawatt and the common sense lessons I learned from lowering my power bill, you should be able to cut at least a few bucks off yours. P
Posted on July 27th, 2014
Supercook: recipe search by ingredients you have at home
Do you have?
Welcome
Supercook unlocks the potential of your pantry and fridge. Save money and help the environment by fully utilizing the ingredients you already have.
Posted on July 27th, 2014
70+ Homestead Hacks: Nifty Shortcuts to Make Your Life Easier
70+ Homestead Hacks: Nifty Shortcuts to Make Your Life Easier
May 22, 2014 By Jill Winger 5 Comments

If there’s one thing I’ve learned about homestead/farmer folk…
…it’s that you guys are a ingenious bunch (especially when it involves baling twine or duct tape!)
I’m all about conserving time whenever possible, and I’m always on the look-out for a good homestead hack to add to my collection.
What’s a “Homestead Hack?"
Good question. Here is how Wikipedia explains it:
“Life hacking refers to any productivity trick, shortcut, skill, or novelty method to increase productivity and efficiency, in all walks of life; in other words, anything that solves an everyday problem in a clever or non-obvious way"
Apply that definition to homesteading, and that, my friends, is a Homestead Hack.
I’ve featured various Homestead Hacks in the past, but this, my friends, is the granddaddy of all Homestead Hack posts. I hope you are ready for this!

70+ Homestead Hacks to Make Your Life Easier

For Your Animals
- How to Weigh a Pig without a Scale
- A Cheap DIY Waterer for Ducks and Geese
- Turn an Old Kitchen Sink into a Dog Water Bowl
- 5 Tips for Putting Your Chickens to Work
- DIY $1 Chicken Feeder and Waterer
- How to Trim Your Goat’s Hooves
- How to Make a DIY Goat Feeder
- How to Make Your Own Udder Balm
- How to Stop Your Milk Cow from Kicking
- How to Remove Skunk Smell (without tomato juice)
- DIY Beehive in a Mason Jar

For Your Garden
12. How to Kill Squash Bugs and Eggs with Duct Tape
13. How to Freeze Root Vegetables
14. How to Get Free Containers for Starting Seeds Indoors
15. How to Repurpose Masonry Ladders in the Garden
16. 6 Tips for Planting and Growing Beans
17. 10 Tips for Growing Awesome Tomatoes
18. How to Warm Up Garden Soil for Early Planting
19. How to Get Superpowered Garden Soil
20. How to Grow Heirloom Vegetables
21. 10 Kitchen Herbs that Grow Well in the Shade
22. How to Grow Tomatoes from Cuttings
23. How to Make a Greenhouse from an Old Trampoline
24. How to Save Money on Lumber for Your Raised Bed Garden
25. How to Make DIY Grow Lamps for Starting Seedlings
26. How to Grow Potatoes in a Vertical Space
27. Make An Easy DIY Watering Can
28. How to Grow Mushrooms in a Laundry Basket
29. Easy DIY Raised Garden Cover
30. How to Test Your Garden Soil Using a Mason Jar
31. How to Make a Whiskey Barrel Container Garden
32. How to Make a No-Dig Fence Post
33. How to Start Seedlings in Egg Cartons

For Your Kitchen
34. The Hands-Free Way to Skim Fresh Milk
36. How to Quickly Cook Dry Beans (The No-Soak Method)
37. Simple “Pioneer Soup" Formula for a Fast Supper
38. How to Make a Super-Quick Fruit Fly Trap
39. How to Use a Shower Cap to Replace Plastic Wrap
41. How to Freeze Fresh, Raw Kale
42. The Easiest Way to Peel an Onion
43. A Free (or Super-Cheap) Source of Food Grade Buckets
44. A Nifty Alternative to Buying Cheesecloth
45. A Handy Way to Help Dough Rise Faster
46. How to Make Caramelized Onions in the Slow Cooker
47. A Quick & Easy Way to Remove Corn Kernels
48. A Creative Way to Store Homemade Tortillas
49. How to Bake Bread in Your Toaster Oven
50. How to Can Peaches without Sugar
51. How to Reheat Foods Without a Microwave
52. The No-Stick Way to Measure Honey and Liquid Sweeteners
53. Simple Way to Measure Solid Cooking Oils
54. How to Use a Mason Jar as a Liquid Measuring Cup
55. Convenient Frozen Lemon & Lime Juice Cubes
56. How to Make Homemade Dried Lemon Peel
57. The Secret for Perfectly Measured Spices
58. How to Use Up Leftover Whey
59. How to Use Old Coffee Grounds
60. How to Make Your Own Brown Sugar
61. How to Test Your Eggs for Freshness
62. How to Peel Farm-Fresh Hard Boiled Eggs
63. How to Cook No-Stick Eggs in a Cast Iron Skillet
64. How to Store Onions, Garlic, and Shallots for Months
65. 3 Ways to Wash Your Produce
66. DIY Meat Smoker Made from a Flower Pot

For Your Home
67. How to Cut a Little Boy’s Hair to Save Money
68. How to Easily Remove Labels from Glass Jars and Containers
69. How to Remove Crayon from Painted Surfaces
70. How to Freshen and Clean Carpet Spots with 2 Ingredients
71. How to Organize Your Pantry with Glass Jars
72. Easy (and Cute) Boot Tray with Rocks
73. 13 Homesteading Supplies You Can Get at the Dollar Store
74. DIY Drying Rack for the Wall

STANDARD DISCLOSURE: In order for me to support my blogging activities, I may receive monetary compensation or other types of remuneration for my endorsement, recommendation, testimonial and/or link to any products or services from this blog.
Posted on May 23rd, 2014

7 Questions to Ask Before Starting a Business in 2014
http://mashable.com/2013/12/11/new-business-questions/?utm_campaign=Mash-Prod-RSS-Feedburner-All-Partial&utm_cid=Mash-Prod-RSS-Feedburner-All-Partial&utm_medium=feed&utm_source=rss


If your New Year’s resolutions include quitting your job and starting a business, you’re not alone. What could be more fulfilling than calling the shots, setting your own hours, and making things happen?
However, going off on your own is no easy feat, and many would-be entrepreneurs quickly become unsettled by the hard work and uncertainty of the lifestyle.
You can’t prepare yourself for every aspect of running your own business, but here are some key questions to ask yourself before taking the plunge. Read more...
1. How well do you work without a playbook?
More about Small Business, Startups, Features, Business, and Entrepreneurs
IT General
via Mashable http://mashable.com/stories/?utm_campaign=Mash-Prod-RSS-Feedburner-All-Partial&utm_cid=Mash-Prod-RSS-Feedburner-All-Partial&utm_medium=feed&utm_source=rss
December 11, 2013 at 05:04AM
Posted on December 11th, 2013