

Showing all posts tagged "Cb Security Emergency Response"
Gun Club app
Posted on November 29th, 2013
Escape from zip ties
Learn How to Escape from Zip Ties by Slipping Out. View more details here http://www.itstactical.com/2009/09/26...
Posted on November 28th, 2013
How to Crack a Wi-Fi Network's WPA Password with Reaver


How to Crack a Wi-Fi Network's WEP Password with BackTrack
You already know that if you want to lock down your Wi-Fi network, you should opt for WPA encryption because WEP is easy to crack. But did you know… Read…
Your Wi-Fi network is your conveniently wireless gateway to the internet, and since you're not keen on sharing your connection with any old hooligan who happens to be walking past your home, you secure your network with a password, right? Knowing, as you might, how easy it is to crack a WEP password, you probably secure your network using the more bulletproof WPA security protocol. P
Here's the bad news: A new, free, open-source tool called Reaver exploits a security hole in wireless routers and can crack most routers' current passwords with relative ease. Here's how to crack a WPA or WPA2 password, step by step, with Reaver—and how to protect your network against Reaver attacks. P
In the first section of this post, I'll walk through the steps required to crack a WPA password using Reaver. You can follow along with either the video or the text below. After that, I'll explain how Reaver works, and what you can do to protect your network against Reaver attacks. P
First, a quick note: As we remind often remind readers when we discuss topics that appear potentially malicious: Knowledge is power, but power doesn't mean you should be a jerk, or do anything illegal. Knowing how to pick a lock doesn't make you a thief. Consider this post educational, or a proof-of-concept intellectual exercise. The more you know, the better you can protect yourself.
What You'll Need P
You don't have to be a networking wizard to use Reaver, the command-line tool that does the heavy lifting, and if you've got a blank DVD, a computer with compatible Wi-Fi, and a few hours on your hands, you've got basically all you'll need. There are a number of ways you could set up Reaver, but here are the specific requirements for this guide: P

- The BackTrack 5 Live DVD. BackTrack is a bootable Linux distribution that's filled to the brim with network testing tools, and while it's not strictly required to use Reaver, it's the easiest approach for most users. Download the Live DVD from BackTrack's download page and burn it to a DVD. You can alternately download a virtual machine image if you're using VMware, but if you don't know what VMware is, just stick with the Live DVD. As of this writing, that means you should select BackTrack 5 R3 from the Release drop-down, select Gnome, 32- or 64-bit depending on your CPU (if you don't know which you have, 32 is a safe bet), ISO for image, and then download the ISO. P
- A computer with Wi-Fi and a DVD drive. BackTrack will work with the wireless card on most laptops, so chances are your laptop will work fine. However, BackTrack doesn't have a full compatibility list, so no guarantees. You'll also need a DVD drive, since that's how you'll boot into BackTrack. I used a six-year-old MacBook Pro. P
- A nearby WPA-secured Wi-Fi network. Technically, it will need to be a network using WPA security with the WPS feature enabled. I'll explain in more detail in the "How Reaver Works" section how WPS creates the security hole that makes WPA cracking possible. P
- A little patience. This is a 4-step process, and while it's not terribly difficult to crack a WPA password with Reaver, it's a brute-force attack, which means your computer will be testing a number of different combinations of cracks on your router before it finds the right one. When I tested it, Reaver took roughly 2.5 hours to successfully crack my password. The Reaver home page suggests it can take anywhere from 4-10 hours. Your mileage may vary. P
Let's Get Crackin' P
At this point you should have BackTrack burned to a DVD, and you should have your laptop handy. P
Step 1: Boot into BackTrack P
To boot into BackTrack, just put the DVD in your drive and boot your machine from the disc. (Google around if you don't know anything about live CDs/DVDs and need help with this part.) During the boot process, BackTrack will prompt you to to choose the boot mode. Select "BackTrack Text - Default Boot Text Mode" and press Enter. P
Eventually BackTrack will boot to a command line prompt. When you've reached the prompt, type startx and press Enter. BackTrack will boot into its graphical interface. P
Step 2: Install Reaver P
Update: This step is no longer necessary, as Reaver comes pre-installed on Backtrack 5 R3. Skip down to Step 3. P
Reaver has been added to the bleeding edge version of BackTrack, but it's not yet incorporated with the live DVD, so as of this writing, you need to install Reaver before proceeding. (Eventually, Reaver will simply be incorporated with BackTrack by default.) To install Reaver, you'll first need to connect to a Wi-Fi network that you have the password to. P
- counter(item, decimal) .
- Click Applications > Internet > Wicd Network Manager
- counter(item, decimal) .
- Select your network and click Connect, enter your password if necessary, click OK, and then click Connect a second time.
Now that you're online, let's install Reaver. Click the Terminal button in the menu bar (or click Applications > Accessories > Terminal). At the prompt, type: P
apt-get update
  P
And then, after the update completes: P
apt-get install reaver
  P
If all went well, Reaver should now be installed. It may seem a little lame that you need to connect to a network to do this, but it will remain installed until you reboot your computer. At this point, go ahead and disconnect from the network by opening Wicd Network Manager again and clicking Disconnect. (You may not strictly need to do this. I did just because it felt like I was somehow cheating if I were already connected to a network.) P
Step 3: Gather Your Device Information, Prep Your Crackin' P
In order to use Reaver, you need to get your wireless card's interface name, the BSSID of the router you're attempting to crack (the BSSID is a unique series of letters and numbers that identifies a router), and you need to make sure your wireless card is in monitor mode. So let's do all that. P
Find your wireless card: Inside Terminal, type: P
iwconfig
  P
Press Enter. You should see a wireless device in the subsequent list. Most likely, it'll be named wlan0, but if you have more than one wireless card, or a more unusual networking setup, it may be named something different. P

Put your wireless card into monitor mode: Assuming your wireless card's interface name is wlan0, execute the following command to put your wireless card into monitor mode: P
airmon-ng start wlan0
  P
This command will output the name of monitor mode interface, which you'll also want to make note of. Most likely, it'll be mon0, like in the screenshot below. Make note of that. P

Find the BSSID of the router you want to crack: Lastly, you need to get the unique identifier of the router you're attempting to crack so that you can point Reaver in the right direction. To do this, execute the following command: P
airodump-ng wlan0
  P
(Note: If airodump-ng wlan0 doesn't work for you, you may want to try the monitor interface instead—e.g., airodump-ng mon0.) P
You'll see a list of the wireless networks in range—it'll look something like the screenshot below: P

When you see the network you want, press Ctrl+C to stop the list from refreshing, then copy that network's BSSID (it's the series of letters, numbers, and colons on the far left). The network should have WPA or WPA2 listed under the ENC column. (If it's WEP, use our previous guide to cracking WEP passwords.) P
Now, with the BSSID and monitor interface name in hand, you've got everything you need to start up Reaver. P
Step 4: Crack a Network's WPA Password with Reaver P
Now execute the following command in the Terminal, replacing bssid and moninterface with the BSSID and monitor interface and you copied down above: P
reaver -i  moninterface -b  bssid -vv
  P
For example, if your monitor interface was mon0 like mine, and your BSSID was 8D:AE:9D:65:1F:B2 (a BSSID I just made up), your command would look like: P
reaver -i mon0 -b 8D:AE:9D:65:1F:B2 -vv
  P
Press Enter, sit back, and let Reaver work its disturbing magic. Reaver will now try a series of PINs on the router in a brute force attack, one after another. This will take a while. In my successful test, Reaver took 2 hours and 30 minutes to crack the network and deliver me with the correct password. As mentioned above, the Reaver documentation says it can take between 4 and 10 hours, so it could take more or less time than I experienced, depending. When Reaver's cracking has completed, it'll look like this: P
 S Expand
A few important factors to consider: Reaver worked exactly as advertised in my test, but it won't necessarily work on all routers (see more below). Also, the router you're cracking needs to have a relatively strong signal, so if you're hardly in range of a router, you'll likely experience problems, and Reaver may not work. Throughout the process, Reaver would sometimes experience a timeout, sometimes get locked in a loop trying the same PIN repeatedly, and so on. I just let it keep on running, and kept it close to the router, and eventually it worked its way through. P
Also of note, you can also pause your progress at any time by pressing Ctrl+C while Reaver is running. This will quit the process, but Reaver will save any progress so that next time you run the command, you can pick up where you left off-as long as you don't shut down your computer (which, if you're running off a live DVD, will reset everything). P
How Reaver Works P
Now that you've seen how to use Reaver, let's take a quick overview of how Reaver works. The tool takes advantage of a vulnerability in something called Wi-Fi Protected Setup, or WPS. It's a feature that exists on many routers, intended to provide an easy setup process, and it's tied to a PIN that's hard-coded into the device. Reaver exploits a flaw in these PINs; the result is that, with enough time, it can reveal your WPA or WPA2 password. P
Read more details about the vulnerability at Sean Gallagher's excellent post on Ars Technica. P
How to Protect Yourself Against Reaver Attacks P
Since the vulnerability lies in the implementation of WPS, your network should be safe if you can simply turn off WPS (or, even better, if your router doesn't support it in the first place). Unfortunately, as Gallagher points out as Ars, even with WPS manually turned off through his router's settings, Reaver was still able to crack his password. P
In a phone conversation, Craig Heffner said that the inability to shut this vulnerability down is widespread. He and others have found it to occur with every Linksys and Cisco Valet wireless access point they've tested. "On all of the Linksys routers, you cannot manually disable WPS," he said. While the Web interface has a radio button that allegedly turns off WPS configuration, "it's still on and still vulnerable. P
So that's kind of a bummer. You may still want to try disabling WPS on your router if you can, and test it against Reaver to see if it helps. P
You could also set up MAC address filtering on your router (which only allows specifically whitelisted devices to connect to your network), but a sufficiently savvy hacker could detect the MAC address of a whitelisted device and use MAC address spoofing to imitate that computer. P
Double bummer. So what will work? P
I have the open-source router firmware DD-WRT installed on my router and I was unable to use Reaver to crack its password. As it turns out, DD-WRT does not support WPS, so there's yet another reason to love the free router-booster. If that's got you interested in DD-WRT, check their supported devices list to see if your router's supported. It's a good security upgrade, and DD-WRT can also do cool things like monitor your internet usage, set up a network hard drive, act as a whole-house ad blocker, boost the range of your Wi-Fi network, and more. It essentially turns your $60 router into a $600 router. P

How to Monitor Your Internet Usage So You Don't Exceed Your Data Cap
Internet data caps are becoming a reality and can seriously suck. If you're stuck with the limitation, the best thing you can do is monitor your … Read…

Get More Out of Your DD-WRT Router with an External Drive
You've supercharged your router with DD-WRT, you're using it to monitor your bandwidth use, and yet you still wish it could do more. Well… Read…
Further Reading P
Thanks to this post on Mauris Tech Blog for a very straightforward starting point for using Reaver. If you're interested in reading more, see: P
- Ars Technia's hands on P
- This Linux-centric guide from Null Byte P
- The Reaver product page (it's also available in a point-and-click friendly commercial version. P
Reddit user jagermo (who I also spoke with briefly while researching Reaver) has created a public spreadsheat intended to build a list of vulnerable devices so you can check to see if your router is susceptible to a Reaver crack. P
Have any experience of your own using Reaver? Other comments or concerns? Let's hear it in the comments. P
Posted on November 27th, 2013
Something you know v something you have
Posted on November 27th, 2013
IT Best Practices: The Polarity of Security and Privacy | Connected Social Media
IT Best Practices: The Polarity of Security and Privacy
For more information on Intel IT best practices , please visit www.intel.com/IT
IT Best Practices : Security and privacy are like magnets. When they are turned in the right direction they are perfectly binding. But if one starts turning, they start to push away from each other. Listen to Malcolm Harkins, Intel Chief Security and Privacy Officer, discuss how organizations can manage the polarity of security and privacy with collaboration and a balanced approach.
Related posts:
- IT Best Practices: The 21st Century CISO (Chief Information Security Officer) IT Best Practices: From the book “Managing Risk and Information Security: Protect to Enable" by Malcolm Harkins As the technology environment continues to evolve, many people believe we’re moving toward a future in which organizations outsource much of the delivery...
- Inside IT: Malcolm Harkins – Business Velocity in the Changing Security Landscape IT Best Practices: Episode 61 – In this podcast we engage in a wide-ranging discussion on business velocity, security, and privacy with Intel’s Malcolm Harkins. Harkins has a unique view from his position as the Chief Security and Privacy Officer...
- Inside IT: Security and Business Intelligence IT Best Practices: Episode 45 – Intel’s approach to security has evolved. The current strategy looks to apply reasonable protections that allow information to flow through the organization. This reduces risk, but maintains a quality user experience. A big component...
- Intel IT Best Practices: Rethinking Information Security with Intel CISO In this short IT Security vblog, Malcolm Harkins, Intel CISO, talks about why Intel IT has undertaken a radical new five-year redesign of our information security architecture. Malcolm says that compromise is inevitable under almost any compute model, find out...
- IT Best Practices: Rethink Privacy IT Best Practices: Consumers care about privacy, is your company or organization paying attention? This video shows why companies and organizations should incorporate privacy early in their design, development, and deployment process – whether they’re working on products, programs or...
- IT Best Practices: Information Security and Cloud Computing Intel CISO, Malcolm Harkins shares his perspective on security and the cloud. ...
- Inside IT: Stopping Viruses and Threats IT Best Practices: Episode 15 – Information Technology has changed dramatically in just a few years, and the security threat has changed along with it. The opportunities for bad actors to infiltrate an organization have grown, and the nature of...
- Intel IT Best Practices: Intel CISO Discusses Misperception of Risk Intel CISO, Malcolm Harkins believes that underestimating or over exaggerating risk is one of the biggest vulnerabilities we face. Watch this short vblog to hear Malcolm’s explanation. ...
- IT Best Practices: Intel IT Embraces Social Computing Intel CISO, Malcolm Harkins suggests we embrace social media and social computing to reduce risk. ...
- IT Best Practices: Protecting the Perimeter IT Best Practices: From the book “Managing Risk and Information Security: Protect to Enable" by Malcolm Harkins At Intel, we are well aware of the risks associated with social media, but attempting to stop the use of external social media...
Posted in: Corporate , Featured , HD Video , Information Technology , Intel , Intel IT , IT@Intel , Security , Video Podcast
Tags: data security , governance , information security , information technology , Intel , Intel IT , IT Best Practices , IT Business Value , IT Whitepaper , IT@Intel , Malcolm Harkins , privacy , privacy principles , protect to enable
Posted on November 27th, 2013
Decrease Your Chances of Being Arrested with These Tips from an Ex-Cop

Want to stay out of jail? Then listen to the advice from Dale Carson, a defense attorney who used to be an FBI agent, SWAT sniper, and policeman. Carson says cops these days are racing to arrest as many people as possible, but we have ways of beating that predatory system.P
The advice or "rules," taken from Carson's book Arrest-Proof Yourself and summarized on The Atlantic, are: P
- Stay away from cops or, if you can't, try to blend in. I.e., if you're going to do something illegal, do it at home. When out and about, the people who will attract a cop's attention are the ones with pot leaf bumper stickers, unusual hairstyles and clothes, and so on. "In reality, cops love hassling people who stand out."1 P
- Give in to the psychological battle in order to win "the contest for custody of your body." Make eye contact and be polite—no matter how insulting the cops are. But don't smile.2 P
- If that doesn't work and it looks like you're going to get arrested, be pitiful. Ask or beg for a notice to appear before a judge instead of being arrested.3 P
- Never allow a cop to search your car without a warrant or probable cause.4 5 P
Hit up the link below for a bunch of other interesting tips that are good to know even if you're a model citizen. These know your rights cards are useful to have in your wallet as well.P
An Ex-Cop's Guide to Not Getting Arrested | The AtlanticP
Photo by nerdcoregirl .P

I read this piece a while back and got to thinking about it back then. Just for a little added information for anyone who may be in the same boat that I'm in, I've found this video, from a CNN interview on the topic and featuring LeVar Burton himself, to be pretty descriptive, and similar to what I was taught when I was young about interacting with police, especially during traffic stops:
Now, what I was taught was a little different - namely that instead of putting your hands outside the window, put them on your steering wheel at 10 and 2, in plain view from any angle outside of the vehicle.
Another point that I think varies from time to time or person to person is not to smile. I agree you don't want to try and be friendly or chummy - the officer isn't pulling you over to say hello - but in some cases you may want to at least be courteous or crack a smile - otherwise you may be perceived as cold, and at worst, aggressive. I was always taught to be pleasant and polite. Not friendly, and never volunteer information not explicitly asked, but pleasant.
Of course, all of this advice is *in light of,* not in lieu of, keeping your nose clean and trying your damnedest to make sure you don't get pulled over in the first place. That means don't give police a reason to target you at all, whether it's blend in or don't break the law or whatever. Of course, we all know that's not enough to avoid the eye of law enforcement from time to time, so the other tips are useful too.
I've known good cops and I've known seriously bad ones, but best case is that the cop isn't a jerk and you're being overly cautious for nothing and get home safe. Worst case (or well, not *worst* worst case, but you know what I mean) you don't give the officer reason to take you in-or worse, and you get home safe. That's the goal - getting home safe.Yesterday 10:29am

This is a reality that I never understood growing up until I moved out on my own and ended up around a more diverse group of people. It's kind of shocking and even more shocking that some of my friends don't actually acknowledge that it's a problem.Yesterday 11:34am
Not just out to be contrary here, but I have never felt the need to treat a police officer any different than I would anyway else. If they're professional, I'm professional. If they're an asshat, well, our day gets really interesting. Having said that, I rarely run into an asshat police officer. Only a handful of times, I think. Only twice in my home state.Yesterday 12:22pm
Also, something more timely, when you get pulled over by a cop, please don't give him lip, put your hands on the steering wheel, make no sudden movement, if you need to get something from the glove compartment let him know before hand, give him license and registration when requested, and accept the ticket if he issues it and be on your way.Yesterday 9:07am

I always make sure to have my license, registration, and insurance in hand before the cop even gets to the door. It makes me look prepared, and actually boosts confidence because you don't have to fumble around in your glove box looking for it. You can be "Johnny on the spot" with it. ALWAYS be polite and say yes-sir, no-sir (or ma'am). It really goes a long way.Yesterday 9:23am
That may not always be the best idea. Reaching into your glove box could make an officer nervous, thinking you're reaching for something you shouldn't be. Best bet is always to wait until they ask you for it.Yesterday 9:29am

uNever allow a cop to search your car without a warrant or probable cause.
Good luck with that one.Yesterday 9:40am

Yea, in the real world... this stuff only results in black eyes. Yesterday 9:50am
If a Cop asks to search your car, then they have the ability to detain you and make you wait until a Search Dog comes to sniff your car. It is, at that point, that they will look at that dog and take ANYTHING he does as a sign of a hit.
From there, the cop will have the ability to search your car based on that.
If you've got nothing to hide in your car, just do yourself the favor and let them search it because they're going to anyway..Yesterday 10:19am

Here's a tip: Don't break the law...?Yesterday 11:33am
If you're in a city, are young, and live your life fully (or if you're not white), it's inevitable that you'll be questioned by cops for some reason.Yesterday 1:27pm

That's a good start.Yesterday 1:51pm

seems to explain pretty darn good, and it's from both a current Cop and a LawyerYesterday 9:35am
1) See linked YouTube video, interest piqued
2) Click linked YouTube video to play
3) See "48:40"
4) Click linked YouTube video to stop
5) ???
6) PROFIT?Yesterday 9:42am

Yes, it's an actual class lecture so it's long. It's also quite good and worth watching, seriously, even/especially for a law-abiding citizen.Yesterday 9:51am

uGive in to the psychological battle in order to win "the contest for custody of your body." Make eye contact and be polite—no matter how insulting the cops are. But don't smile.
What exactly is wrong with smiling? I have always considered smiling to be part of being polite...Yesterday 10:25am
I wondered the same thing.Yesterday 10:45am

Unless you're totally comfortable with an armed individual questioning you, then smiling shows a sign of nervousness and/or insecurity that can signal you're hiding something.Yesterday 12:00pm

Might I also suggest: SHUT UP. Don't offer extra information. Don't say shit that you think won't incriminate you. If you're in some sort of "arrest zone", just STFU and ask for a lawyer. The cops are NOT your friends. Doesn't mean they're evil, but they really don't have your (a suspect to them) best interest in mind.Yesterday 9:23am
Exactly. I have tried to teach my kids this - there is no right answer to "do you know how fast you were going?" Anything you say is incriminating in some way. Either you're an inattentive driver or a scofflaw. Hand the nice officer your license and insurance, and keep your mouth shut.Yesterday 9:31am

What is incriminating in saying, "I believe I was under the speed limit."?Yesterday 9:41am

uIf that doesn't work and it looks like you're going to get arrested, be pitiful. Ask or beg for a notice to appear before a judge instead of being arrested.
Also, if you know that the charges they are putting on you are total and utter garbage (to pad his numbers at the end of the month.*) you can ask to see a higher ranked officer. DEMAND IT. Chances are you will be getting some 350lb Desk Dinosaur who hasn't been out on a real crime scene in a decade, and he will be so pissed with you making him come all the way out there that he will tell the lower ranked officer to let you off with a warning.
But you have to be sure that the charges are really garbage. Because if TWO cops issue you garbage, and you show up to court to fight them—that is two cops that are off the street, not making money with tickets, and also they HATE showing up to court for bogus stuff.
* A "quota" is MOSTLY a myth that is perpetuated by urban lore... That is not to say that there are not more tickets issued at the end of the month—there are—but there is no official on paper thing that says you need to issue X number of tickets a month. How could they? What are they doing to do, go out and make up crimes to hand out tickets for? No, that doesn't make sense... But if one officer hands out 100 tickets, and another only does 25... Well... Internal investigations can happen 'randomly' like that...Yesterday 11:41am

There is enough anecdotal evidence of quotas to suggest that they aren't a myth, but they don't exist in the way that people probably imagine that do. Rather than official department policy of 100 tickets a month or what have you, it's more like if you want to be promoted/noticed you'd better turn in a higher job performance than your peers, and number of arrests/citations is one major way of showing that.Yesterday 12:54pm
If you think internal affairs cares about them writing bogus tickets to pull in revenue you are a precious and naive snowflake.Yesterday 1:13pm
Those auto-play video ads you have on this site now.... Get rid of them.Yesterday 9:30am
Don't just get rid of them. Kill them with fire.Yesterday 9:41am

Ads... Never Heard of them...Yesterday 9:42am

I would HIGHLY recommend against ANY bumper or window stickers on your vehicles. Don't think that a "D.A.R.E." sticker will protect you or a Police Association window sticker will help, it actually FLAGS the officer to check you out. Don't put political bumper stickers on your car either. You may love Obama, but that cop might have voted for Romney...or vice versa. Don't give them ANYTHING that sets your car apart!
Make sure your car is in good operational condition, and especially that ALL of your headlights, tail lights, and turn signals are operational. Also, WEAR YOUR SEATBELT! Statistics say that something like 70% of unbuckled drivers have a warrant out on their arrest, so guess what the cops will be looking for?
These things all sound so simple and obvious, but its amazing how many people ignore these "simple" things, and consequently have to deal with the police on a more frequent basis than they should have to!Yesterday 10:50am
You didn't seriously just imply that 70% of unbuckled drivers have a warrant for their arrest did you...
There are approximately 320 million people in the U.S. Let's assume 80% of people actually DO wear their seat belt (this varies from below 70% to over 90% per state, but 80% is a good estimate for our usage). That would mean 320 million * .2 = 64 million people don't wear their seat belt. Out of that 64 million, you're telling me 44.8 million people in the U.S. have a warrant out for their arrest?
Maybe what you meant was that the majority of people who have a warrant out for their arrest don't wear seat belts, but definitely the other way around is not true.Yesterday 12:43pm
You didn't seriously just imply that 80% of drivers actually DO wear their seat belts? Yesterday 1:48pm
I tell everybody the first key to not getting arrested is not breaking the law. Cops love when you explain that to them at parties, I usually start by telling them I have a method to not getting arrested, they all get interested and when I tell them I just follow the rules they crack up laughing. Yesterday 9:39am

I hope I never get stuck at a party with you.Yesterday 10:23am

Sounds sensible. Don't break the rules. Don't hang out with people who break the rules. Don't do stupid things. Chatting with some local police recently, I was impressed at the percentage of issues they have to deal with that involve some sort of mood altering substance, from alcohol to much harder drugs...it was something like 90+% around here.Yesterday 11:46am

Okay, so here is a problem I have with this advice:
It says to not let cops search your car without probable cause. However, in my state, I have been told by cops that all probable cause includes you refusing a car search. So... what the?Yesterday 9:39am
Lucky for us citizens, cops aren't lawyers. Allow them to search your car and you've allowed it. Tell them no and then have them search your car and your lawyer can at least fight it.Yesterday 9:48am
Can't help but wonder if they are just playing mind games with you at that point so you are left thinking you're damned if you do, damned if you don't.Yesterday 9:49am

The one issue I always see when people talk about protecting or exercising your rights (as a citizen), when in a police confrontation, is the difference between rights and convenience. For example, say Ted is a 100% law abiding citizen. He gets pulled over and the officer wants to search his car. He doesn't have a warrant or probable cause. Ted is on his way to an important meeting or interview. He declines consent.
What happens next? The cop can do many things such as making Ted wait while he calls backup units or a K-9 unit. But wait, the K-9 is on another case on the other side of town and it'll be at least 45 mins. The cop has all day; this is his job after-all. Can Ted spare the time? "If he's innocent, why not let the officer search the car?"
What else can happen? Oops, the officer found no front license plate. Oh wait, what's what? Is that a broken taillight? *SMASH* yup, broken taillight.
I want to protect and exercise my rights as much as the next guy but let's be honest, unless you are a teenager or young unemployed adult, you don't have time to fight this. And notice I didn't say "if you're innocent, what do you have to hide" because I absolutely do not agree with that notion.Yesterday 9:58am
Letting them search your car lets them "discover" the joint in the ashtray that wasn't there before.Yesterday 12:51pm
While I do agree, I think it is important to some that their rights are upheld. Truth be told sometimes this means that you are going to be inconvenienced. The people that fought to gave us our rights knew this and I think it is important that sometimes we make the willing sacrifice. (Not saying that your average person who refuses consent is some arbiter of justice btw)Yesterday 1:44pm

If I haven't broken any laws I'll talk to the police however I want, wear whatever I want and display my opinions however I like. I'm a citizen of a democracy and a taxpayer: they work for me. Yesterday 10:03am

And you'll get beat up and go to jail for defending those rights.Yesterday 10:20am
I wish I could do that. I'd give 20 years of my life just to tell the next badge carrying sack of shit to fuck off and leave me alone to his face without repercussion. Yes, that would be worth 20 years of my potential lifetime.Yesterday 2:06pm
"In reality, cops love hassling people who stand out." Thanks. Finally one admits he's prone to racial profiling.Yesterday 9:22am

Race is just one part of "standing out". A large picture of Che Guevera might increase the hassle, as would a cute logo of an Molotov cocktail brandishing anarchist on your rear window. Yesterday 9:38am

It's not just racial. It's certainly not all cops, but unfortunately people who want to control and dominate others are attracted to law enforcement.
Go to a restaurant where cops eat and eavesdrop on their conversations. Listen to how they talk about ANYONE who has power over them, judges, supervisors, etc. You will hear some mind blowing hatred. They cannot stand it when someone else is in charge.
Nor can they stand it when someone who is not in charge (citizen) tries to act like they are in charge by refusing to comply, talking back, etc. That is the psychological battle the author mentions.Yesterday 1:17pm

You have to realize that cops are people with varying degrees of training and professionalism. Expectations aren't going to help you. Just be aware of everyone's rights and responsibilities.
I remember my first arrest. The officers weren't too friendly but the other people I was with just kept screaming at them so I managed to be ignored for the most part after I was cuffed. The city jail didn't have a clock and a few meals were passed around so I was thinking I had been there for a day or more but it was only about 9 hours. I remember one guy being brought in that was practically comatose and bleeding from his nose and mouth. I don't know if he took a fall running from officers or if they decided to do some batting practice on his head. Getting arrested isn't fun but it's extra scary the first time. You're probably just going to be hanging out with some drunks for a few hours if it's minor stuff.Yesterday 11:43am
Wow, your first arrest, meaning there have been more and you say it's been less scary for you on subsequent arrests. You know, the vast majority of Americans manage to keep their number of arrests at 0.
Maybe you have been unfairly profiled, but if not, you might want to consider changing some things about your life.Yesterday 1:26pm
Some people actually live their lives according to THEIR OWN values, not just whatever bullshit the government uses to keep their citizens in line. And yes, if you're caught, it may lead to arrest.
People act like "getting arrested" necessarily ="being a bad/immoral person." It's not always that simple.Yesterday 9:39pm
Depends on if you don't have anything in your car.
I ran a red light one time spacing out while I was talking to my friend. The cop pulled me over and asked why I ran the stop light. I told him that I just spaced and was sorry. He asked if he could search my car and I said yes. I'm sure he though I was high and was carrying. I was not, he found nothing, and after about 5 minutes let me go without a ticket. Yesterday 9:48am

I'd probably do the same thing in your shoes. In fact it's happened to me before and I consented to a search without knowing any better.
It always seems to come down to whether or not you think your local cops are crooked, and whether or not you think it's worth the hassle to stand up for your 4th amendment rights and accept the consequences of a pissed off cop who may or may not think he's just trying to do his job and catch bad guys.
I'm on the side of protecting the 4th amendment, I just know I take the safe route and try to keep out of trouble. Our justice system is broken and our rights are trampled every day, but I guess until we're braver or ready to make things worse on ourselves to make them better overall, we're stuck until we organize. Yesterday 10:06am

Unless you are completely fluent in every single federal, state, county/city/local law applicable in every location you ever travel in, ever, you cannot tell me with 100% certainty that you are innocent of any wrongdoing. (And food for thought: Even if you are fluent in every single applicable law, is the cop who's pulling you over?)
There are lots of things that are legal in one place and illegal in another. There are lots of things that are legal but cops think are illegal. Even shrugging off the idea of cops planting evidence, what if they think something is illegal when it isn't? Any gun owner knows and fears this one, trust me, especially gun owners in blue states.Yesterday 2:53pm

People need to understand that you have the right to refuse any search unless they can produce a warrant. If a cop searches you or your property without a warrant after you have clearly expressed you do not consent, anything they find can't be used in court.Yesterday 9:43am
That really depends. The bar for what constitutes a reasonable search is really probable cause. Probable cause may give them the ability to get a warrant or may give them the ability to circumvent a warrant all together. Further, reasonable suspicion could lead to a frisk which could lead to probable cause for a search. The whole thing can get awfully convoluted. You could get stopped and detained under reasonable suspicion, which could give the officers time to get a K-9 unit who could alert on your vehicle giving them probable cause for a search. It's bullshit most of the time, but they do it anyways.Yesterday 10:19am
Actually not necessarily, it can be used for indictment hearings and to impeach the defendant during their testimony in court. Yesterday 2:30pm
Never try to verbally invoke your constitutional rights. Cops hate that, and frankly, they don't give a shit.Yesterday 10:39am
Never argue with them if you can help it. For example, I got pulled over my a cop that was pulling pretty much everyone over and he told me my windows were too tinted (they weren't and I bought it that way) and some other stuff like that. I could have explained that to him and he would have given me a ticket I'd have to fight in court. Sure, I'd win it, but it's much better for me to just be polite and apologize and leave with a warning.Yesterday 12:13pm
Apologizing is a bad idea because it can be taken as an admission of guilt unless you word it really specifically, like "If I did something wrong, I apologize..."
That's why they ask things like "Do you know why I pulled you over?" an admission of a crime is often probable cause for a search.Yesterday 2:14pm
"An Ex-Cop's Guide to Not Getting Arrested"
#corrections
That said, I bought this book about a year ago (?), and it wasn't half bad.Yesterday 9:43am

ThanksYesterday 10:04am

I didn't even need to click 'Play' to know exactly what Fletcher is about to scream into that phone =)Yesterday 9:44am
I'd have posted this clip, too, if it weren't for you meddling kids...Yesterday 9:56am
I forget what it's called, maybe someone else knows, but there's a video on YouTube about your rights and handling situations like getting pulled over. With tips like if asked to step out of the car, open the door then roll up the window take out your keys and lock the doors, as you're getting out, and place the keys in your pocket. Unless they have a warrant or probable cause already when they ask you out of your car, you're allowed to do so. Of course, you want to be careful to do that as your progressing toward getting out of the car, so they don't think you're trying to run, slow movements. And refusing searches no matter what. Unfortunately, I've seen many cops who consider that probable cause, but legally it is not probable cause at all. Neither is locking your car up while you talk to them.Yesterday 9:29am
Ya know, videos and advice like that is fine but at the end of the day, probable cause is in the eyes of the police officer. You can argue all you want but if they want to arrest you they are going to arrest you. The DA may not file or it may get thrown out latter, but that won't turn back time and keep you from going to jail or having your vehicle towed.
I just never saw the point in challenging a police officer out of principle, especially if I don't have the time or money to deal with the fallout. You can be completely innocent of a crime at the time of arrest but that doesn't mean you don't have to set bail, return to court (probably multiple times, taking off work each time), possibly hire a lawyer, etc; and unless everyone is working for you pro bono you will end up investing more money than you'll see returned in the end.Yesterday 10:15am

Actually, at the end of the day probable cause is not in the eyes of the police, it's in the eyes of the judge and jury. The cops may think they have probable cause, but they don't get to determine that.Yesterday 12:04pm
Is there any advice out there for those of us who get nervous when we get pulled over? I don't ever give in to a cop, I keep my fat mouth shut other than to say 'I have no idea why I was pulled over' when the cop asks.
However, I shake uncontrollably during traffic stops because I have a fear of cops and other authority figures, I believe they can make my life a living hell just because, and it hence causes the shaking. And EVERY SINGLE TIME, they ask me if I am on or have been doing drugs and they want to search my vehicle. I know I have nothing to hide, but I always say no. I will not give them the satisfaction, nor will I make their job easier. You want to search my car? Get a goddamn warrant.
Maybe I should keep a bottle of aspirin in my car for such occaisions? Any ideas on how to get over the shaking? I ask because I live in Southeast MI in the Detroit suburbs. I'm white and they still fuck with me pretty bad.Yesterday 2:15pm
I think what you are describing is a release of adrenaline and nothing is going to make you stop shaking if that's what it is until you're system purges it. Not sure why you get worked up but maybe you can tell yourself that even though they CAN make your life a living hell, that it's probably not on their agenda for tonight.Yesterday 3:15pm
Yeah, that's a fair point. Although there was one day I was parked on the street waiting to see if a family member was going to be home, and someone must have called the cops on my because I had an officer pull up behind me and turn his flashers on and harass me for about 20 minutes as to what I was doing. Needless to say, I don't sit in my parents neighborhood anymore unless I am actually visiting them.
As to the adrenaline thing, I'd agree it's that or nerves. I just have a strong dislike of authority figures after bad experiences with them in the past.Yesterday 3:23pm


Sure way to get in trouble.Yesterday 1:50pm
Well, to be accurate, Dwight had a LOT of bodies in his trunk.Yesterday 1:54pm

You can't just not allow a cop to search you car, they can just overpower/bully you.What you do is make it clear that you do not consent to the search. Say it loudly, say it repeatedly. Generally speaking, when a police officer searches your vehicle, they're doing it illegally. If you voice you opposition, they can't say you consented, and what they find (if anything) will get thrown out in court.
A lot of police officers will argue that by refusing to consent to a search, you have given them probable cause to search you. This isn't true. The court in the United States v. Fuentes in 1997 held that refusing to consent, or withdrawing consent, does not give probable cause or the a right to search you. For one, most people have a reasonable expectation of privacy. And, if refusing did give the police the right to search you, they could search anyone at anytime for any reason. The Fourth Amendment would be irrelevant.
Basically, be polite, hold your ground, don't fight, but voice opposition. Be willing to win the long battle, at the expense of a couple of blows.Yesterday 9:39am
Record the stop in states where it's clear you have a legal right to do so also.Yesterday 11:24am
Darn it. you beat me to it. though IMHO this video gives much better advice than the article, other than the "don't stand out" part, but then again that's also profiling and not a real probable cause .Yesterday 9:43am

I just pay Lester to get rid of my wanted level. Much easier that way.Yesterday 10:32am
I could really use that goddamned ability in the new game. The cop AI is for the birds in that installment.Yesterday 2:04pm
It comes down to this:
1. Don't surprise the cop. Approaching a motorist is a very dangerous thing for them. Sit with your hands where they can see them (on the wheel). If you need to reach for something, tell them that you're going to reach for your wallet or whatever along with where it is, and that you are not armed. It may sound silly, but you do not want them jumpy.
2. Don't be an ass. If you were speeding, or ran a light, or whatever, don't make up bullshit excuses. If you say "I guess I didn't realize my speed" or something, you're better off than trying to bullshit. People bullshit them all day long and they're mostly pretty good at reading it.
3. Don't argue with the heavily armed person who is just off the peak of an adrenaline fueled approach. If you can't be friendly, say little and accept that they have the power. Even if (especially if) they're in the wrong. The time to fight about it is later, in court or through a compliant process. Fighting with Mr. Testosterone who's 20 something years old, heavily armed, wearing mirrored shades and sporting his first mustache is a really bad idea. He's got all the power, and may well be too insecure to be willing to back down even if he realizes you're right. Just shut the hell up and do what he says. Complain later.Yesterday 10:42am
Guys! I found a REALLY easy way to not get arrested ever! It works 1,000%!!! :D
HOW TO NOT GET ARRESTED:
Step 1) Don't do anything illegal.
Step 2) Enjoy never getting arrested.
Trust me! It works!!! :D!!!Yesterday 10:30am
It's funny, but that doesn't always work. Sometimes, they arrest you and then later let you go because you're actually innocent. That's still worth avoiding.Yesterday 12:21pm
The sure way to be investigated further is to be the loud, less reasonable person that spouts off. My officer friends say all the time, only answer what's asked...know your rights in your location...pay attention. You can live to fight another day and in a different way. I remember a few years back a friend telling me that his friend was arrested in a raid...the raid was on the wrong house. The guy got a ton of money and apology. Seems he was the child of some well connected types, home on vacation from school and picking up a friend but no one listened when he told them that's what he was there to do...give a friend a ride. Luckily for him he kept his head and made the right call. I've heard way worse stories. I think that police work can be a most honorable profession but it puts people in front of the worse situations to try to figure out what's going on in a split second. It's not enviable! Oh and the best way to deal with being pulled over is to make sure you have what's required...license and insurance card...yes technology has moved to mobile cards but you are still expected to produce one from a killed tree...just do it no matter how silly it's seems. Take up how silly it seems with those that make the laws not those that enforce them.Yesterday 9:58am
Posted on November 20th, 2013
Strategic Terrorism - Call to Action
Posted on October 23rd, 2013
Learn How to Use a Handsaw Correctly | The Art of Manliness


Toolmanship: How to Use a Handsaw
by Brett & Kate McKay on November 3, 2009 · 21 comments

Today we return to our monthly series called Toolmanship. The goal of this series is to pass on the basics of tool use to a generation of men who never got around to learning how to be handy.
In this edition, we take a look at how to properly use a handsaw. We’ll give a rundown on the different types of handsaws out there and tips to get you sawing like a carpenter.
Crosscut Saw or Rip Saw
Before you put saw to wood, you need to determine what sort of saw you’ll need for your job. In the pantheon of saws, two basic designs exist: the crosscut saw and the rip saw. Which one you use depends on whether you plan on cutting with or against the wood grain. Let’s take a closer look at the differences between the two saws and when you would use them.

Crosscut saw. If you’re cutting across the grain of the wood, you’ll want to use a crosscut saw. The teeth on a crosscut saw angle back and have a beveled edge. The teeth are also much smaller than those on a ripsaw. This design allows the saw to act like a knife-edge that cleanly slices through the wood’s grain. The crosscut saw’s design also allows the saw to cut on both the push and pull stroke.

Rip saw. When you’re making a cut parallel to the direction of the grain of the wood, use a ripsaw. Unlike a crosscut saw, the teeth on a ripsaw don’t angle backwards nor are they beveled. Instead, the teeth bend left and right in an alternating pattern. This design allows each tooth to act like a chisel that chips away small pieces of wood on each push stroke. The chisel design ensures a clean cut as you saw along the grain. Also, unlike the crosscut saw, the rip saw only cuts on the push stroke, not on the pull stroke.
Different Handsaws for Different Jobs
While the crosscut saw and rip saw will cover most cutting jobs, sometimes you need an even more specialized handsaw. Here are a few handsaws you might consider adding to your toolbox arsenal.

Keyhole saw. The keyhole saw is good for cutting holes for pipes, electrical outlets, or fixtures in floors, walls, and ceilings. Its narrow, tapered blade goes where other saws can’t, and its teeth can chew through tough material like drywall.

Coping saw. If you’re wanting to cut curves and other intricate shapes, you need to bust out the coping saw. The coping saw consists of a thin metal blade set between a C-shaped metal frame. Because of its thin blade, you can easily change directions and still maintain a clean cut with a coping saw. If you want to make cuts inside a piece of wood, you can do that with a coping saw, too. Just drill a starter hole, remove the coping saw blade, insert the blade through the hole, and reattach the blade to the handle.

Backsaw. Backsaws have a stiffening metal rib on the edge opposite the cutting edge. This allows for better control and more precise cutting than with other types of saws. Use a backsaw in woodworking when you need precise cuts. Different kinds of backsaws exist for different kinds of jobs. Miter saws are used with miter boxes to cut angles in wood. Dovetail saws cut, well, dovetails for joining pieces of wood together.
8 Things to Check When Shopping for a Handsaw
When you’re at the hardware store looking for a new saw, make sure to run each saw through this 8 point test to ensure you get a quality tool:
1. Sharp teeth. Run your thumb lightly over the teeth. If they’re properly sharp, they’ll catch your skin with little snagging tugs.
2. Straight blade. Sight along the blade to see if it’s true. Even a slight bend or bow will cause binding. Check the handle, too. A crooked one throws your arm off center, making sawing inaccurate and tiring.
3. Evenly set teeth. Squint toward the teeth from the back of the saw. If any teeth project farther than others, they’ll drag and leave a rough cut. If all teeth on one side are set out farther than those on the other side, the blade will twist.
4. Blade taper. Good saws taper so they’re thinner at the top than at the teeth. This provides blade clearance, reduces binding, and makes a cleaner cut because less tooth is needed. Taper may not be apparent, so be sure it’s specified. Watch out for saws that are just chamfered to give the appearance of a taper grind.
5. Proper flexing. Your saw should flex easily when you bend it, but quickly straighten when you let you go.
6. Built-in tension. Bend the saw with a straight edge across the blade and you’ll see a slight bow. The bow will keep trying to spring the blade back straight. This is the result of tension built into the saw by rolling and hammering the center portion. If the saw’s tension is correct, the bow should appear in a uniform curve and not look lopsided.
7. Blade crown. Hold the saw at arm’s length and sight along the teeth. You should see a slight outward curve at the blade’s center. This crown increases the cutting pressure by putting only a few teeth in contact with the wood at a time. The higher the crown, the better.
8. Balance. There are no absolute rules for good balance, but a saw should feel comfortable in your hand– not nose heavy or cumbersome. Make a series of sawing motions in the air to see how the saw feels in your hand.
How to Saw Like a Carpenter
Mark the cutline. Remember the timeless rule of carpentry: measure twice, cut once. Measure where you want a cut (twice of course) and draw a line marking where you want the cut to be. The line will act as a guide to help you get a straight cut.
Make the starting cut.When you make the first cut, use your thumb or the knuckle of your thumb on the hand holding the wood as a guide to ensure you cut along the cutline.

If you’re using a crosscut saw, start your cut with the teeth nearest the handle. This will give you the best control. Make a few back cuts until you get a nice kerf (opening in the wood).
If you’re using a ripsaw, start your cut with the finer teeth furthest from the handle (near the point of the blade). Make a few short draw strokes to get a kerf going.
Don’t start the cut right on the line you marked earlier with pencil. Instead, cut right next to the line on the waste side. The waste side is the part of the wood you’re not going to use in the finished product. It’s always better to have a piece of wood that’s a bit long, than a bit short. You can always sand the wood down to the pencil line.
Angle the saw correctly. After you get your kerf going, you need to angle your saw correctly to get the best cut. For crosscut saws, the proper angle is 45 degrees between the saw and wood. With ripsaws, it’s 60 degrees.
Hold your elbows close to your body. To counteract the natural tendency to angle the blade away from perpendicular, hold your elbows close to your body when sawing. This will also help prevent you from twisting and tilting the blade, thus ensuring a nice, clean cut.

Hold the saw firmly, with forefinger extended along the side of the handle.
How to hold the saw. Just grip the handle so that your forefinger extends along the side of the handle. This helps you “point" the saw along the line and ensures more accurate cuts. Hold on to the handle firmly, but not too tightly.
The stroke. After you’ve started the groove, a few short forward strokes will deepen the cut so you can move your left hand away from the blade. Push the saw with an easy, free-running motion. Use long strokes so that each tooth does a fair share of the work. Short strokes dull the saw faster because only a few of the teeth do the work.
Resist the temptation to bear down on the saw. It won’t do anything except tire you out. Let the saw do the work. If you feel like the saw isn’t cutting properly, something might be wrong with the saw itself.
For straight cuts, use a 2×4 as a guide. For many men, simply using the pencil line as your guide to cutting just doesn’t work. If you want to ensure that you get a true and square cut, place a 2×4 (or 2×2) along your pencil line and clamp it to the board you’re cutting. The board will now act as your guide to keep the saw on the line.
Correcting veering. Even the best carpenters veer from the cut line. If this happens to you avoid the natural tendency to twist and bend the saw blade so it gets back on track. This will only result in an uneven and rough cut. Instead, stop sawing and bring your blade back to the point where you veered off. Start sawing again on the line.
Prevent binding with a nail. One problem you may encounter, especially when you’re cutting along the grain with a rip saw, is binding. Binding occurs when the kerf closes in on the saw. To prevent this, simply place a nail in your kerf. This will keep it open. Move the nail towards you as you saw.
Storing Your Saw Properly
If you want to ensure your saw gives you years of cutting service, you need to take good care of it. By placing a simple sheath on your saw blade before you throw it back in the toolbox you can prevent your saw teeth from becoming dull and rounded, thus maintaining the sharp edge necessary for all your woodworking projects.
Most new saws come with a sheath, but if yours didn’t or you lost the sheath, here’s how you can make a makeshift sheath with just a bit of garden hose.
1. Hold the saw up against a straightened section of an old rubber garden hose. Use a utility knife to cut a section of hose that’s roughly as long as the saw blade.
2. Cut a slit down the length of the section of hose. Make sure that the slit goes all the way through the rubber.
3. Slide the cut edge of the hose over the exposed blade of the saw. The stiffness of the hose should hold it in place over the blade, protecting it from nicks and bending.
Further Reading:
Toolmanship: Wrenches
Toolmanship: Screwdriver
Toolmanship: Hammer
Got any other handsaw tips? Share them with us in the comments!


{ 21 comments… read them below or add one }
- 1HayleyNovember 3, 2009 at 11:37 pm
Who needs a man when there are websites like this?
OK, maybe I do
- 2Scott KNovember 3, 2009 at 11:55 pm
No mention of Japanese saws? My Ryoba is that best saw I ever bought.
- 3non player characterNovember 4, 2009 at 7:32 am
At first glance your article reminded me of something I’ve seen previously, link below.
http://www.popularmechanics.com/home_journal/tools/4307803.html?nav=RSS20&src=syn&dom=yah_buzz&mag=pop- 4Bruce WilliamsonNovember 4, 2009 at 8:11 am
I use my power tools for everything except:
*coping
*the occasional times when I would end up with the extra bit of kerf from a circular saw
*cutting plasticBruce
- 5BobNovember 4, 2009 at 9:54 am
Have to agree with Scott K about the Japanese saws. Lee valley tools in Canada has a terrific selection of specialty saws and the Dozuki and Ryoba saws are a must have for so many applications, they are great for tenons, dovetailing, and making nice flush cuts. The Lee Valley Catalogues are to woodworkers, what the Sears Christmas Wish catalogue is to kids. Check it out at http://www.leevalley.com. Nice article!
- 6RonNovember 4, 2009 at 10:07 am
Lie-Nielsen makes some excellent hand saws. For anyone who has ever struggled with hand sawing wood, a Lie-Nielsen saw is simple unbelieveable! Go slow, and concentrate on keeping the blade perpendicular to the wood. A good quality saw will cut the wood for you much faster than trying to force the saw through the wood.
- 7Ross PattersonNovember 4, 2009 at 10:40 am
Handsaws should be oiled from time to time, especially the big boys. Especially if they’re going to be stored in suboptimal environments (i.e., not hanging on the workshop wall). And don’t neglect the non-cutting parts of the blade – you’ll regret letting rust develop, from both tool-life and performance perspectives.
Oh, and in a pinch, every carpenter has a replacement sheath in his toolbox: masking tape does just fine.
- 8IsiNovember 4, 2009 at 11:10 am
Good topic. I have been teaching my boys to saw recently. They love it because they get to play with one of the tools otherwise reserved for dad. I have been trying to teach them the principle (or what I know of them) around hand tools – this keeps them hands on and whether they know it or not, they are learning something that hopefully they will remember.
Interesting though. I never understood the difference between a ripsaw and a crosscut saw – i had always assumed them to be the same thing just referred to differently.
I still love my power tools though !!!
- 9IsiNovember 4, 2009 at 12:57 pm
Good topic. I have been teaching my boys to saw recently. They love it because they get to play with one of the tools otherwise reserved for dad. I have been trying to teach them the principle (or what I know of them) around hand tools – this keeps them hands on and whether they know it or not, they are learning something that hopefully they will remember.
Interesting though. I never understood the difference between a ripsaw and a crosscut saw – i had always assumed them to be the same thing just referred to differently.
I still love my power tools though !!!
Oops…forgot to say great post! Looking forward to your next one.- 10ScottNovember 4, 2009 at 1:48 pm
Any pointers on sharpening a saw. This far my approach has been to buy a new one.
- 11seanNovember 4, 2009 at 2:29 pm
Scott K.
I’ve bought a dozuki from Lee Valley (I actually live down the road from one *gloat*) and while the cut is superb, I find the blade to be brittle and needs frequent replacement. Furthermore, Japaness saws are tricky to sharpen, which brings me to Scott’s question…
Sharpening a Western style panel saw (basically a saw with a big blade, like a rip, crosscut, backsaw, dovetail saw, etc) is relatively easy, but meticulous and it takes time. However, since I use mainly handtools, and own a few of my grandfather’s old Disstons, it is a skill that is necessary to keep the saws operating.well. You need a few specialty tools, which at the very least include a good flat file, a small triangular cross section file, a good vice and a saw set. The size of the triangular file is determined by the size of the teeth of your saw, which are measured in TPI (Teeth per inch). Make sure you have the right size file for your saw. If you have multiple saws with varying TPI you will need several sharpening files. You must have good lighting. It would be helpful if you had a saw vice which is a longer jawed vice designed specifically for holding saws while being sharpened. This way you won’t have to keep opening the vise and moving the saw. I built my own for this. They aren’t hard to build. It would be a wonderful luxury if you also had a large table mounted magnifying glass on an adjustable neck that you could move over the saw and keep an eye on the teeth as you sharpen them, I don’t have one. I also use a black magic marker when sharpening.
First is to check the saw for straightness, corect any bends, and get rid of any rust on the saw. The next thing I do is secure the saw in a vice, teeth facing upwards. I then use the marker to darken all the teeth. Next I joint the teeth, which is to simply run the flat file perpendicularly across the tops to the teeth. This will flatten the tops of the teeth, producing a little flat shiny spot on the top of the teeth. The main function of jointing is to make sure all the teeth are the same length. A few strokes is usually suffficient.
Now you get the triangular file and begin the actual sharpening of the teeth. This is the guts of the operation, and how it is done depends on what kind of saw you are sharpening. The main difficulty is holding the file at the correct angle for your saw. If your saw has been sharpened well previously, the teeth themselves are a fair guide, but this isn’t always a given. Many modern saws have been stamped out with the wrong setting for the teeth, and the teeth will be need to be ground in correctly during sharpening.
When sharpening, give each tooth a stroke or two with the triangular file. Your aim is to make about half the shiny spot left from the jointing to disappear. Since you will be stroking the other half as you sharpen the next tooth, you don’t try and remove the entire shiny spot in one pass. You want to be careful and even here. The end result should be that each tooth is sharp and the same length. Having a bunch of sharp teeth of varying lengths will be of no use to you. Take your time, and feel free to go back over the saw again if necessary. For a rip saw you can do every tooth in one pass, although it is not recommended. For a crosscut you will have to do every other tooth in your first pass, then reverse the saw in the vice and sharpen the rest. You should find that the original darkening of the teeth is helpful in keeping track of where you’ve been so far in your sharpening. Also, rotate the triangular file from time to time as its faces wear out from the sharpening.
When the primary sharpening is done you will find that the edges of the teeth will have a little metal burr along the sides. This must be sanded or filed off, otherwise the saw may wander in its cut. Getting rid of the burr can be done by taking the flat file and hlding it flush against the side of the blade and running it back and forth a few times.
The last things to do is set the teeth. In setting the teeth (using the saw set) you are bending teh teeth outwards slightly. This is so the kerf (the part of the wood destroyed by the stroke of the saw) will be slightly wider than the saw blade itself, thus reducing friction and binding.
That’s basically it. You’re ready to cut.
One last caveat: You need to remember that the tools you use to sharpen your other tools need as much care as the cutting tools themselves. Your files will not last forever and will need replacement. I get about two or three sharpenings out of my triangular files. After that I need a new one.
Hope that was helpful.
- 12PattersonNovember 4, 2009 at 3:06 pm
“Any pointers on sharpening a saw." – no no no!
- 13JedNovember 4, 2009 at 4:42 pm
Third the vote for Japanese pole saws. If I could only have one saw, that would be it.
- 14Neverland BallroomNovember 5, 2009 at 9:31 pm
Don’t forget that you can make music with a handsaw:
http://www.musical-saw.com/tutorial.htm- 15NikNovember 5, 2009 at 11:55 pm
Another tool article to overlook the poor bow saw. Maybe not as good for lumber, but they are the best for yard work.
- 16Mr MiyagiNovember 6, 2009 at 11:42 am
What about the chainsaw?
- 17JohnNovember 8, 2009 at 8:27 pm
As a carpenter who has occasionally had to deal with a power outage or working in the rain, it is one of the more important things to know how to use a handsaw properly.
A good manly test of skill is to build a proper saw horse with only a handsaw. The saw horse should only be at the height where you will lean on the board you are cutting with a knee to stabilize it. You build a saw horse like that for a job interview and a good ole carpenter will hire you instantly.- 18BenNovember 12, 2009 at 1:10 am
John,
When you say “build a sawhorse with only a hand saw" Do you mean using the handsaw rather than power tools or do you mean builing the sawhorse with nothing but a handsaw; ie no nails, hammer ect….?
- 19PhilipJanuary 25, 2010 at 10:21 pm
Passed down from my grandfather, who made roll top desks by hand:
Keep your elbow in line with with the cut, for better control of the tool. If the blade tip flutters on the backstroke, you are out of line.
Lift the saw blade slightly on the backstroke. This helps to clear the teeth and preserve the sharpness, so you will cut faster. Once learned, this technique produces a distinctive-sounding quieter backstroke that separates the men from the boys, without even looking.
Use the same lifted backstroke for files and planes, too.- 20JasonFebruary 16, 2010 at 12:32 am
Check out http://www.vintagesaws.com/ for more information about hand saws or if you are interested in buying a tool from another era.
I am in no way affiliated with the site, I just learned a lot about saw there.
- 21BrownApril 12, 2013 at 10:22 pm
Hi, I got a question. I have a handsaw similar in shape to this one, but not rusty.
http://static5.depositphotos.com/1032427/523/i/950/depositphotos_5236017-Hand-saw.jpg
I’ve recently have had the pleasure of acquiring several trees (young, no more than 15-20 cm thick) due to very stormy weather. I was thrilled! A quick project that I thought about was making coasters for the house (instead of going down to Big-Box-Mart and buying them). However, as I cut through this min-log, the cut is rarely perfect and I have to lop-off parts in order to “straighten" out the next cut. It seems like I could benefit from a “guide" that could keep my blade in place as I work through the wood, but I don’t know 100%.
What would you recommend in this case?
Leave a Comment
Name *
E-mail *
Website


Posted on October 17th, 2013
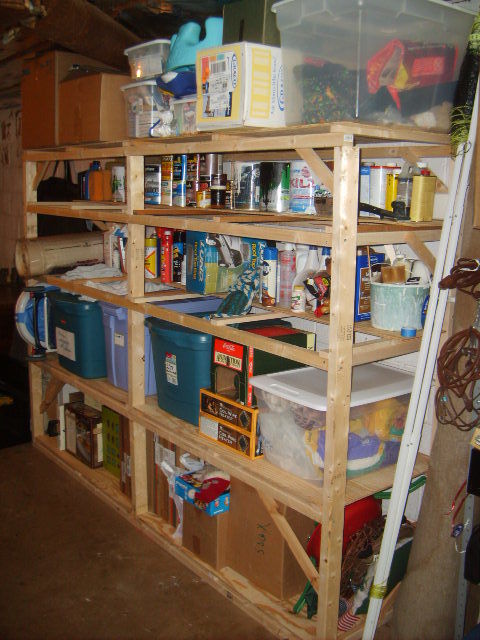
How to Build Sturdy Shelves | The Art of Manliness


How to Build Sturdy Basement Shelves
by Brett & Kate McKay on June 30, 2009 · 12 comments
Editor’s Note: Every now and then, we feature an excellent blog post that was originally posted in The Art of Manliness Community by a community member. Today we’re featuring an article from one of our most prolific community members, Will. Thanks for the great write up, Will!
If you’re thinking about learning a handy skill, making bookshelves as one of the most practical and satisfying to tackle. Every man has a desire to make some furniture that will be used in his home day after day. And bookshelves are a great introduction to this craft.
I recently undertook a project to build cheap, sturdy bookshelves that would not fall over, and decided to write-up the results. I am not an expert; don’t sue me if yours do fall over. But I’m not worried about mine. (I did take the precaution of putting very heavy stuff on the bottom shelf. Nothing will save a top-heavy structure from falling over — nothing but an L-bracket, anyway, and I don’t think I need one.)
These instructions show you how to make a 5-shelf set, 8 feet wide and 2 feet deep.
Tools:
- hammer
- power drill, with bits and a Phillips’-head attachment
- Skil saw
- chalk line
- jigsaw (maybe; see below)
- sawhorses, work table, or both
- safety equipment: ear protectors, goggles, etc.
Materials:
- Elmer’s glue
- 3″ wood screws
- 3/4″ wire nails. These are for connecting the plywood shelves to their 1×2 supports. Heavier nails would split the board, and lighter ones wouldn’t connect firmly. I erred too far on the lighter side, and they don’t hold well — but since the weight is on them, it’s not a big issue
- 4-penny, 1 1/2″ nails (I think)
- 8-penny (2 1/2″) nails
Note that the nail and screw sizes aren’t set — I used what I had, mostly. I used 3/4″ wire nails for attaching 1×2′s to plywood, because the bigger ones split the boards. (AoM member David Hawkins suggested smaller ones, and also banging the point of the nail on something hard to blunt it, to reduce this.) 3/4″ was maybe a little too small, because they don’t hold firmly. Still, since the weight pushes the plywood onto the 1×2, it doesn’t matter much.
Wood
I used the cheapest wood they had:
- (4) 4′x4′ plywood, 1/4″ thick. That’s 1 per 2′ shelf. I made two of the shelves only 1′ deep, so together they took only 1 4′x4′ piece between them.
I tried to get unwarped pieces, but that isn’t easy. As it turned out, much of it was very warped. It doesn’t matter if you handle it right (below).
- (6) 8′ 2×3′s. These are the vertical supports.
- (10) 8′ 2×2′s. These are the front and back supports for the five shelves
- …and 3 more 8′ 2×2′s, to make two approximately 2′ connectors between front and back, one at each end.
- (8) 8′ 1×2′s. I put 6 2′ 1×2′s under each shelf (even the ones only 1′ deep) as supports. That makes 30 2′ pieces, or 60′, so that’s (6) 8′ pieces (64″). Better get 2 more to make the diagonals that give the frame rigidity.
…and you will go back to the hardware store. It’s a fact of life! If they take things back no questions asked, like Lowe’s, it’s no problem if you buy too much.
Be sure and measure everything yourself rather than assuming my measurements will work.
(Especially if you’re in a metric world –!) I found that my 2×2′s were actually 1 1/2″ thick, say, and the 1×2′s were 3/4″ thick, but I don’t know if this is guaranteed. (When you start cutting, very little is!)
Planning the shelves
How many do you want, and how tall? I wanted to be sure they’d fit in the door, in case I ever wanted to move them; so they had to be under 82″. I had some plastic baskets and boxes to fit in that were 18″. So I decided on 5 shelves: 18″, 17″, 12″, 10″, and whatever clearance was left for the top shelf. The diagram I drew is below.

Since each shelf is 1″ thick (1/4″ plywood, plus a 1×2 layer underneath that was 3/4″ thick), the heights inside the frame need to be 1″ more than the height you want in the shelves.
Note that although the 2×3′s at the end are whole, the ones in the middle are sawed into smaller lengths that rest on the horizontal 2×2′s. I didn’t want to weaken the horizontal 2×2′s by cutting them, and this method should still supply vertical support in the middle.

Dealing with warp
You can’t expect wood this thickness not to be warped. So I dealt with warped supports as follows:
- I identified the warp by looking along the length of the board. It may be twisted (one end is rotated relative to the other) or it may be bowed (the middle isn’t in a straight line with the ends).
- The more twisted 2×2′s I cut into the small lengths to connect front and back frames. Shorter boards don’t have enough length to be as warped.
- The most bowed I put on the bottom, with the bow facing up, so that the weight on the shelf could force it flat. I figured that the most weight would go on the bottom shelves, so the most warped 2×2′s went on the bottom.
![]()
Similarly, when I built the plywood shelves, I made sure the bow was facing up (if not, I’d have some silly looking shelves), and tried to put the worst ones on the bottom.
My 2×3′s weren’t noticeably warped, but if they had been, I’d have used the worst for the middle support, which is cut into shorter lengths.
Building the front and back frames
I sawed the lengths that you saw in the diagram above. I did find that the shelves tended to be just a little higher than I expected (I probably should have noted that you can’t fit boards perfectly together), so the top shelf was a little under its desired 9″; but that was OK by me. If not, I could have cut the middle supports a little shorter.
To connect the horizontal supports to the vertical end supports, I used 3″ wood screws. (Nails were not sufficient: banging one board in loosened the one I’d just done — and these are the joints that must be strong!) I drilled a hole in the 2×3 straight to where the horizontal 2×2 was going; did this for each joint. Then I put a little Elmer’s glue in the joint and put in the screw using a power drill with a Phillips’-head attachment.
To connect the middle supports, I used nails. The top and bottom supports I put in first — 2 nails per joint, because if it’s only 1, the support can spin on an axis of its 2 nails! For middle joints, half the time the only option was to put the nails in at an angle, as below. Every joint gets glued. (I glued every joint I made in the entire frame, for strength.)

Shelves
Each shelf is actually two halves: the left and the right half. To make it, I just sawed the 4′x4′ plywood right down the middle. To make the 1′ deep shelves, I sawed one of the resulting 2′x4′ pieces lengthwise.
To cut it straight, I used a chalk line.
Here’s a diagram of a 2′-wide half-shelf, as seen from the bottom. I’m showing the right half: the holes cut for the exterior 2×3 supports are on the exterior end (since this is upside down, that’s on the left), and the holes for the middle supports are on the interior end. Since the left and right shelves share a gap
for the middle supports, that gap only needs to be half as wide. The left half-shelf is a mirror image of this one.

The 1×2 supports are one in the middle and one at each end. They don’t need to be flush with the end, but should be close.
Here’s a 1′-deep shelf:

The top shelves are just like the other 2′ shelves, except that I didn’t have to cut out a place for the vertical supports.
Bracing everything

Here’s my front (as seen from the back, so you can see how the diagonal fits onto the horizontal support) and then my back (as seen from the front). The diagonals are not of a particular length; I eyeballed them. They’re about 6″-10″.

Where possible without causing anything to stick out of the frame, I left the diagonal’s end flat and nailed it onto the surface it was to connect to. But often I needed to cut at 45 degrees, as shown. I eyeballed it.
All joints are glued and then nailed with approx 1 1/2″ nails.
Here’s the back. It seemed a little stronger to put the diagonals on the very bottom.

This did lead to a complication, though: the bottom shelves no longer fit into their places! The diagonal was in the way. Also, putting it in place required an even bigger hole than was needed just for the diagonal to fit through. I used a jigsaw to cut the hole as shown. (Remember, this is the right half
of the shelf — the left half would be a mirror image.) The cut needed to be at least 1 1/2″
deep (for the 2×2) + 3/4″ deep (for the diagonal 1×2) = 2 1/4″; so I made it 2 1/2″ deep. (No need to make the shelves fit tight.)

If I hadn’t had a jigsaw, I could have just cut 2 1/2″ off the back
with the Skil saw:

Putting the frames together
When the frames felt sturdy (and they did), I screwed them together with wood screws and 2x2s at each end. Each 2×2 was at the same level as the horizontal 2×2 shelf supports, and was 2′ minus two times the longer width of a 2×3 = 19″ long.
These also were braced by 2 pairs of diagonals, near the top and the bottom, done as before, on the sides.
Finally, the frame got a pair of diagonals flat under the bottom shelf, and another pair under one of the upper shelves, to brace it in the one remaining direction.
Putting it all together
Finally, I moved the frame into place, and set the shelves onto their supports, going bottom to top. They are not nailed on. I don’t think they’re going anywhere.
What I’d do differently
It’s a little wobbly front to back. I probably should have put more diagonal bracing in that direction. I still may.
…and I don’t want to suggest that it all went as smoothly as I presented it. I omitted the false starts to
prevent confusion.
What you can do for me
If you’re inexperienced, and I didn’t explain something, let me know.
If you’re experienced, and there’s something else I should have done, especially for stability, please add a comment!


{ 12 comments… read them below or add one }
- 1FredJune 30, 2009 at 7:45 am
I just built some shelves just like this with my father-in-law a few weeks ago. I didn’t have any set plans ahead of time but they turned out great! One thing that we did different was attaching the selves to a box frame using some screws. Each shelf was attached to a 4 x 8 (out of 2 x 4′s) box with two braces in the middle similar to studs in a wall. Then all we did was use four 2 x 4s for the legs. You can get much better support if you attach the legs to your floor joists. My father in law was standing the bottom shelve as he attached the legs to the joists and there was no problem with supporting his weight. After all is said and done, this thing is solid as a rock
- 2chris wilcoxJune 30, 2009 at 8:51 am
Good reference article!
When we moved into our new home, I built some 2×4 shelves in the unfinished section of our basement. They aren’t as pretty as these, but they’re certainly sturdy.
Since I didn’t have open studs to build on, I drilled 3/8″ holes into the foundation, fixed 2x4s along the back wall with 2 nails through a hole drilled in the 2×4, and attached the whole works to that. : )
- 3AlexJune 30, 2009 at 10:48 am
As far as stability goes, the diagonals are a good start, but you could also reinforce some of the corners with metal angle brackets. These are just pieces of metal about 1/8″ thick bent into a right angle. Don’t let their small thickness fool you, they can be quite strong, especially if you’re just using them to reinforce a structure that is already reasonably solid on its own. They come in other thicknesses, and depending on how strong they are, you may not need wooden diagonals at all. You can find them in some form in most hardware stores.
- 4DaveJune 30, 2009 at 11:17 am
I built some shelving units to about these same dimensions, but I used 1/2″ plywood for the shelves so I wouldn’t need as many supports. I also cut notches in the uprights to support the cross pieces so I had wood supporting the weight on the shelves instead of depending on the shear strength of the screws. The shelves are solid (my kids have climbed all over them), freestanding so I can move them, and there is no need for the diagonals, which block access in this example.
- 5lady brettJune 30, 2009 at 7:08 pm
those look great! i like the lack of clutter the half-shelves give.
with regard to the measurements of the 2x2s, etc., that is perfectly normal. lumber is sold under the dimensions it is originally cut (say 2 inches by 4 inches), but then it is milled so that the finish will be more smooth and the size more uniform, which shears a half-inch off of each dimension (lengthwise). hence the 1 1/2 inch 2x2s. of course, as you say, always measure ’cause that’s just a general case. and some more craft-oriented woods will be exactly the size they say!
also, one thing i’ve found helpful for stabilizing bookshelves is to add a “kickplate". It’s not really something you can add after the fact, but it’s not hard if you plan it in. Simply get a 1×4 the width of your shelves, make the sides extend 3 1/2″ (the height of the 1×4) below the bottom shelf, and screw/nail in the 1×4 in the space below. if you set it back – like, “inside" – about a half-inch it won’t be very visible and will add greater stability. plus, for bookshelves it gives it a somewhat more “finished" look.
i hope that made sense – hard to explain hands-on without visuals!
- 6Rodney HamptonJuly 1, 2009 at 7:32 am
I was just about to take on a project just like this to expand our food storage in the basement. Thanks AofM!
And thanks for the excellent 30 days to a better man series. That was top rate!
- 7Chris HoffmanJuly 1, 2009 at 10:32 am
Well I’ve been there done that.
Not to put a cold wash on the idea but it guesstimates at about $50 just for the 27 support pieces. Then the cost adds up with plywood if you do not keep such things hanging around. Nails and screws. Then there are the men among us who will also get a new tool or two for such a project, God is pleased by a fine working tool, as we all know.
A Gorilla rack at Costco was about $80, takes way less time, and can be easily dissassembled/moved/customized.
Not EVERY thing is about money, a Gorilla rack leaves no sense of accomplishment. But it IS biblical to count the costs. AND I cut my hand the other day taking it apart, leaving a pride-boosting humbling yet manly injury, that I did NOT complain to anyone about. AND my wife hit the thing with the car so a steel support corner got bent. THAT was pretty manly pounding it straight, lots of cool shop sounds, sweat and blood.
A prefabricated steel rack is a lesser thing, but I managed to get some testosterone out of it anyway.
- 8normJuly 2, 2009 at 7:20 am
Why bother?
Just go to IKEA make an inexpensive purchase and spend more time with your family.- 9lady brettJuly 2, 2009 at 10:15 am
but, norm, maybe this is spending more time with your family. take your son and daughter to the shed, shop or basement to help you fashion your own shelves – it’ll be higher quality family time than an outing to buy more stuff.
of course, i’m biased; i practically grew up in my dad’s shop. wouldn’t give that up for the world. and now i can do my own repairs at home – it’s win-win.
- 10WillJuly 2, 2009 at 11:46 am
I should have included my costs. I paid about $70 total, including a tool (the chalk line). I had a few 1×2′s already, and didn’t need to buy the screws; this wouldn’t have been much anyway. The biggest expense was the plywood; it ran me about $40. I got my materials at Lowe’s; YMMV.
I already have something like a Gorilla rack; I like it, but it doesn’t hold nearly as much and it’s not nearly as stable. (Bolting it to the wall would fix the stability, but would be difficult in my basement, which has cinder-block walls.) Pricing Gorilla racks at Amazon, I found that $70 would get me five 30×12 shelves, rather than the five 96×24 shelves I have. Not the best deal! Or there’s the 72×24, three shelves, for $190…not for me either.
- 11Jason CAugust 18, 2009 at 5:07 pm
To increase stability, decrease time and labor, and limit costs, I did the following:
-buy some #8 wood screws in 3″ and 1 1/4″ lengths
-buy 2, 4×8 plywood sheets (5/8″ works well and is most cost-effective for price vs. sturdiness) cut lenghtwise into thirds (each approx 16″ wide) (to save time and ease transport I always had the hardware store cut these for me)
-buy 10, 8′ 2×3′s, and cut 16″ off the top of 8, and cut the last 2 into 16″ lengths
-using 2 of the long 2×3′s, make a ladder-shaped box structure by fitting 5 of the 16″ 2×3 cut-offs in between them like ladder rungs (make sure the top and bottom “rungs" are fastened at the very top and bottom ends of the 2 long 2×3′s) (make 4 “ladder" box structures in total) (the “rungs" determine shelf heights, so use less rungs if you want more space in between shelves, and ensure the rungs are all the same height as each corresponding rung in each “ladder" box) (fasten using 2 of the 3″ screws for each side of each rung, screwing through the side of the upright 2×3′s into the ends of the horizontal 16″ pieces between them)
-now the shelf is ready to be put up – and it is very easy for 1 person, but even easier with 2 – stand the 4 “ladder" boxes up together and slide a plywood strip between them at the bottom and then the third level up – spread the “ladder" boxes apart until there are 2 at each end of the plywood strips, and 2 evenly spaced in the middle
-fasten the plywood down to each rung with the 1 1/4″ screws (2 for each rung)
-slide the other plywood sheets into place on the other shelf levels, and one at the very top (you will have 1 16″ wide plywood sheet leftover (in total I made 3 of these, so this leftover was not wasted) and fasten down just like the othersThese have always been sturdy, and have never tilted sideways. It takes 5-10 minutes to put them up and take them down once the “ladder" boxes are made (in the military I move a lot, so I wanted shelves that could survive multiple set-ups and take-downs). In total, for 1 shelf, the project costs (in Canada):
-plywood and 2×3′s = $40
-screws = $10- 12TonyJune 30, 2010 at 8:01 pm
I made something similar in my basement. They are NOT coming out. Just a two shelf unit to keep suitcases, Christmas and other holiday decorations, etc off the floor.
I used 9 8′ long 2×4′s and two 4×8 pieces of 1/2″ plywood.
Framed up a rectangle of 2×4′s to frame under the sheets of plywood and cut an additional piece for the center.
I saved the longer halves of the 2×4′s cut for the frames to make the vertical supports. What I had left determined the height of the top shelf. I mounted the bottom about 1′ off the ground.
I’ve found I didn’t need diagonal bracing, but then again, my shelves are only about 51″ tall and the 2×4 frame under the shelves provide a pretty rigid structure.
It’s strong enough I can get up on them, and I’m about 240#.
I can build two of these for the same price as some pre-made units.
I could make the movable by using different hardware to assemble them. The wood screws installed with the drill could be replaced with lag bolts, nuts and washers to make this something that could be disassembled.
Leave a Comment
Name *
E-mail *
Website
Previous post: 30 Days to a Better Man Day 30: Get a Straight Razor Shave
Next post: 30 Days to a Better Man Wrap-Up


Posted on October 17th, 2013
Be Your Family's Secret Service Agent


- Prepper

- Posts: 78
- Karma: 11
- MSB Member

I've started learning about "Advance Work," and how it is used to prevent dangerous incidents from occurring. Many hours are spent strategizing travel routes, hotel accommodations, home security, ect. It is amazing how little details like knowing your spouses blood type, or where the nearest hospital is can be overlooked in our preps. Even at work, do you know where all the fire extinguishers are on your floor? We tend to live very busy lives, and should probably slow down to make time for planning.
I also started reading The Art of Executive Protection by Robert L Oatman, and highly recommend it. It talks about how needing to draw you gun, or evacuate, means that something has already gone wrong.
This thread will be used to share the info I learn, and hopefully those of you with experience in this area or advice can comment.


- Prepper
- Posts: 20
- Karma: 0
- New TSP Forum member
- Prepper
- Posts: 78
- Karma: 11
- MSB Member
More to follow.
- Prepper
- Posts: 78
- Karma: 11
- MSB Member
Don’t follow too close- You may think that you can stop in time, but odds are you won’t.
Always keep at least a full tank of gas- Puttering into a gas station on fumes is a good way to get yourself stranded.
Driving under bridges- If you are about to drive under a bridge and a suspicious person is standing above your lane, you may want to quickly change lanes just before going under. I watched a documentary a while back on Executive Protection in South Africa. Thieves were rolling large boulders off bridges onto cars and robbing the car after it crashes. This may also protect you from accidentally hitting someone committing suicide.
High speed turns- A tactical driving class at my local police department taught me that the key to taking a turn at high speed is to brake before the turn (which will load up the front shocks), coast through the turn, and accelerate after.
J-turns and Boot leggers- There are plenty of tutorials online for learning how to do J turns and Bootlegger turns. You can also look up how to pit a moving car.
Ramming – If you’re stopped by a car roadblock and your only option is to ram it, the book says to slow down and pretend like you are about to stop. Figure out which part of blocking car to ram. Usually the rear quarter is a good place to ram, because it doesn’t have the weight of the engine. Just before you come to a complete stop slam on the brakes, and as the car begins to rock backward hit the gas . This will load up the rear shocks for traction, allowing you to accelerate into the blocking vehicle. Ideally you want to ram the other car at 5-15Mph without letting off the gas. This will provide you more than enough force to move the blocking car.

- Prepper
- Posts: 35
- Karma: 2
- MSB member

As for RAMMING with newer vehicles, be prepared for your AirBags to deploy. Have eaten a few over the years, it can upset your concentration. .... Just prior to impact, lean back as far as you can from the steering wheel and dashboard. Remove your thumbs from your steering wheel grip or they may be sprained or broken from being forced off the wheel very quickly by the airbag.
Also, be mentally prepared to take the hit from the airbag. They are not a soft pillow. It's just like bracing for a punch. If you know it may connect, you are better off than getting hit flat footed.
When you aim for the stopped vehicle, center your front end on the rear axle to spread the impact across the front of your vehicle or you risk disabling your vehicle with a crushed front quarter into your wheel.
Size does matter. If you are in a compact car, DO NOT attempt to ram a large truck. I had a Honda Accord broadside my RAM2500 and it totaled the Honda, moved my truck 6 inches and flattened my rear tire. Remember modern small cars are made to collapse on impact, dont test it.
- Prepper
- Posts: 78
- Karma: 11
- MSB Member
The book describes how you should never let anyone into your house unless you can verify who they are. Many people have been robbed or worst by criminals posing to be from the cable company or a vacuum salesmen pushing their way into your house to clean your carpets. This even goes for Police officers. If a police officer or other government agent wants to come into your house, call the agency that they represent to authenticate their employment. Look up the number yourself, even if they try to provide you with one.
*Even if they aren't there to rob you, they could be there to plant a bug.
[Side Note: If I want to do a quick background check on regular person, I use free online tools like Zabasearch.com, County assesors office, Google, and facebook.
ITS tactical has a good article on Protecting You and Your Family Against Home Invasions
*The only thing I have to add is: Remove the red emergency handle from the cord hanging from your garage door opener. I have hear of criminal running a coat hanger along top of a closed Garage door to hook the handle. Once the handle is pulled they can easily slide the garage door open.
- Prepper
- Posts: 78
- Karma: 11
- MSB Member
SilvaConsultants.com
- Prepper
- Posts: 78
- Karma: 11
- MSB Member
Here are a few tips on how to better protect your identity:
1. Establish a junk email address and forward it to your real email account. Only use your real email for those you trust and provide the junk email when prompted by websites or businesses.
2. Keep you anonymity by signing up for rewards programs under an alias. Most places just want a name and email. My Safeway Grocery store rewards card is under James Bond. Every time I shop there the say "Thank you Mr. Bond"
3. put your credit cards in a mylar bag, or keep a dollar sized piece of aluminum foil in your wallet. Most credit cards have an RFID that can be easily scanned by someone near you.
4. Consider getting a prepaid credit card for online purchases. At a minimum refrain from using your debit card.
5. Like Jack mentioned, don't broadcast personal information by having car decals with your family member’s names on it, or stickers promoting the school that your kids attend.
6. Cover your Debit pin!!! Everywhere I go, I see people entering their debit pin in plain view of the general public. People behind you in line at the check stand, or people waiting to get gas at the gas station can see your pin, not to mention the security cameras of the business. A teller at my bank, laughed at me because I covered my pin. She said that hardly anyone covers their pin anymore, and that she had my all my info, including pin, on the screen in front of her. I told her that "security is important to me", and I continued covering my pin...... knowing that some college kid working as a bank teller has my pin makes me uneasy.
7. When cutting up credit cards, or throwing away receipts, make sure to tear them into pieces and throw each piece away in a separate trash can. One can could be at home and one at work, ect. Make sure they are taken out on different days.
8. Also shred unwanted bills, statements, or cell phone deposited checks. It is mind boggling how many people just wrap up their financial data in a nice plastic bag, and put it on the curb for anyone to pickup. I securely dispose of my financial paper shredding by adding them to my Verimicomposter.
9. Question those asking for Your Social Security Number, Birth date, or Mothers Maiden name, ect. You would be surprised how many websites have security questions that ask for private data. I usually tweak the questions in my mind, So if it asks for my dogs name, I put the name of my cat. Or if the ask my favorite teacher I enter my least favorite. I even sometime enter a birthdate close to mine but not correct.

As for RAMMING with newer vehicles, be prepared for your AirBags to deploy. Have eaten a few over the years, it can upset your concentration. .... Just prior to impact, lean back as far as you can from the steering wheel and dashboard. Remove your thumbs from your steering wheel grip or they may be sprained or broken from being forced off the wheel very quickly by the airbag.
Also, be mentally prepared to take the hit from the airbag. They are not a soft pillow. It's just like bracing for a punch. If you know it may connect, you are better off than getting hit flat footed.
When you aim for the stopped vehicle, center your front end on the rear axle to spread the impact across the front of your vehicle or you risk disabling your vehicle with a crushed front quarter into your wheel.
WOW, seems like you have a lot of experience with ramming vehicles!
- Survival Demonstrator
- Posts: 3522
- Karma: 70
- Oooops!

Day 1 was class room
Day 2 was hand to hand combat and joint locks in the morning and moving in the diamond formation and protecting the principle from threats in the afternoon
Day 3 was high speed driving and escorting in a 3 to 4 vehicle convoys.
Day 4 we had to plan out an escort senerio. Took about 10 hours to do with a 12 person team.
Day 5 we had the senerio. picked up the principle from the airport and had to escort her all around the city. the instructors tried several attempts to take out out principle but all the attempts failed.
It was a great class. Stressfull staying on high alert all the time trying to protect someone.

- Prepper
- Posts: 78
- Karma: 11
- MSB Member
Many people consider dogs to be part of their family. However nobody likes a freeloading relative. Even dogs have ambitions above and beyond sitting at home while you’re at work. Consider training your dog to be a family asset instead of an expense, they will be much happier earning their keep.
I’m fortunate enough to have a K9 Nosework training facility in my area. Our Labrador began detection training/Nosework classes at a very early age from one of the premier trainers in our state. Now our dog can detect firearms in buildings and in vehicles. We are working towards identifying firearms carrier concealed on a person.
Most people don’t have a training facility in their area, but the good news is that training you dog is easy. It just takes patience and consistency. There are many online resources and DVD’s for the DIY trainer at home. Below are some tips that I have learned over the years.
Stinky Treats - hide treats in a controlled location like your living room. Start off easy by placing the treats in plain view, and letting your dog hunt for them. Gradually start hiding the treats in more difficult locations like inside a closed card board box. Only use these stinky treats when detection training.
Short Sessions - Dogs are like ADD kids, they are only able to focus for a short period of time. Train for only 3-5 minutes, then take a break, then another 3-5 minutes. Total training time should not exceed 1-2 hours.
Hide high and Low - Get your dogs accustom to finding treats above their head. Start low like on top of chairs, and work up to tables or counters. Also hide in confined spaces, and makeshift tunnels to build your dogs comfort level in strange situations.
Introduce other scents – poke holes in a small tin and place inside a q-tip head dipped in birch oil. Hide this scent box alongside your stinky treats. Your dog will begin to associate the birch oil with treats and lock onto that scent. Pretty soon you can just used the birch oil container and enthusiastically reward your dog with treats when they find the birch oil. Once you introduce one scent you can introduce any. To minimize contamination, we were instructed to put our scent box in inside 2 layers of Tupperware and keep the Tupperware inside the fridge. This may seem like overkill but dogs noses are so sensitive that Cadaver dogs can find bodies at the bottom of a lakes.
Minimize Contamination – Wear latex gloves when handling scents and keep scents isolated like a controlled substance. If you get the scent smell on your hands and touch things around your house, pretty soon you whole house will smell like birch oil to your dog. When using multiple cardboard boxes, try to consistently use the same box for scents and randomize its location. Otherwise all the boxes will start smelling the same and the dog may get confused. It is also good to regularly train in new places.
Create a Signal – After your dog becomes an expert at finding a scent box, you can refrain from rewarding them until they give you a signal. A signal could be sitting, lying down, barking, turning in circles, or whatever. Our dogs signal is to lay down. If you signal is to sit, your dog should already be able to sit on command. When the dog finds the hide and looks at you for their treat, command them to sit (signal) before giving them the treat or reward. After a few times, do not offer a verbal command and just wait until you dog signals on their own. Immediately reward when they signal.
Reward properly - When your dog finds a hide, give them the treat within a few inches of the hide so that they maintain focus on the hide. The last thing you want is the dog to find the hide, and run over to you looking for a treat. I don’t reward our dog unless she stares directly at the location of the firearm. This way she pinpoints the exact location.
Timing - Potty your dog before training, and don’t train directly after feeding them.
Overtime you dog will acquire detection skills that can come in very handy. They will also enjoy the attention and playing this new game.
- Tactical Skittle Assassin
- Dedicated Contributor
- Posts: 1699
- Karma: 190
- All we have to do is create another universe

Black - On following too close, always stop behind traffic with enough room for you to pull your vehicle out of the lane in case you need to take off.
The easiest way to do this is to only pull as close to the car in front of you as you can see their rear tires over your hood. This gives most vehicles enough room to turn in either direction and pull around/away.
The Professor
Yeah, that's right. . ."Professor EMERITUS!" Now, pardon me while I show up "late" for. . .uh. . .work.
- Senior Survivalist
- Posts: 236
- Karma: 12

90% of EP is the advance work, not combat training. I trained under one guy who did SS work for over 20 years. Won awards for his advance work. IMHO it's the most important part of protection.
I would read up on advance work and corporate event pre-planning to get into that mindset.
BTW most of the schools out there teach SS doctrine 2 revs old. Not the current doctrine, which is VERY different.
Also Tony Scotti has several good books on offensive/defensive driving.
My 2 cents
I took a 40 hour EP class a couple of years ago.
Day 1 was class room
Day 2 was hand to hand combat and joint locks in the morning and moving in the diamond formation and protecting the principle from threats in the afternoon
Day 3 was high speed driving and escorting in a 3 to 4 vehicle convoys.
Day 4 we had to plan out an escort senerio. Took about 10 hours to do with a 12 person team.
Day 5 we had the senerio. picked up the principle from the airport and had to escort her all around the city. the instructors tried several attempts to take out out principle but all the attempts failed.
It was a great class. Stressfull staying on high alert all the time trying to protect someone.
- Senior Survivalist
- Posts: 236
- Karma: 12
Bumping locks is incredibly easy and quick.
A good deadbolt near the bottom of the jam is also annoying to thieves.
- Survival Demonstrator
- Posts: 3522
- Karma: 70
- Oooops!
A good deadbolt near the bottom of the jam is also annoying to thieves.Good point.
- Prepper
- Posts: 14
- Karma: 1
- More Patients then a Hospital.

- Prepper
- Posts: 78
- Karma: 11
- MSB Member
I'm learning that Advance work is the most import part of any EP operation. It accounts for about 90% of the effort, while actual Security detail only accounts for about 10%. Advance work is much less glamorous, and meticulously time consuming. However it is the determining factor in your success.
Being aware and organized are critical components to conducting good advance work.
Situational Awareness
Situation Awareness is a popular concept used by many people in an attempt safeguard against danger. However situational awareness is not limited to just setting off your "spidy-senses." We need to be situationally aware of all things. Don't push the door, when it says pull. Don't back your car up without looking. Don't approach the deli cashier oblivious to the "Order Here" sign clearly pointing somewhere else. Don't misplace your coffee cup or lose your keys. These are all actions of someone on autopilot clearly not paying attention. Unfortunately most people spend their entire lives this way.
As you become more aware of your surroundings, you will feel a sensation of "high speed" living. You will start to effortlessly navigate through the mundane hurdles of life. You will avoid bumping into people. You will notice road construction in the distance and know to merge early. You will already know if a store takes American Express because of the Credit card sticker on the register. you will see the people around you still stepping in gum, but you will avoid it.
This heighten sense of awareness will help you to focus on the intricate details of advance work. You will be able to identify details about a location or person that would normally go unnoticed.
Organizational Timing
The most observant person in the world is still nothing without organization skills and timing. Knowing what to look for when you are lost is great, but not getting lost in the first place is even better. Being organized and punctual will help alleviate these types of headaches in life. Whether it going to the Airport, or meeting friends for dinner, put in the extra effort to be organized and punctual. Have a map or clear directions of your route to the destination. Be familiar with alternate routes, and even know the proximity to the closest hospital or police station. Give yourself more than enough time to reach your destination and factor in extra time for possible delays.
Have a dependable clock. Don't try to outsmart your clock by intentionally setting it 10 minutes slow or fast. Arrive at your destination at least 5 minutes early. Time is delineated in minutes for a reason. Meeting someone at 6:00 does not mean 6ish. [It actually means 5:55].
Always have a pen and paper with you at all times for jotting down notes. Nobody can remember everything. I carry a spiral 3x5 Rite-in-the Rain pad in my back pocket. If I need to quickly jot down a license plate number, phone number, or address, it is ready to go. I try to use my smart phone, but entering a security code and opening an app takes time. Smart phones can be more convenient when taking pictures, emailing, and the having the added security. Notepads are great for quick notes. In a future post I will attempt to provide an example of advance work for a public location in my area.
- Prepper
- Posts: 78
- Karma: 11
- MSB Member
This my be a little over the top for some, but Microsoft Access is a great program to keep records of people and locations when doing advance work. The standard Access contact template already allows the uploading of photos and is easily customizable to include additional fields that you feel pertinent. You can begin creating your own top secret spy dossiers in no time.
Just be sure to encrypt it using something like TrueCrypt. Keep the encrypted file on a keychain thumbdrive and you are set.
- Prepper
- Posts: 78
- Karma: 11
- MSB Member
Not sure on the legality of this, so let say for eductional purpose only:
http://www.ehow.com/how_12228280_make-bug-disposable-cell-phone.html
Additional Notes:
Check the features of the prepaid phone before you buy.
Hiding the phone near an electrical outlet, and keeping it plugged in, will keep it continuosly charging.
- Survivor
- Posts: 135
- Karma: 1
- "Guns dont kill people. People kill people."

Man, to much info.....
But, from what i have seen, what makes the most sense to me is protecting your identity.
i see a lot of people that easily give um their personal information to any person doing a survey for a local Supermarket.... Not me.
I also do stuff like, having different routes to work and not using close that scream "Money" since i am an executive.... I keep a low profile. Even my car is old in order not to stick out.
I try hard not to make myself a target. But reading this topic made me realize i have long ways to go.
@Black November@
i laughed my A** off at you ant the Mr. Bond thing.... 10 pt for you ! LOL

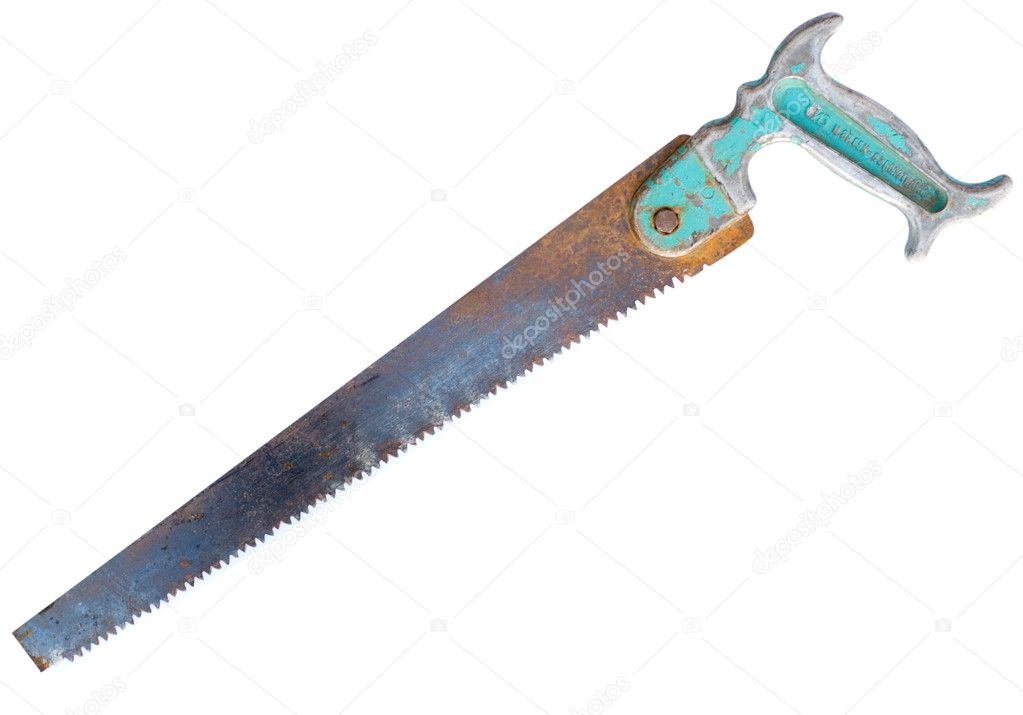
When on a trip some place more than an hour away I pay attention to mile markers on the highway or any substantial landmarks. If we break down or have some emergency on the road I would rather be able to tell the dispatcher " we just passed mile marker 146 on hwy so and so" instead of I think we are between two places that may be a hundred miles apart.
I taught my sons this from a very early age. It's amazing how much you can teach young kids when you make it a game and throw a little brotherly competition in. You can get the highway number, county, direction and type of road (federal/state or N/S/E/W if you know how the system works) and location on that road all from those simple white strips along the side of the road. Being that I live in the desert, sometimes that's all you'll see for an hour or more, so it's important to be able to read them.
Of course, now that I'm looking for one, I can't find a single image. But they're the skinny white plastic ones, no more than a couple of feet high, all along the side of the road out in the middle of nowhere.
went out to dinner tonight with 2 friends both LE, my wife and i CCW. we picked a nice booth that gave a great view of the overall place and noted the exits and everyone knew their primary duties if anything went down. its something that we have been doing for years now but it started after a local shooting in a subway shop down here that made us think. when out in groups lets take the 1 min to set us up for success should things go bad.
I noticed that with the guys I was dating. I felt much more comfortable with guys that sat so they could see the entrance and watched when people came in. And if they were sitting with their back to the door and looked uncomfortable when I mentioned owning firearms, we probably weren't a good match.
Love this thread, by the way.
- Prepper
- Posts: 78
- Karma: 11
- MSB Member
Whether it's signalling to leave a boring dinner party, or being held at gunpoint while answering a call from your wife, it is a good idea to establish a duress code. Take a few moments with your loved ones to agree on a specific word, phrase, and body language that can be used during such occasions. It could really be the difference between life and death, or at least minimize the discomfort of attending a function where you don't know anyone.
Picking a Duress Code:
Words - Try picking words that don't come up regularly in conversation, and will not sound strange when used. Your friends might become suspicious if you start saying "Abbra Cadabara" every time you are about to leave. You might consider choosing a less conspicuous word like automobile, newspaper, heartbeat, or streetlight that can easily be inserted into a sentence. To be even more subtle, have a secret pet name for your significant other like hunny, or sweetheart to be used only in the perils of danger. It may seem silly to dedicate a special word, when most couples have a knack for reading each other, but it could be crucial in a telephone or email conversation. Its better to have a duress code word and not need it, than to need it and not have it.
Phrases - Using a phrase can simply be a sentence with your secret word in it, but it can also be a metaphor. Suppose your secret phrase is "car trouble". This allows you to use the different words every time. You could say the cars making noises, having trouble starting, acting funny, or the battery is won't hold a charge. This gives you much more variety in dialogue, and could be used to interpret the severity of a situation. If you want to leave a party, you might say that you recently noticed the tires look low. If you are being held at gun point you might say that yesterday the car started making loud grinding noises during gear shifts.
Body Language - Simple gestures like scratching your elbow, or cracking your knuckles can also relay the message of duress. It doesn't have to be as elaborate as a major league catcher signaling the pitcher, just enough to get your point across to the intended recipient. Being able to signal your wife could come in pretty handy the next time someone invites you to attend their child's fifth grade piano recital, and expects an on the spot answer.
It is a good idea to incorporated all three of these methods when creating your duress code. This allows for the most flexibility for sending signals. Use some creativity to determine your own personal duress codes, and never tell anyone.
- Prepper
- Posts: 78
- Karma: 11
- MSB Member
If you are staying in a hotel, or even just at home, one of the simplest/cheap ways to secure a door from the inside is to jam a plain old door stop in the door. It is especially good for office buildings, schools, or other large complexes with many lock-less interior doors.

Just kick one of these under the door and the door will not open without breaking it down. You can even drill a hole in the back of the door stopper and attach a paracord lanyard for easy removal. Great for traveling!
- Prepper
- Posts: 78
- Karma: 11
- MSB Member
I found this pdf online. It has a bunch of good info about effective security operations surrounding a major event. It was created by the US Dept of Justice as guidelines for Law enforcement.
Love this thread, by the way.
Thanks for the feedback.
- Prepper
- Posts: 78
- Karma: 11
- MSB Member
Your family can easily create their very own Bat Signal using the free texting service offered by Groupme.com. Just register with Groupme.com, and they will issue your family a single phone number. During an emergency anyone can send a text to that number, and the message will be broadcasted to everyone else in the family (group).
This service also works well for neighborhood watch & larger groups as mentioned in a post I did last year.
- Prepper
- Posts: 78
- Karma: 11
- MSB Member
For work, I regularly have meetings at various .gov agencies. It always amazes me how a collared shirt, pad of paper, and a nonchalant nod, will get you unlimited access to almost any interior office wing no questions asked. The key is to look like you are on business, know where you are going, and to walk at a brisk pace. These types of mannerisms make gathering advanced work much easier.
If you start snooping around a hotel wearing jeans and a T-shirt, the staff will usually just confront you, and ask you to leave.
However, if you look semi-professional (but not too important), and start approaching staff about hotel policies and procedures, most of them will gladly tell you whatever you want to know. Try to speak clearly and conscisely. If you are polite, they will go out of their way to help you. No need to mention why you are there, just be direct and assertive. Be organized and know your questions ahead of time. If anyone asks, tell them that you've been sent there to gather information for a upcoming business trip.
Don't be timid, or shy. Timid and shy sticks out like a sore thumb. While riding the train to work, it is easy to pick out perplexed faces of first time riders. If you look lost, or unsure of yourself, people will become suspicious of your presence. Always act like you belong.
This works almost anywhere. [restaurants, offices, car rentals, stores, ect.]
Homework: Go to your local grocery store and ask for the name of the person responsible for ordering produce. Gathering info is easy, but don't be discouraged if you don't get it the first time around.
- Senior Survivalist
- Posts: 236
- Karma: 12
Both the family and my MutualAid Group use it.
I recently tried it with a friend vacationing in Europe using a burner sim card he bought
at a corner store. Flawless.
Ability to attach geolocation maps and photos is quite nice.
Killer app. Only trouble is it uses Amazon Web Services, so if AWS goes down, the app goes down.
THE FAMILY BAT SIGNAL (Text)
Your family can easily create their very own Bat Signal using the free texting service offered by Groupme.com. Just register with Groupme.com, and they will issue your family a single phone number. During an emergency anyone can send a text to that number, and the message will be broadcasted to everyone else in the family (group).
This service also works well for neighborhood watch & larger groups as mentioned in a post I did last year.
Posted on October 6th, 2013