

Showing all posts tagged "Cb Homepreps Homesteading"
Freezer Cooking Recipes: $0.24 Microwavable Pasta Lunches
Freezer Cooking: $0.24 Microwavable Pasta Lunch Packets
March 7, 2014 By Jazmin Rode 20 Comments

I’m a fan of easy freezer cooking recipes, convenience and inexpensive meals. So I combined all of these qualities and turned them into a metaphorical super soldier of sorts and came up with this:

Yep, the price you see is indeed accurate. These freezable pasta lunches come in at just $0.24 per serving. Not only are they insanely inexpensive (can you even buy a pack of gum for $0.25?), they offer convenience and endless possibilities for variety to spice up your work lunches.
Do the work once and you’ll be able to fill your freezer![]() with over three weeks worth of tasty lunches to bring to work.This was music to my husband’s ears, since he was getting pretty tired of taking leftovers or sandwiches to work every day.
with over three weeks worth of tasty lunches to bring to work.This was music to my husband’s ears, since he was getting pretty tired of taking leftovers or sandwiches to work every day.
Here’s how to make your own:
Cook the pasta in a salted pot of boiling water until al dente. I cooked up two boxes of pasta, so I needed two pots. Or you can just skip the extra effort and use a large stock pot![]() . Then drain.
. Then drain.
Stir drained pasta with olive oil to prevent sticking. I used a little over 1 tsp. of Olive Oil![]() for each box of pasta.
for each box of pasta.

Place pasta in an even layer on a cookie sheet![]() . I used one cookie sheet per box of cooked pasta. My pasta overlapped a bit, so I had to snap a handful of pieces apart once frozen.
. I used one cookie sheet per box of cooked pasta. My pasta overlapped a bit, so I had to snap a handful of pieces apart once frozen.
Place in the freezer for two hours. If you have a small freezer like me, use a small wire shelf from the dollar store to be able to freeze two sheets at once.

While the pasta is freezing, mix together your sauce and let it cool completely before packaging up. You’ll see two types of sauce in this post, but since I way over estimated how much I needed, I’m only accounting for the cost of one sauce – the broccoli alfredo sauce.
Recipe to come soon for the broccoli alfredo sauce.
UPDATE: The broccoli alfredo sauce recipe has been posted.
Remove the frozen pasta from the freezer and transfer to a large bowl. If some of your pieces are frozen together, gently snap them apart. I opted to mix my pastas together even though they were different varieties.

Tip: Larger pastas are easier to freeze and less likely to stick together. If some of them do stick together, it’s a lot easier to snap them apart than a smaller pasta.
I used zippable sandwich bags and small 2-oz. cups w/lids (like this![]() ) to package up my pasta lunches. If you prefer not to use the cups, you can freeze your sauce in ice cube trays. Since most ice cube trays hold 1-oz. per cube, you’ll need to use two ice cubes for each bag of pasta.
) to package up my pasta lunches. If you prefer not to use the cups, you can freeze your sauce in ice cube trays. Since most ice cube trays hold 1-oz. per cube, you’ll need to use two ice cubes for each bag of pasta.
It’s important to work quickly when packaging up your pasta so it doesn’t thaw.Place one cup of pasta into each bag. Try to remove as much air as possible from each bag, fold over once if your bags are large enough and seal. Place them into the freezer immediately.

Then package up your sauce cups. Each cup holds two ounces. I just used a regular spoon to scoop in my sauce. Place lids on cups and transfer to the freezer.

** if you’re using an ice cube tray for your sauce, you’ll have to add the frozen cubes to the bags of pasta later.
I’m storing my pasta in a basket on the top shelf of my freezer and just sliding in the cups in the leftover space on the side. Super easy to grab and go!

Now, About the Sauce
I know I touched on it above, but I’ll explain a bit more about my choice for the sauce. The reason I consciously chose the little cups to store the sauce was because I wanted my husband to have some variety with his lunch each day.
Keeping the sauce separate from the pasta allows me to save leftover sauce from our dinners in the cups and add it to our sauce stash. This allows for a much greater variety than if the sauce was packaged together with the pasta. He can just choose the sauce he’s in the mood for, grab the pasta, and go.
This is just an easy way to break up the monotony of essentially eating the same thing for lunch a few times each week.

Heating Instructions:
Straight from the freezer:
Lightly massage bag of pasta to break apart any pieces that are frozen together. Place pasta in microwave safe bowl. Remove frozen sauce from cup and place directly over the pasta (if you’re using sauce from ice cube trays, use 2 cubes of sauce). Microwave for 90 seconds. Then mix thoroughly, ensuring all pasta is covered in the sauce. Place back in microwave for 30 seconds. Let sit for one minute before removing from microwave.
*Microwave times may vary according to your microwave’s wattage.
When thawed:
Place pasta in microwavable bowl, mix sauce and pasta together and microwave for one minute or until thoroughly heated through.
I knew they were going to be inexpensive, but I was happily surprised to see that the cost per serving is just $0.24. To date, this is probably one of the cheapest freezer meal recipes I’ve posted. Though, my $0.59 freezer smoothie packets do come pretty close.


Posted on July 27th, 2014
Paracord Cord Reinforcement

Step 1: Gather Supplies

You will need:
1. The cable you are going to wrap. In my case this was a 6' HDMI cable.
2. The paracord you want to use for the wrap. I used two 4' scraps of blaze orange.
3. Something to cut the paracord with, I just used a pocket knife.
4. And something to melt the paracord with, in my case I used a Zippo.
Step 2: Gut the Paracord
Step 3: Cobra Weave


Step 4: Cut and Finish the Ends


| 1-40 of 53 | Next » |


| 1-40 of 53 | Next » |
Posted on July 27th, 2014
How to Keep Yellow Jacket Wasps Away: 14 Steps (with Pictures)
Edited by 1Youare8, Mop and Bucket, Maluniu, Writelf and 7 others
Two Methods:Remove or Prevent Yellow Jackets Without KillingKill Yellow Jackets
Finding a way to get rid of them without chemicals is challenging because you want to get rid of them once and for all. So what can you do to get rid of wasps naturally without harming your family or the environment? Here are some unusual ways to do the job. These methods are not scientifically proven but the people who have used them have seen good results.
Method 1 of 2: Remove or Prevent Yellow Jackets Without Killing
-
Keep food sources, especially protein, indoors. Yellow jackets feed primarily off of protein, so be sure to keep those turkey sandwiches indoors and enjoy the postprandial glow outside instead of the other way around.
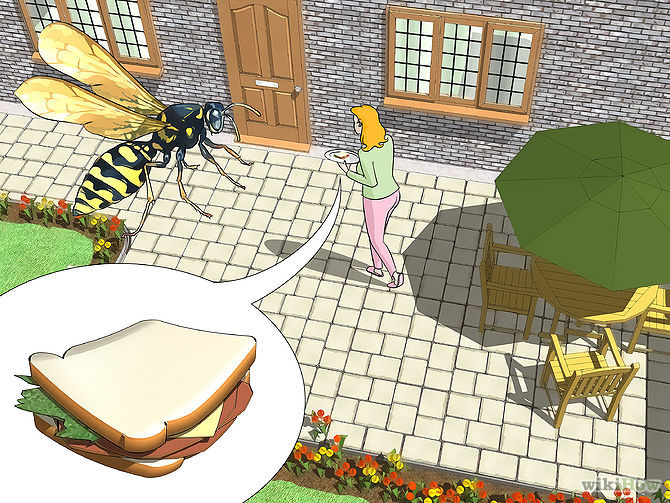
- Food sources include your pet's food as well. Make sure you find an effective way to store your pet food (if you do store it outside) so that any roaming yellow jackets can't make a quick feast out of your furry friend's treat.
-
Don't leave sugar out. In the spring and summer, yellow jackets eat primarily protein. In the fall, yellow jackets begin to incorporate sugars into their diet. Sugar can increase the lifespan and reproductive function of many predatory wasps, making it a particularly dangerous thing to keep around.[1]
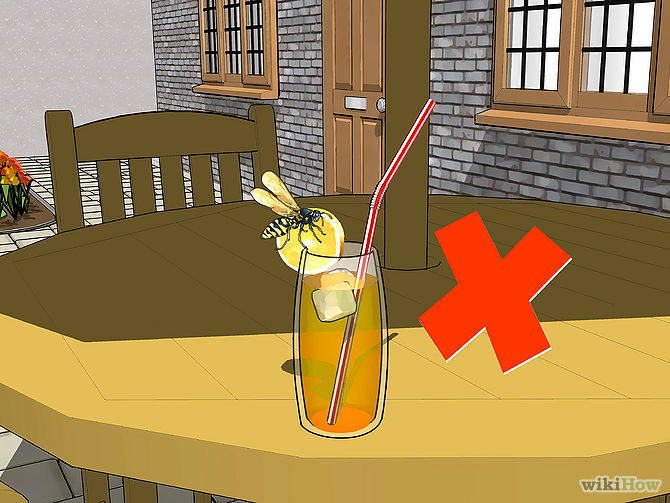
- If picnicking, try to keep sweets such as sodas and desserts indoors.
- Hummingbird feeders, essentially sugar-water dispensers, can be especially problematic. Investigate ways to kill or remove the entire colony before you put up a lot of sugar-water for them to gorge on.
-
Put out sliced cucumbers. If you have to put out food (we do not advocate blowing off 4th of July on account of some pesky wasps), one unusual wasp repellent you can try is cucumber. This vegetable has an acid property that wasps don't like. Cut up a few slices and leave around your picnic or BBQ area. They stay away and you can enjoy your outdoor activities without fear of getting stung.

-
Seal your garbage cans tightly. Yellow jackets are primarily hunters, but they can morph into greedy little scavengers if the prize is worth it. An open or easy-to-access garbage can is just that.

- Remember that sugars and proteins are especially pleasing to yellow jackets, so consider isolating those into separate bins to be extra sure. It's not necessary if you take care to lock up your entire garbage heap, but it may give succor to those fiercely afraid of yellow jackets.
-
Hang up a crumpled brown paper bag. Wasps are territorial so they will not make a nest where one already exist. To give the illusion of a wasp nest crumple up a small brown grocery bag, attach a string, and hang near your doors. They cannot tell if it's truly a nest but they seem to trust what they see. Their instincts will kick in and they will go away.

-
Seal up the sides of your home and shore up your awnings. Awnings and loose siding on your home is a safe, enticing place for yellow jackets to shack up and make a home. Seal these places properly to prevent a yellow jacket infestation from making its way — quite literally — into your home.
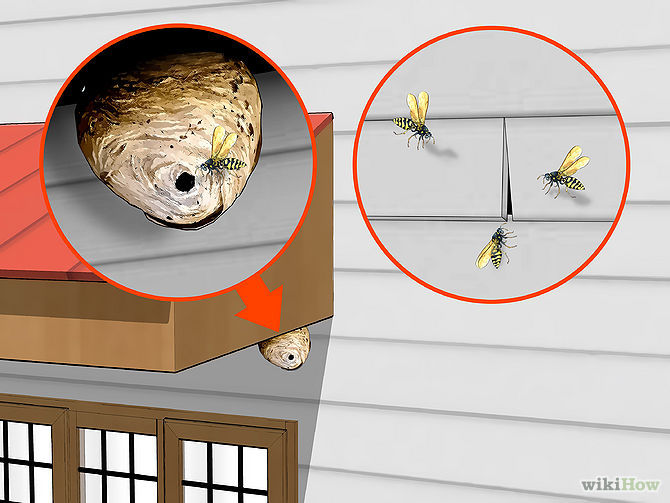
- Infestations of yellow jackets into your home will most likely require the expertise of a professional exterminator, and will cost you a pretty penny while you're at it. If you're the patient type, wait for winter. Cold enough weather will kill off the entire colony, after which time you can remove the wasp nest and seal up your home properly.
-
Don't do these things. In addition to the advice above, don't do any of the following thing, as they are most likely counterproductive:
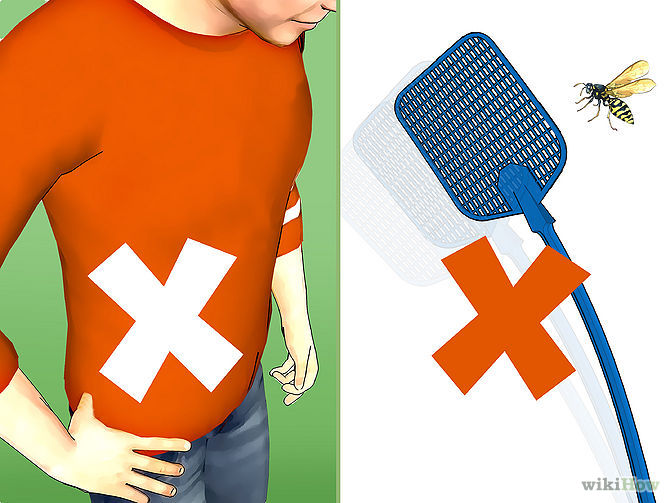
- Don't wear bright colors. The yellow jackets could think that you're a flower and be attracted to you.
- Don't swat at yellow jackets. Killing one yellow jacket may be cathartic, but it also causes a pheromone to be released which attracts other wasps. Out of the frying pan and into the fire.
- Don't wear overly aromatic perfumes. Yellow jackets are attracted to sweet smells.


Method 2 of 2: Kill Yellow Jackets
-
Spray them with soap and water. Old fashioned soap and water is the first natural repellent to use. Spray the soapy mixture on the wasp and their nest. The soap will stick to their wings and weigh them down. Eventually they will suffocate.

- Line your doors and windows with soap to keep the wasps away.
- If the yellow jackets have built a nest in the ground, pour soapy water into the hole at night and preferably during cooler temperature. The entire colony should die. Be sure to wear protective clothing in case the yellow jackets are feeling especially murderous.
-
Get a non-toxic wasp trap and set it out early in the season. Non-toxic wasp traps don't use any chemicals to kill wasps caught inside. Instead, they rely on asphyxiation, drowning, starvation, or exhaustion to kill the yellow jackets. Not exactly the most humane, but this is war, isn't it?
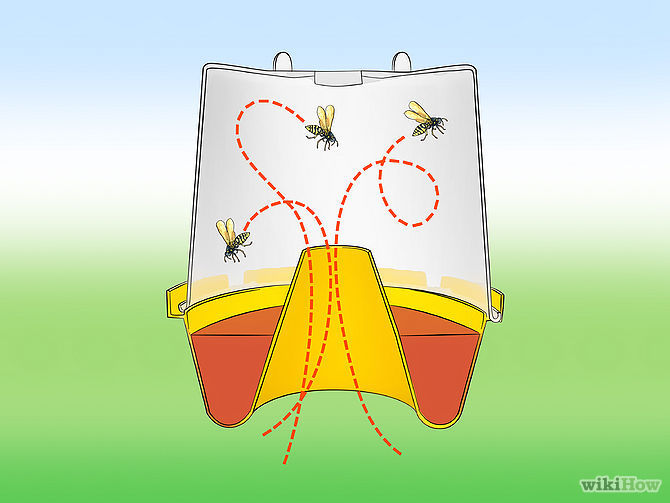
- Place the trap two to four feet above the ground and as far away from human habitation as possible.[2] This is the ideal scenario.
-
Build a trap of your own using a large soda bottle. Cut off the top 1/3 of a 2-liter soda bottle. Turn the top around (so that it's facing the bottom of the soda bottle instead of the top) and staple it to the remaining soda bottle. You should have a kind of minnow trap with the inverted neck as a funnel.
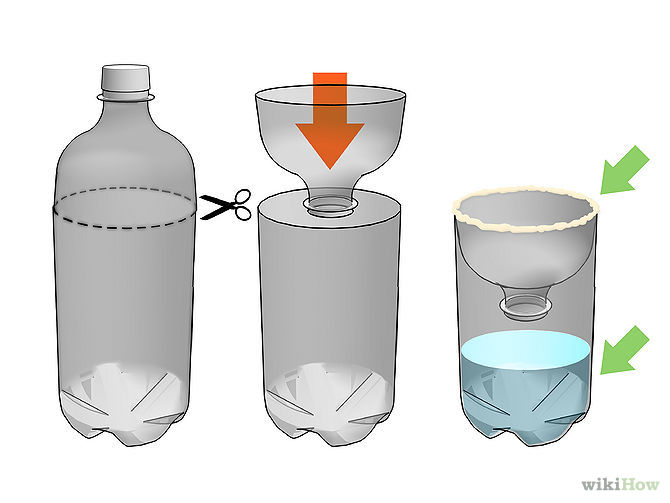
- Fill the soda bottle about halfway full with soapy water. Coat the neck of the soda bottle with sweet jam. The yellow jackets will try to get to the jam and accidentally fall into the bottle, from which it is very difficult to get out.
- Empty and refill the soda bottle frequently. Dead yellow jackets can form a barrier that other caught yellow jackets can rest on, possibly escaping. Empty the contents of your homemade trap frequently to cut down on this risk.
-
Cover the entrance and exit of the yellow jackets's nest with a powdered insecticide. The yellow jackets will crawl through the insecticide in order to get into their nest, carrying the insecticide into the nest and infecting the other members of the colony. Coating both the entrance and exit of their nest will increase the likelihood of extermination.

-
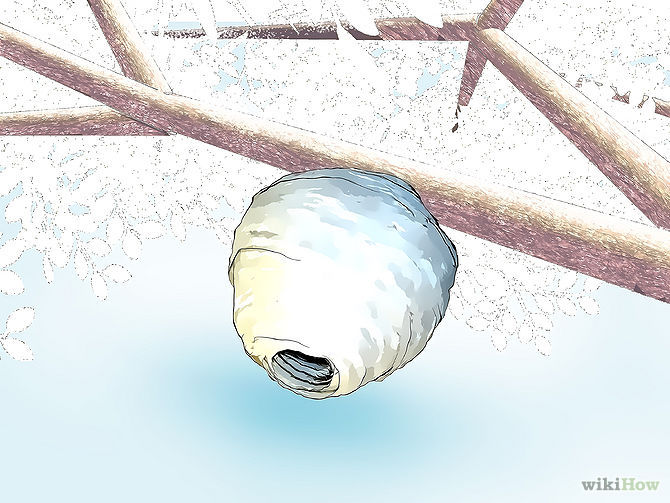
Dispose of an aerial nest with a big cloth bag. During nighttime, when the yellow jackets are drowsy, sneak up to the aerial nest and quickly envelop it in your cloth bag. Make sure to tie off the bag so that none of the wasps may escape. Break the wasp nest off from its mooring and submerge it completely in water to drown the yellow jackets. Use a couple rocks to help keep the nest submerged.

-
Dispose of an underground nest by sealing off all entry and exit points. Once you are sure you have located all of the possible entry and exit points of the nest, approach them during the nighttime when the wasps are drowsy. Place a large bowl over any entrances and exits, working them into the ground so that they create a kind of seal.
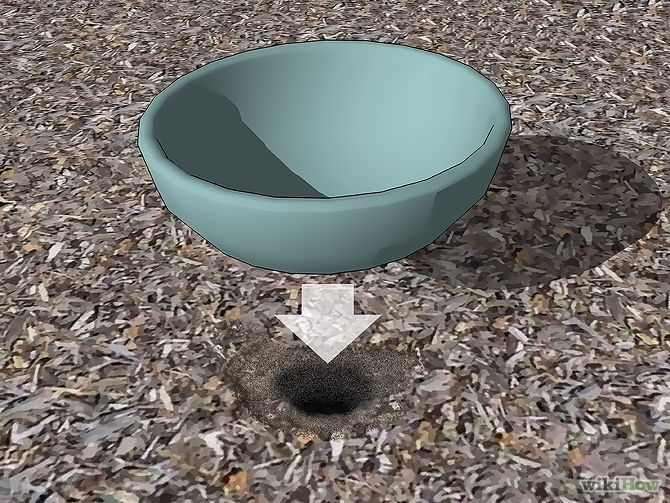
- Leave the bowls over the entry and exit points for approximately two weeks. The yellow jackets will be disoriented but unable to leave their underground prison. They should die off after the two weeks, if not relocate to another more accessible nest.
-
Wait it out. Wasps cannot survive the harsh winter months, during which time they regularly die off. If you discover a yellow jacket nest during the end of summer/fall, consider waiting for the first frost to kill off your pesky yellow jackets for you. You won't risk getting stung and, if you can stand it, you won't have to worry with the headache of playing exterminator for weeks on end.


Warnings
- Remember that wasps sting and if you are allergic to them or bees, keep right away from them and let someone else do it.
Related wikiHows
Posted on July 27th, 2014
How I Cut My Energy Bill By a Third with Tech and Common Sense
Last month my electric bill was $300. That was ridiculous. Something had to be done. By using gadgets, common sense, and a constant awareness of power consumption, I've made changes that will cut my power bill by at least a third. And that's not just temporarily—that's forever. And, I'm doing it without really sacrificing anything. P
I've always used more power than normal people because 1) I work at home on a 30-inch monitor and a 27-inch iMac, and 2) I have an assload of electronics. The 63-inch Plasma TV (larger TVs use more already, and plasma draws three times as much power as LCD), as well as water coolers, various NASes, and the need to keep some lights on during the day for my rabbits are a constant drain on the grid. But what could I do? Could I still realistically use all my devices when I wanted them, but still draw a lot less power? Yes. Here's how you can do it too. P
I'm going to start with common sense tips that require no extra equipment so anyone can start lowering their power consumption right now. But if you're serious about lowering your electricity usage dramatically, I'll discuss tools like the eMonitor that tell you exactly what's drawing power in your home down to the circuit level. Once you know exactly what's wasting money, I'll point out some advanced tips and equipment you can use to do something about it. P
The common sense stuff you can do right now P
Turn off your lights P
Go around your house and turn off all the lights you're not using, especially if you're using old style incandescent light bulbs (Edison's kind). Bathrooms, closets, and sometimes kitchens use incandescent lights because unlike compact fluorescents, they get up to maximum brightness right away. When all you want to do is take a leak or check the mirror, CFLs won't even be done going through their 5 minute warmup stage up by the time you're washing your hands. Another alternative is LED bulbs, which are dramatically more expensive upfront, but don't have the drawbacks of CFL and behave more like a traditional light. 1 P

Am I Washing My Hands Correctly?
Much like wiping, washing our hands is something that all of us hopefully do, but don't really …Read more
Point is, each 60 watt bulb uses 0.060 kWh (more or less, depending on your wiring) per hour, and you probably have somewhere between 2 to 4 bulbs in each bathroom and kitchen, which makes for 120-240 watts of wasted electricity per hour. In comparison, my 27-inch iMac takes about 130 watts with the screen on and everything powered up. Two (inefficient) lights use the same amount of power as a large computer! A laptop uses about 40 to 60 watts, in comparison, so you could do an hour's work by just shutting off a light. P
Moral: Turn off your lights when you're not using them. Tell your spouse, roommates, parents, pets and goblins to do the same, and show them exactly how much power they're wasting by not doing this. P
Unplug stuff you rarely use P
I have an exercise room with a treadmill and a TV inside. I don't use them nearly as often as I should, which means they could theoretically sit plugged in for weeks for no reason. Stuff like TVs and other stereo equipment still draw power when they're plugged in but off—which is called vampire drain—due to the fact that they have to still power their IR receivers for your remote control to work. You'll need to physically unplug these things from the wall to eliminate any power consumption when not in use. It might take an extra minute to find the cord, plug it in and switch on the electronics when I do use them—and an extra minute to unplug when I'm done—but it's worth it if they're barely used. P
Don't use your AC so damn much P
Your air conditioning power usage is a very nebulous thing, because unless you physically track how long your AC was on (including all the stops and starts), compare it to how much electricity your other electronics are using, then somehow correlate that with your bill at the end of the month, you're really in the dark. But trust me when I say that it's a lot. Depending on the weather, how much you use it and what other electronics you have, you could be paying more for AC than everything else in your house put together. That's insane. P
We've got five alternatives to running your air conditioner all the time, which include ice in front of a fan, turning off your heat-generating electronics, and generating a breeze into your home at night when the air outside is cooler. I'm not telling you to not use the AC at all, but walking around the house with fewer clothes on rarely hurts anybody. P

Five Effective DIY Alternatives to Running an Air Conditioner
If you don't have an air conditioner and can't take the heat (or you just don't feel …Read more
For the curious, I'll cover an actual way to measure your air conditioner's power usage compared to everything else a little later, with the eMonitor. P
Turn off your electronics, especially your computers, when you're not using them P
This point, just like turning off your lights, is a super obvious thing that all of us know, but don't religiously follow, because we're not electricity nazis. Unless you're torrenting at night, or hosting a Minecraft server for your friends, you don't really need to have your computer on when you're asleep. I know it's nice to not have to wait 5 minutes to get started in the day, but are those five minutes really worth keeping your computer on overnight and spending $1.85 a month? Actually, probably. P
But, when you're trying to shave off dollars from your bill, having a computer, a NAS, a couple laptops, and stereo equipment be on all the time can quickly add up to double digits per month for stuff you're not using. I'm not talking about not using these devices when you need them, it's the paying for stuff when it's not actually having any benefit that's the killer. P
Find out exactly what's using so much power 2 P
The basic method P
The cheap way of examining your electronics is to go around with a Killawatt or a Belkin Conserve Insight and plugging all your devices, one by one, into it and seeing how much power they draw. This is easy for something like a computer or a microwave, because you know exactly when they're on and off. But for something intermittent that cycles between drawing a lot of power and very little power, like a refrigerator or a water cooler, this is more difficult. But, using this, you can realize that—holy crap—my hot pot cooker uses 2,000 watts. Or that maybe it's really not a good idea to leave your TV on when you're not using it. P

The Batman method P
If you really want to get serious about knowing exactly how much power use is going on—and I mean the kind of serious you get when you get a $300 bill in the mail, get an eMonitor from Powerhouse Dynamics. P
Traditional smart meter solutions that hook up to your meter—which are difficult or impossible to install if you live in a multi-unit complex or an apartment—can only tell you how much power your entire house is using as a whole. That's better than no information, but it renders it hard to narrow down the energy hog to an appliance level unless you constantly go around with a Killawatt and measure. The eMonitor installs onto the circuit level, so you can get a room-by-room readout. The only way you could get any more detailed is if there were Killawatt type measuring tools on each individual outlet that fed wirelessly into a central place that consolidates all this data. As far as I know, this doesn't exist yet. P
 SExpand
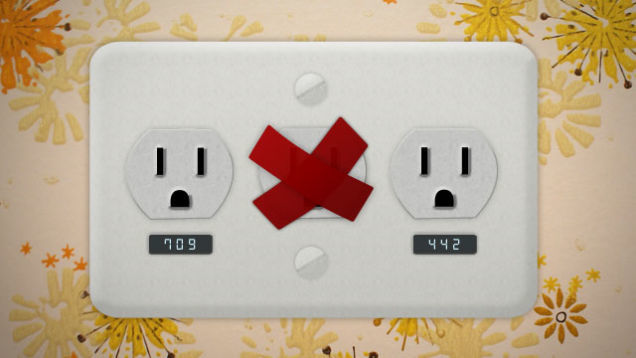
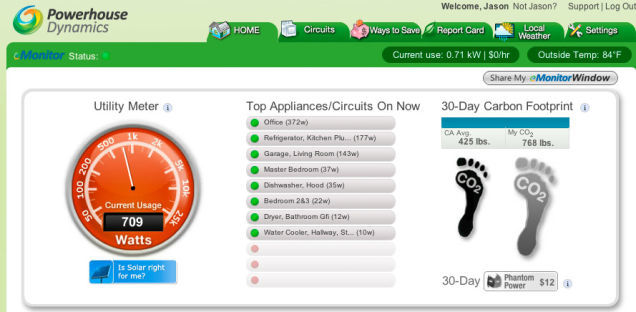
I'll explain the home screen of the eMonitor webapp. It's hard to make sense of it as a whole, so I'll break it down into pieces. P
You can see that my office is drawing the most right now, because my computers are on, as is my cable modem and wireless router. The refrigerator is in one of its higher power cycles, which explains why it's coming in at second, and there's a computer on in the living room, punching it up to 143 watts. Usually this idles at about 100, which includes a TiVo, another Wi-Fi router and a home automation system. Everything else is effectively unplugged. P
The other rooms have a small, constant power draw for things like clock radios, more Wi-Fi routers, appliances, security systems, and even this eMonitor setup. You could technically classify these as phantom power draws, but you're not going to unplug your clock radio every morning, and stuff like security systems are just things that you need to have on constantly. P
SExpand
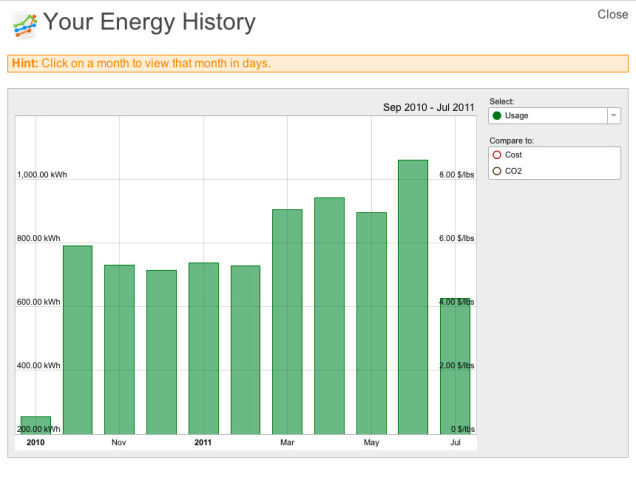
The second chunk tracks my last 30 days of power consumption. The living room and office are two obvious rooms with giant power usage, because my computers and my television are there, and that's where most of the day is spent. The AC, however, comes in third and fourth, because it's on two circuits. So together, it's used about a third of the total power for the last 30 days. And that's with me not turning on the AC at all for the last ten! I am ashamed of myself. That's the kind of wasteful behavior you can settle into if you stop paying attention. P
 SExpand
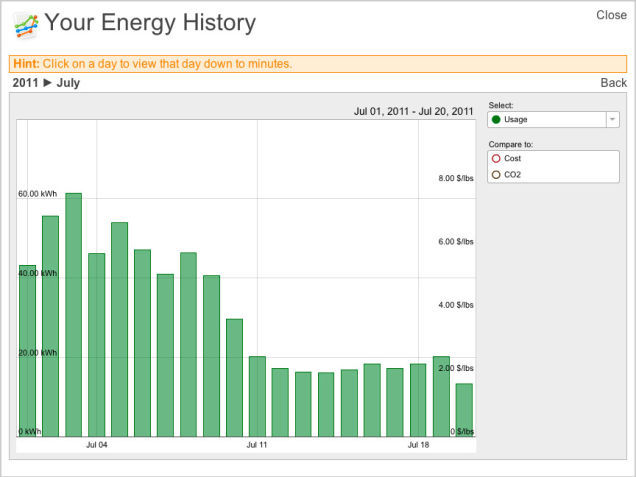
But the good news is that the bill estimate for this month is already dramatically less than last month, and I've only been trying to save power for about 10 days now. The first 10 days of July are still shameful, but I'm proud of the last 10. Part of that is me not using the AC, but it's also me eliminating useless power consumption. P
 SExpand
If I keep on this new low-energy diet, the August month will be the lowest I've ever had since the installation of the eMonitor at the end of September (which doesn't count). P
What's also great are the historical charts, which can also be shown on a circuit by circuit view to help you figure out what's sucking down the most juice. Each circuit can also be clicked on to see a historical view as well, or if you just want to monitor it closely in real time. The chart updates once a minute, but you can bypass that and go directly to your local eMonitor's IP address and see exactly what it's using right now via its tiny web server. P

Although the eMonitor is unbelievably powerful, it's also quite expensive. A 12 circuit monitor (what I have) will cost $688. A 24 circuit monitor, for large houses, costs $948. This is steep, but if you manage to cut down your power by $50 a month—and be able to keep it down, because you can set alerts and monitor when appliances use more than they should—you'll make that back within a couple years. It's also very useful for people who have solar panels, because it can keep track of your power generation as well. P

Trust me, when you're trying to cut your power use down, you'll be religiously monitoring the site throughout the day to keep a constant eye on what's using what. You'll also know exactly when the other people in your household start showering, watching TV, doing laundry or engage in any other electricity-intensive activity (and then yell at them for it). P
What do I do with all this information? P
Once you have the eMonitor installed, the first step is to identify devices in rooms that are using too much power while off. Start unplugging things and see how that affects the power consumption for its circuit. For example, some televisions and receivers and game consoles still draw a considerable load when powered down because they're keeping part of their circuitry on, even in the off state. You'll want to unplug these when you're not using them, or use the lamp timer or smart power strip methods I explain later. P
You can also start turning on electronics and seeing if something is insanely inefficient. Buying a new iron for $15 because your old one uses that much more in electricity in a year would be a good possible outcome. The mentality applies for the rest of the small-ticket appliances like hairdryers, toasters and coffee makers. P
You'll also be able to see how much power your lights are drawing compared to your other electronics, and you'll immediately want to swap out your bulbs for more efficient ones, which I explain next. P
The key is that once you know exactly what's drawing power in your house, you can start doing something about it. P
The technical solutions P
Switch your light bulbs to more efficient ones P
 SExpand
Like I said earlier, a 60 watt incandescent bulb uses 60 watts, or 0.060 kWh per hour, whereas the a compact fluorescent equivalent uses 13 watts, and a Philips LED bulb uses 12.5 watts. The chart should quickly outline the good and bad of each type of bulb. P
Notes
1 Average life for a GE and a Sylvania CFL bulb on Amazon. Wikipedia lists the average life as somewhere between 6000 to 15000, but the more common bulbs are 8000. And "average" life is the point at which half the bulbs at this age are dead, and half are still functional.
2 Average life for the Philips Ambient LED bulb, the one tested for this post. According to the Energystar website (PDF), most bulbs are coming in at about 25000 hours, with some at 50000 and a handful down at 15000. Like CFL, this is the point where half the bulbs would likely be dead and half would not.
3 There are CFL bulbs that are dimmable, but they are four times as expensive, and do not dim well. Complaints on Amazon say they're maximum brightness, down to about 80%, and then off.
4 Energystar rebates exist for LED lights, and you can search the site with your local zip code to see if your power company has any. Mine did not.
P
For most instances, you're going to want to go with a CFL, because it's cheap, drawing only slightly more power than an LED, and has a reasonably long life. An LED wins out in the cases where you're replacing an incandescent in the bathroom, where you want the lights to come on at max brightness instantly, or when you want to be able to control your brightness from a dimmer. But if you're talking living room lamps or dining/kitchen lights, where you'll physically be there for a while, a CFL works just fine. Those of you lucky enough to rebate the price down from $45 a bulb might find the 3x long lifetime and slightly decreased power consumption worth it for rooms where you want to keep the light on all the time as well. P
Here's a simple calculation that illustrates my point. If you keep a 60 watt bulb on for 12 hours a day, every day of the month, it would cost you about $2.77. A CFL used under the same conditions would cost $0.60. The difference there is already enough to cover the purchase of a new bulb, for just one month's use. P
You should also think about whether you really need 100 watt bulbs everywhere. I, for one, know how satisfying it feels to install one, fill up a room and really blow my retinas out. But unless you're performing delicate visual work all the time or trying to illuminate a large room, you can most likely make do with a 60 watter. Even 75 watt bulbs are plenty bright most of the time. P
Use a lamp timer to keep stuff on only when you need it P
I have two water coolers, one in my office and one in the kitchen so that I can have hot or cold water at any time. But if I think about it, how likely is it that I'm going to be in both places at the same time? Or, that I'm going to need cold water while I'm asleep? P
Take a $10 lamp timer ($6 if you use it for non-grounded, two-prong plug items) and you can specify exactly what times of the day you're likely to be using this. For the office cooler, I'm only really going to need water from it between noon and 5PM. For the kitchen cooler, it's 7AM to 9AM, then 6PM to midnight. By doing this, I've shaved 80% use time off one and 66% off the other. Sure, it takes a little more power to get the water to optimal temperature when they first start up, but that's less than keeping it on the entire day. P

You can extrapolate this lamp timer usage to appliances that you use every day and don't want to unplug all the time, but only need part of the day. Are you going to use your internet connection while you're asleep (if you don't Torrent)? Put your cable modem and router on a lamp timer. Do you ever really watch any shows your TiVo records from 2AM to 9AM? Or need your stereo when you're at work or asleep? Take a look around your house and see what devices you use every day, but only for parts of it, that would be annoying to unplug manually. P
Use a smart power strip that knows when to turn everything off P
If you think about it, there's little reason for your Xbox, PS3, receiver or subwoofer to be on when your TV is off. Likewise, why would your computer speakers, external USB backup drive, and monitor need to be on when your computer is not? Grab a smart power strip, like the Belkin Conserve Smart AV, that kills power going to five other devices when the main device—your TV or computer—is shut off. If you often listen to music with your receiver on and your TV off, you could make that the primary device as well. P
And if you're forgetful, you could combine this with the lamp timer method to make sure that your "main" devices—the ones that kill everything else—are off when you go to bed. P
An alternate method is to get a power strip with a remote, like these two Belkin models, which gives you the plug/unplug functionality without physically going and doing it. P
Use a charger that knows when your devices have had enough P
You could also use a special Conserve Valet that charges four USB things at once. This thing knows when your device has drawn enough power to fill up, and then automatically cuts off the charging to eliminate phantom power drain. P
I've found that the Valet is not that, practically speaking, because when you're charging your phones, iPods and Kindles, you expect them to be charged when you unplug them, whether it's 3 hours later or a day later. But if you're vigilant about charging your devices, this is a decent solution to only draw as much power as absolutely necessary. P
Do I really need to do all these things? P
Installing an eMonitor and knowing exactly how much power each gadget in your house uses may be a little extreme if your electric bill is already reasonable. The eMonitor is expensive, despite its comprehensiveness, and I wouldn't expect many of you to actually install it. But, with a $20 Killawatt and the common sense lessons I learned from lowering my power bill, you should be able to cut at least a few bucks off yours. P
Posted on July 27th, 2014
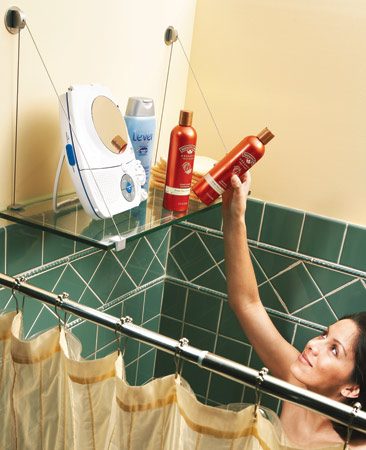
Refrigerator-Freezer Cleaning Checklist | Real Simple

Refrigerator and Freezer Cleaning Checklist
You may think you have the technique down cold, but keeping the refrigerator clean requires more than a box of baking soda. Think of this checklist as a refresher course.
See Your Saved Checklists|Cleaning Checklists|All ChecklistsPosted on July 27th, 2014
Supercook: recipe search by ingredients you have at home
Do you have?
Welcome
Supercook unlocks the potential of your pantry and fridge. Save money and help the environment by fully utilizing the ingredients you already have.
Posted on July 27th, 2014


Small camp security by Gary Lewis
| ||||||||||||||||||


Posted on July 24th, 2014
Pole Shift Survival Information
|
The information on this site is for those who wish to improve their chances for survival after the coming pending pole shift. |
4001 Files, 14.1 GB Last Updated 21 Jul 2013 |
PSSurvival.com (Primary site - AZ) PS-Survival.com (Backup site - IL) |
Posted on July 21st, 2014
11 Skills Your Great-Grandparents Had That You Don’t
11 Skills Your Great-Grandparents Had That You Don’t
Our parents and grandparents may shake their heads every time we grab our smart phones to get turn-by-turn directions or calculate the tip. But when it comes to life skills, our great-grandparents have us all beat. Here are some skills our great-grandparents had 90 years ago that most of us don’t.

(Image courtesy Library of Congress)
1. Courting
While your parents and grandparents didn’t have the option to ask someone out on a date via text message, it’s highly likely that your great-grandparents didn’t have the option of dating at all. Until well into the 1920s, modern dating didn’t really exist. A gentleman would court a young lady by asking her or her parents for permission to call on the family. The potential couple would have a formal visit — with at least one parent chaperone present — and the man would leave a calling card. If the parents and young lady were impressed, he’d be invited back again and that would be the start of their romance.
2. Hunting, Fishing, and Foraging
Even city dwellers in your great-grandparents’ generation had experience hunting, fishing, and foraging for food. If your great-grandparents never lived in a rural area or lived off the land, their parents probably did. Being able to kill, catch, or find your own food was considered an essential life skill no matter where one lived, especially during the Great Depression.

Postcard printed by V.O. Mammon Co. (Ancestry.com)
3. Butchering
In this age of the boneless, skinless chicken breast, it’s unusual to have to chop up a whole chicken at home, let alone a whole cow. Despite the availability of professionally butchered and packaged meats, knowing how to cut up a side of beef or butcher a rabbit from her husband’s hunting trip was an ordinary part of a housewife’s skill set in the early 20th century. This didn’t leave the men off the hook, though. After all, they were most likely the ones who would field dress any animals they killed.
4. Bartering
Before the era of shopping malls and convenience stores, it was more common to trade goods and services with neighbors and shop owners. Home-canned foods, hand-made furniture, and other DIY goods were currency your great-grandparents could use in lieu of cash.
5. Haggling
Though it’d be futile for you to argue with the barista at Starbucks about the price of a cup of coffee, your great-grandparents were expert hagglers. Back when corporate chains weren’t as ubiquitous, it was a lot easier to bargain with local shop owners and tradesmen. Chances are your great-grandparents bought very few things from a store anyway.
6. Darning and mending
Nowadays if a sock gets a hole in it, you buy a new pair. But your great-grandparents didn’t let anything go to waste, not even a beat-up, old sock. This went for every other article of clothing as well. Darning socks and mending clothes was just par for the course.
7. Corresponding by mail
Obviously, your great-grandparents didn’t text or email. However, even though the telephone existed, it wasn’t the preferred method of staying in touch either, especially long-distance. Hand-written letters were the way they communicated with loved ones and took care of business.

Celina Anzalone, 2264 First Ave. making lace for Cappallino’s factory near by. (Library of Congress)
8. Making Lace
Tatting, the art of making lace, was a widely popular activity for young women in your great-grandparents’ generation. Elaborate lace collars, doilies, and other decorative touches were signs of sophistication. However, fashion changed and technology made lace an easy and inexpensive to buy, so their children probably didn’t pick up the skill.
9. Lighting a Fire Without Matches
Sure, matches have been around since the 1600s. But they were dangerous and toxic — sparking wildly out of control and emitting hazardous fumes. A more controllable, non-poisonous match wasn’t invented until 1910. So Great-grandma and Great-grandpa had to know a thing or two about lighting a fire without matches.

Clothesline, Winton, Minnesota. Photograph by Russell Lee. (Library of Congress)
10. Diapering With Cloth
Disposable diapers weren’t commonly available until the 1930s. Until then, cloth diapers held with safety pins were where babies did their business. Great-grandma had a lot of unpleasant laundry on her hands.
11. Writing With a Fountain Pen
While it’s true that your grandparents were skilled in the lost art of writing in cursive, your grandparents probably were, too. However, the invention of the ballpoint pen in the late 1930s and other advances in pen technology mean that your great-grandparents were the last generation who had to refill their pens with ink.
Have you got what it takes to go really retro? Find out. Start your free trial.
More From Ancestry.com
Posted on July 20th, 2014