

12 Simple Storage Solutions: The Family Handyman

Need more room for your stuff? Learn 12 new solutions for storage space problems—everything from hidden shelves to shoe racks to recycling towers and more.


Heavy-duty utility shelves
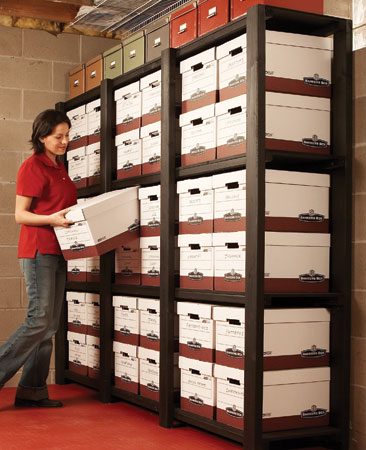
Store-bought shelving units are either hard to assemble and flimsy or awfully expensive. Here's a better solution. These shelves are strong and easy to build and don't cost much. We sized this sturdy shelf unit to hold standard records storage boxes. If you want deeper storage, build the shelves 24 in. deep and buy 24-in.-deep boxes. If you prefer to use plastic storage bins, measure the size of the containers and modify the shelf and upright spacing to fit.
Refer to the dimensions below to mark the location of the horizontal 2x2 on the back of four 2x4s. Also mark the position of the 2x4 uprights on the 2x2s. Then simply line up the marks and screw the 2x2s to the 2x4s with pairs of 2-1/2-in. wood screws. Be sure to keep the 2x2s and 2x4s at right angles. Rip a 4 x 8-ft. sheet of 1/2-in. MDF, plywood or OSB into 16-in.-wide strips and screw it to the 2x2s to connect the two frames and form the shelving unit.
If you choose plastic bins rather than cardboard boxes, label the plastic with a wet-erase marker. When it's time to relabel the bin, just wipe away the marks with a damp rag.
Stud-space cabinet

When you can't find a convenient nook for a set of shelves, you can often create one by recessing the shelves into the wall itself. Choose the location before you build the project to make sure it will fit. Start by looking for a space with no obvious obstructions. Locate the studs with a stud finder. Some stud finders can also locate electrical wires and plumbing pipes inside walls. When you've found a promising spot, cut a 6-in.-square inspection hole between the studs. Use a flashlight and a small mirror to inspect the stud cavity for obstructions. You often can modify the size of the cabinet to avoid obstructions.
When you find a good space, mark the perimeter of the opening and use a drywall keyhole saw to cut it out. Measure the opening and subtract 1/4 in. from the height and width to determine the outer dimensions of your cabinet.
For standard 2x4 stud walls with 1/2-in.-thick drywall, build the cabinet frame from 1x4s that measure 3-1/2 in. wide (see illustration). If your walls are different, adjust the depth of the frame accordingly. Then add a 1/4-in. back. We screwed 1/4-in. pegboard to the back so we could hang stuff from pegboard hooks.
Add casing that matches the trim in your house. Drill holes into the sides to accept shelf supports. Shelf supports fit in 3mm, 5mm or 1/4-in. holes depending on the style.
Install the cabinet by slipping it into the opening, leveling it and nailing through the trim into the studs on each side. Use 6d finish nails placed every 12 in. along both sides.
Don't want to cut your walls open? Unfinished wall framing in a basement or garage also makes ideal storage space for narrow items like cleaning supplies or small boxes of nails and screws. Simply cut 2x4s to fit between the studs and toe-screw them in to form shelves.
Behind-the-door shelves
The space behind a door is another storage spot that's often overlooked. Build a set of shallow shelves and mount it to the wall. The materials are inexpensive. Measure the distance between the door hinge and the wall and subtract an inch. This is the maximum depth of the shelves. We used 1x4s for the sides, top and shelves. Screw the sides to the top. Then screw three 1x2 hanging strips to the sides: one top and bottom and one centered. Nail metal shelf standards to the sides. Complete the shelves by nailing a 1x2 trim piece to the sides and top. The 1x2 dresses up the shelf unit and keeps the shelves from falling off the shelf clips.
Locate the studs. Drill clearance holes and screw the shelves to the studs with 2-1/2-in. wood screws. Put a rubber bumper on the frame to protect the door.
Joist-space space-saver
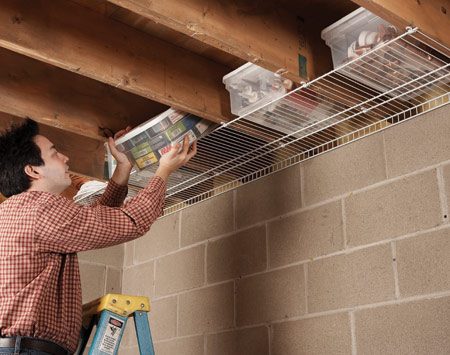
Don't waste all that space between joists in a basement or garage. Screw wire shelving to the underside of the joists. Use a standard 8-ft. x 16-in. length of wire shelving and a pack of plastic clips, or have it cut to length at the home center.
Closet nook shelves
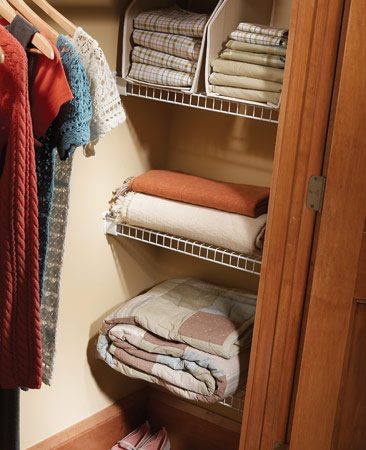
Salvage the hidden space at the recessed ends of your closets by adding a set of shelves. Wire shelves are available in a variety of widths. Measure the width and depth of the space. Then choose the correct shelving and ask the salesperson to cut the shelves to length for you. Subtract 3/8 in. from the actual width to determine the shelf length. Buy a pair of end mounting brackets and a pair of plastic clips for each shelf.
Shoe-storage booster stool

Build this handy stool in one hour and park it in your closet. You can also use it as a step to reach the high shelf. All you need is a 4x4 sheet of 3/4-in. plywood, wood glue and a handful of 8d finish nails. Cut the plywood pieces according to the illustration. Spread wood glue on the joints, then nail them together with 8d finish nails. First nail through the sides into the back. Then nail through the top into the sides and back. Finally, mark the location of the two shelves and nail through the sides into the shelves.
Stacked recycling tower
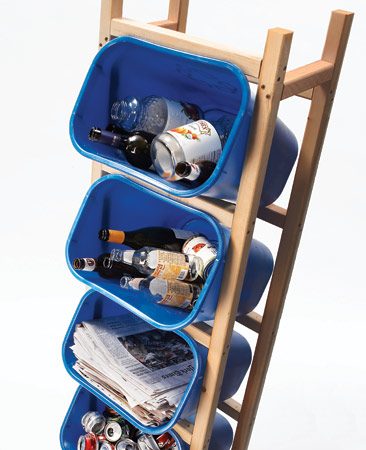
Five plastic containers, six 2x2s and screws, and one hour's work are all it takes to put together this space-saving recycling storage rack. Our frame fits containers that have a top that measures 14-1/2 in. x 10 in. and are 15 in. tall.
If you use different-size containers, adjust the distance between the uprights so the 2x2s will catch the lip of the container. Then adjust the spacing of the horizontal rungs for a snug fit when the container is angled as shown.
Start by cutting the 2x2s to length according to the illustration. Then mark the position of the rungs on the uprights. Drill two 5/32-in. holes through the uprights at each crosspiece position. Drill from the outside to the inside and angle the holes inward slightly to prevent the screws from breaking out the side of the rungs.
Drive 2-1/2-in. screws through the uprights into the rungs. Assemble the front and back frames. Then connect them with the side crosspieces.
Sandwich-bag parts organizer
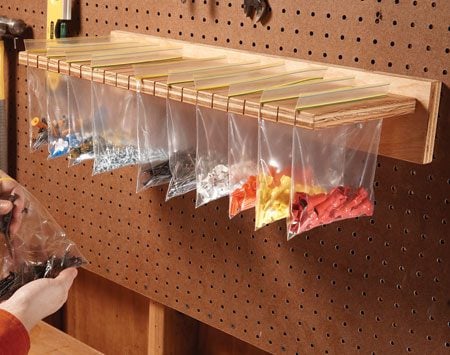
Keep screws, connectors, nails and other small parts in sight and handy with this resealable bag holder. You can build it out of a 3/4-in.-thick scrap of plywood. Start by cutting two pieces of plywood as shown. Draw lines 1 in. apart across the shorter piece with a square, stopping 1 in. from the edge. Now cut along the lines with a jigsaw. Screw the two pieces of plywood together and screw the unit to the wall. Fill resealable bags and slip them into the slots.
Two-story closet shelves

There's a lot of space above the shelf in most closets. Even though it's a little hard to reach, it's a great place to store seldom-used items. Make use of this wasted space by adding a second shelf above the existing one. Buy enough closet shelving material to match the length of the existing shelf plus enough for two end supports and middle supports over each bracket. Twelve-inch-wide shelving is available in various lengths and finishes at home centers and lumberyards. We cut the supports 16 in. long, but you can place the second shelf at whatever height you like. Screw the end supports to the walls at each end. Use drywall anchors if you can't hit a stud. Then mark the position of the middle supports onto the top and bottom shelves with a square and drill 5/32-in. clearance holes through the shelves. Drive 1-5/8-in. screws through the shelf into the supports.
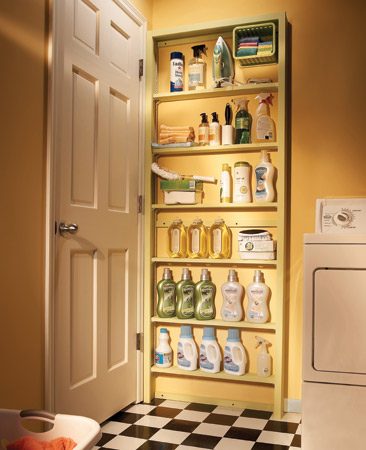
Back-of-door organizer
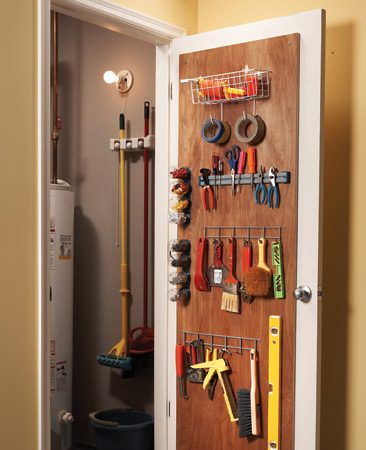
The back of a door that opens into a utility room or closet makes a handy hanging space. The trouble is that most doors don't offer a good mounting surface for hardware. The solution is to screw a piece of 3/4-in. plywood to the back of the door. Add construction adhesive for hollow-core doors. Cut the plywood 3 or 4 in. shy of the door edges to avoid conflicts with the doorknob or hinges. Now you can mount as many hooks, magnets and other storage gizmos as you like.
Double-decker closet rod
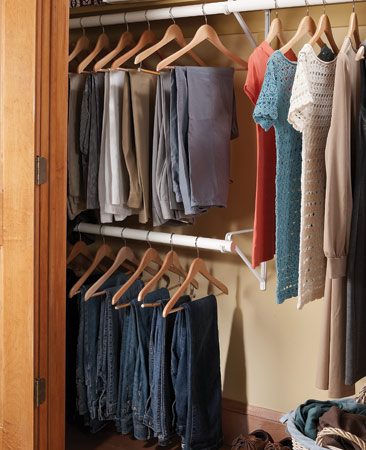
All you need to gain a lot of hanging space in your closet is two metal closet brackets and a length of closet rod. If your existing closet rod is at least 66 in. from the floor, there's enough space to add a second rod below it and still hang shirts and slacks. We placed the top of the rod 35 in. from the floor, which allowed just enough room to hang two levels of pants.
Locate studs on the back wall of the closet with a stud finder. Then attach metal brackets to the studs. Use a level to align the brackets along the top. Space the brackets no more than 32 in. apart.
Glass shower shelf
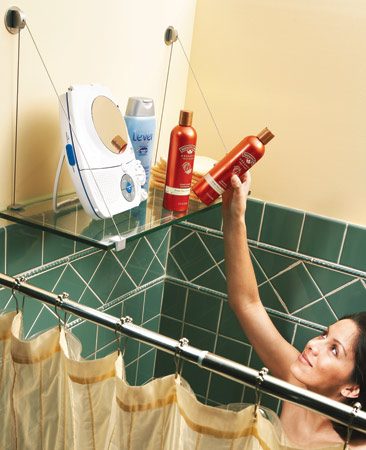
Tired of the clutter of shampoo and conditioner bottles along the rim of your tub? This tempered safety glass shelf on a cable shelf bracket is an easy solution. The cable shelf bracket requires only two screws for support. If studs aren't located in the right positions, use toggle bolts to anchor the shelf brackets. The glass hangs on the cables. The cable shelf brackets are available online from expodesigninc.com. Order a tempered glass shelf from a local glass company. We used a 3/8-in.-thick, 12-in.-deep shelf.
Source: www.familyhandyman.com