Christine's Site

Christine Barry

Showing all posts tagged "Action Item"

Freezer Cooking Recipes: $0.24 Microwavable Pasta Lunches


Freezer Cooking: $0.24 Microwavable Pasta Lunch Packets

March 7, 2014 By 20 Comments

I’m a fan of easy freezer cooking recipes, convenience and inexpensive meals. So I combined all of these qualities and turned them into a metaphorical super soldier of sorts and came up with this:

Make your own pasta lunch packets to store in the freezer. The cost is just $0.24 per packet. Definitely one of the cheapest freezer cooking recipes ever!

Yep, the price you see is indeed accurate. These freezable pasta lunches come in at just $0.24 per serving. Not only are they insanely inexpensive (can you even buy a pack of gum for $0.25?), they offer convenience and endless possibilities for variety to spice up your work lunches.

Do the work once and you’ll be able to fill your freezer with over three weeks worth of tasty lunches to bring to work.This was music to my husband’s ears, since he was getting pretty tired of taking leftovers or sandwiches to work every day.

Here’s how to make your own: 

Cook the pasta in a salted pot of boiling water until al dente. I cooked up two boxes of pasta, so I needed two pots. Or you can just skip the extra effort and use a large stock pot. Then drain.

Stir drained pasta with olive oil to prevent sticking. I used a little over 1 tsp. of Olive Oil for each box of pasta.

Freezer Cooking Recipes: $0.24 Microwavable Pasta Lunches

Place pasta in an even layer on a cookie sheet. I used one cookie sheet per box of cooked pasta. My pasta overlapped a bit, so I had to snap a handful of pieces apart once frozen.

Place in the freezer for two hours. If you have a small freezer like me, use a small wire shelf from the dollar store to be able to freeze two sheets at once.

small kitchen hack

While the pasta is freezing, mix together your sauce and let it cool completely before packaging up. You’ll see two types of sauce in this post, but since I way over estimated how much I needed, I’m only accounting for the cost of one sauce – the broccoli alfredo sauce.

Recipe to come soon for the broccoli alfredo sauce.

UPDATE: The broccoli alfredo sauce recipe has been posted. 

Remove the frozen pasta from the freezer and transfer to a large bowl. If some of your pieces are frozen together, gently snap them apart. I opted to mix my pastas together even though they were different varieties.

Freezer Cooking Recipes: $0.24 Microwavable Pasta Lunches

Tip: Larger pastas are easier to freeze and less likely to stick together. If some of them do stick together, it’s a lot easier to snap them apart than a smaller pasta.

I used zippable sandwich bags and small 2-oz. cups w/lids (like this) to package up my pasta lunches. If you prefer not to use the cups, you can freeze your sauce in ice cube trays. Since most ice cube trays hold 1-oz. per cube, you’ll need to use two ice cubes for each bag of pasta.

It’s important to work quickly when packaging up your pasta so it doesn’t thaw.Place one cup of pasta into each bag. Try to remove as much air as possible from each bag, fold over once if your bags are large enough and seal. Place them into the freezer immediately.

Freezer Cooking Recipes: $0.24 Microwavable Pasta Lunches

Then package up your sauce cups. Each cup holds two ounces. I just used a regular spoon to scoop in my sauce. Place lids on cups and transfer to the freezer.

Freezer Cooking Recipes: $0.24 Microwavable Pasta Lunches

** if you’re using an ice cube tray for your sauce, you’ll have to add the frozen cubes to the bags of pasta later.

I’m storing my pasta in a basket on the top shelf of my freezer and just sliding in the cups in the leftover space on the side. Super easy to grab and go!

Freezer Cooking Recipes: $0.24 Microwavable Pasta Lunches

Now, About the Sauce

I know I touched on it above, but I’ll explain a bit more about my choice for the sauce. The reason I consciously chose the little cups to store the sauce was because I wanted my husband to have some variety with his lunch each day.

Keeping the sauce separate from the pasta allows me to save leftover sauce from our dinners in the cups and add it to our sauce stash. This allows for a much greater variety than if the sauce was packaged together with the pasta. He can just choose the sauce he’s in the mood for, grab the pasta, and go.

This is just an easy way to break up the monotony of essentially eating the same thing for lunch a few times each week.

Freezer Cooking Recipes: $0.24 Microwavable Pasta Lunches

Heating Instructions:

Straight from the freezer:

Lightly massage bag of pasta to break apart any pieces that are frozen together. Place pasta in microwave safe bowl. Remove frozen sauce from cup and place directly over the pasta (if you’re using sauce from ice cube trays, use 2 cubes of sauce). Microwave for 90 seconds. Then mix thoroughly, ensuring all pasta is covered in the sauce. Place back in microwave for 30 seconds. Let sit for one minute before removing from microwave.

*Microwave times may vary according to your microwave’s wattage.


When thawed:

Place pasta in microwavable bowl, mix sauce and pasta together and microwave for one minute or until thoroughly heated through.


Cost Breakdown

*this makes 17 frozen pasta lunches
(2) boxes of pasta: $2
Broccoli Alfredo Sauce: $2
Olive oil: $0.11
Total cost: $4.11
 
Cost per packet: $0.24

I knew they were going to be inexpensive, but I was happily surprised to see that the cost per serving is just $0.24. To date, this is probably one of the cheapest freezer meal recipes I’ve posted. Though, my $0.59 freezer smoothie packets do come pretty close. 


Paracord Cord Reinforcement


Step 3: Cobra Weave

The weave I used was the cobra, which is what you see on most paracord bracelets. Start with the cord behind the cable. Then bring the left side, the bottom in this case, over the cable. Next bring the right, top, cord over the left cord, under the cable and through the loop on the other side created by the left cord. Pull tight and repeat only starting on the right this time. Continue the weave until it is the desired length.
1-40 of 53Next »
changabanga made it!2 months agoReply

Thanks for the step by step. This is my first foray into paracord projects, and a very useful one! Question about the end though: how do you make it look at nice and neat at you have it in your pictures? As you can see, after burning the ends, it looks kinda ugly on mine. Any tips?

Also just generally regarding melting paracords. Do you just burn and press it with your fingers? It won't burn/stick on skin?

Photo 30-4-14 10 33 44 am.jpg

Paracord ( or 550 cord - spoken as Five-Fifty cord) *will* stick and burn your fingers if you are not careful. If your using a lighter, then melt the tip, place on hard surface (that you don't mind getting a little messed up) and use plastic body of lighter to mash down in melted portion. Not burn and mushed appropriately.

It helps to melt the ends with a lighter then wet your fingers and quickly pinch them.

hawcrofta (author)  changabanga2 months agoReply

Paracord will give you trouble if you leave the ends too long when trying to singe them. I have found it best to leave about 1/8 in to burn. When I singe the ends I just take my lighter and use the smooth spot on the bottom of a zippo to press against the melted paracord. It makes it look better and you wont get any blisters. The metal also absorbs the heat so it hardens almost instantly.

mehahaha1 month agoReply
Cygent1 month agoReply

I managed to get the pattern after a few online video tutorials. I am curious how you managed as tight a weave as you did. Still, it's nice seeing the green cable come through, and I'm happy with it. Thanks for the instructable!

temp_920111044.jpg
hawcrofta (author)  Cygent1 month agoReply

Looks good. I am sorry if I wasn't really clear on how to do the weave. I was able to make it as tight as I did because I gutted the paracord. This made it much thinner and so I was able to push it very close together. You won't be able to do this if you are using accessory cord, 350 cord or something else that is solid core, but it really doesn't effect the finished product.

Manoka made it!2 months agoReply

Many Thanks, very helpfull. Done with Shoelace in absence of Paracord.

IMG_2248bis.jpg
3stepps2 months agoReply

Way back when I first studied electronics in high school sometime in third quarter of the last century we always made our own cables. Would do the stain relief with electrical tape and rubber cement. When I worked in the TV satellite industry a few years later we used self vulcanizing tape on the outside connections.

docrjc2 months agoReply
Good idea. I usually put 2 inches of krazy glue on each end. It's invisible, only takes a few seconds and lasts forever.
chitownjohnny3 months agoReply

First off great idea. Second the paracord you use is 550 lb type or just some craft type paracord? I am curious before I run out and get the wrong thing

hawcrofta (author)  chitownjohnny3 months agoReply

What I used is 550 lb cord, but I don't think it matters. It would most likely not effect the integrity of the reinforcement too much if it wasn't real 550 cord. Plus I gutted it and the otter sheath is only rated at something like 70 lbs.

DvsNegrito made it!3 months agoReply

Nice instructible. Fixed up my cords today, but used accessory cord so it wouldn't be so bulky.

IMG_20140422_143805_123.jpg
hawcrofta (author)  DvsNegrito3 months agoReply

Looks good!

hawcrofta (author) 3 months agoReply

Remember to vote if you like it.

nchew2 hawcrofta3 months agoReply

very nice! will try it today! :D

FirstSpear3 months agoReply

Don't know how much support the paracord is giving, but it is adding a degree of extra support surely? Given that there is likely to be a chunk of expensive electronics at one end, any help is welcome. Nice weaving, by the way. The problem with many cables is that the strain relief section is often too rigid to allow a smoothly curved bend, and often only allows the cable exiting that section to bend at right angles thus enabling breaking at that point. I check cables to see how the strain relief section is working, and if too rigid I use a sharp blade to cut Vs into some or all of the plastic sections that join the peaks of the concentric rings. This increases the flexibility of the strain relief section. I also like the biro springs and Sugru ideas.

yogunny3 months agoReply

To ensure cord doesn’t slip, use a drop of cyanoacrylate (CA) glue. Same for the ends of the cord - instead of burning them shut, a drop of CA glue will do you.

usmcreed yogunny3 months agoReply

thanks Gunny, was just contemplating what I would do to keep it from slipping and saw your post.

yogunny usmcreed3 months agoReply

Glad it was helpful. Semper Fi!!

hawcrofta (author)  yogunny3 months agoReply

That would definitely work very well. Just a drop of crazy glue and that paracord is never coming off.

thinkdunson3 months agoReply

Good try, and it looks neat, but this isn't actually going to do anything. The only reinforcement is the tiny section of cord between the first loop and the second.

As a matter of fact, it may actually make things worse. The rest of the weave is going to make that length of cable more stiff (as intended), however, since the weakest point is still barely reinforced, it's even more unstable. When the weakest part bends, that bend can't be translated (distributed) along the cable anymore.

I think the best way to reinforce a cable would be to just give it some hot melt glue. Then you can add your paracord to dress it up.

I think this WOULD work well, if (combining others' suggestions with a new one): in addition to affixing the woven cord to the cable with cyanoacrylate, also stiffen the woven paracord up with lots more CA glue. That'll give you a rather inflexible reinforcement.

CA glue (superglue) is a bad choice for two reasons.
1, It's brittle... instead of bending, as a cable should, it will either crack (in fabric), or break free (from a smooth surface).
2, It's too stiff for this application. The whole point of putting tension relief on a cable is to spread the bend from a single location, the spot directly behind the connector housing, over a larger area. A rigid structure would simply transition that single point from the edge of the connector housing to the edge of the new structure.
Hot-melt glue is flexible and you can make it thick near the connector and taper off.
lamedoug3 months agoReply
(removed by author or community request)

That's a bitchin' idea.
And hell.
Cover it with Sugru sculpture and your favorite things.

This is great.

I have attempted to reinforce wires like this with Sugru. But found they simply aren't strong enough. So as I added the Sugru last time, I used something that happened to be on my desk: an Italian 500 lira coin.

IMG_2050.JPG
ladysequia3 months agoReply

I think it is a great idea but how does that stop the cord from breaking at that point?

hawcrofta (author)  ladysequia3 months agoReply

It makes it less flexible. I have found that it is usually bending that weakens these cables and causes them to break

Thank you!

bob30303 months agoReply
Thanks for sharing. I'm gonna try this. I spend too much replacing cords.
kakmer3 months agoReply

It's a great way to use up those scraps rather than just tossing them. We've done similar with embroidery floss on iPod cords (they always break at the usb base), and on earbuds. Keeps them from breaking and helps keep them from tangling also! A super 'ible!!

SGutshall3 months agoReply
Does it ever slide off the factory reinforcement and move up the cable?
hawcrofta (author)  SGutshall3 months agoReply

I have only had it on there for about two weeks and so far it hasn't. I think if you snug it down good it shouldn't move.

This is great. I've previously reinforced the factory reinforcement with a bit of Sugru. It occurs to me that if you put a small amount of that down as a base layer, the paracord weave will bond with texture, and won't be going anywhere. Can't wait to combine the two and fortify all my cables.

Snugging down the first few knots at the very beginning of the weave where you are over the factory reinforcement (make them good and tight) should keep it in place well.

TechnoWombat3 months agoReply

Gonna try this on my guitar cords, better than plain heatshrink, and I can add it to ones that are already made.

solorbob3 months agoReply

Great idea. I have lots of scraps that would be perfect for this usage. Thanks

kderevan3 months agoReply

Great idea! My cords always fail right at these points, too.

GrumpyOldGoat3 months agoReply

A tiny dab of 100% silicone caulking spread around the beginning should lock it in place to prevent slipping.

Should work for any power cord where elderly people with arthritis and have grip problems can unplug everything from toaster to hair driers.

Excellent Idea.

1-40 of 53Next »

How to Keep Yellow Jacket Wasps Away: 14 Steps (with Pictures)


Edited by 1Youare8, Mop and Bucket, Maluniu, Writelf and 7 others

Two Methods:Remove or Prevent Yellow Jackets Without KillingKill Yellow Jackets

Finding a way to get rid of them without chemicals is challenging because you want to get rid of them once and for all. So what can you do to get rid of wasps naturally without harming your family or the environment? Here are some unusual ways to do the job. These methods are not scientifically proven but the people who have used them have seen good results.

Method 1 of 2: Remove or Prevent Yellow Jackets Without Killing

  1. Keep Yellow Jacket Wasps Away Step 1 Version 2.jpg
    Keep food sources, especially protein, indoors. Yellow jackets feed primarily off of protein, so be sure to keep those turkey sandwiches indoors and enjoy the postprandial glow outside instead of the other way around.
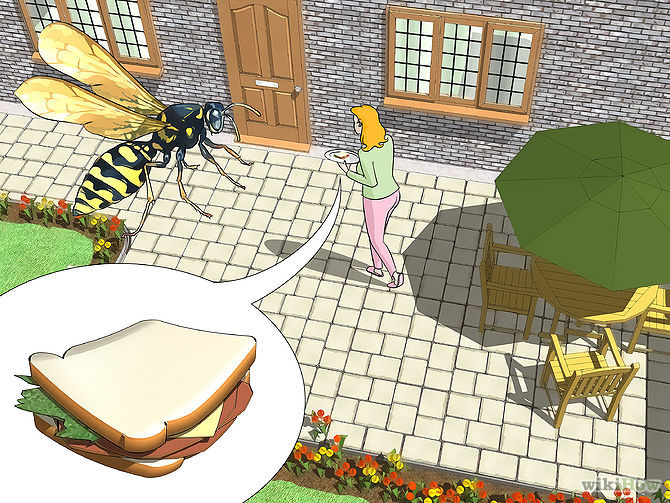
    • Food sources include your pet's food as well. Make sure you find an effective way to store your pet food (if you do store it outside) so that any roaming yellow jackets can't make a quick feast out of your furry friend's treat.
  2. Keep Yellow Jacket Wasps Away Step 2 Version 2.jpg
    Don't leave sugar out. In the spring and summer, yellow jackets eat primarily protein. In the fall, yellow jackets begin to incorporate sugars into their diet. Sugar can increase the lifespan and reproductive function of many predatory wasps, making it a particularly dangerous thing to keep around.[1]
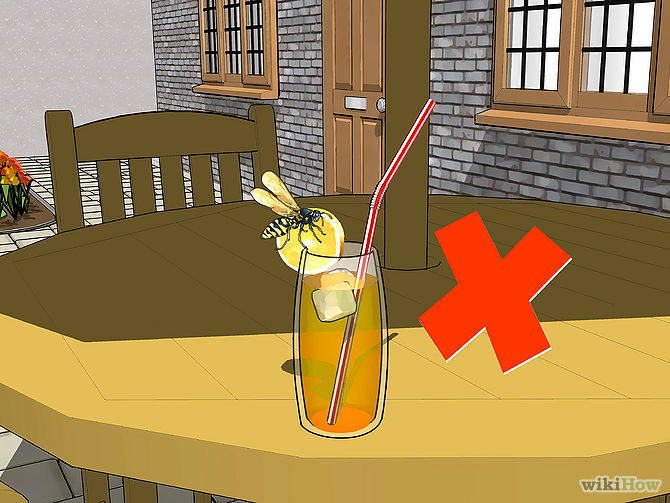
    • If picnicking, try to keep sweets such as sodas and desserts indoors.
    • Hummingbird feeders, essentially sugar-water dispensers, can be especially problematic. Investigate ways to kill or remove the entire colony before you put up a lot of sugar-water for them to gorge on.
  3. Keep Yellow Jacket Wasps Away Step 3 Version 2.jpg
    Put out sliced cucumbers. If you have to put out food (we do not advocate blowing off 4th of July on account of some pesky wasps), one unusual wasp repellent you can try is cucumber. This vegetable has an acid property that wasps don't like. Cut up a few slices and leave around your picnic or BBQ area. They stay away and you can enjoy your outdoor activities without fear of getting stung.
  4. Keep Yellow Jacket Wasps Away Step 4 Version 2.jpg
    Seal your garbage cans tightly. Yellow jackets are primarily hunters, but they can morph into greedy little scavengers if the prize is worth it. An open or easy-to-access garbage can is just that.
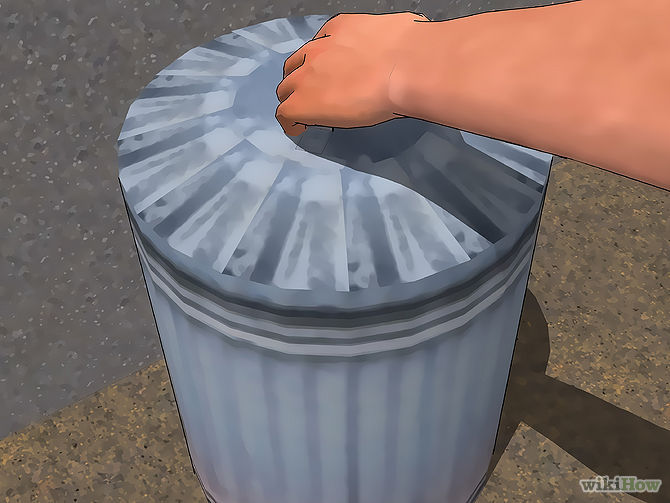
    • Remember that sugars and proteins are especially pleasing to yellow jackets, so consider isolating those into separate bins to be extra sure. It's not necessary if you take care to lock up your entire garbage heap, but it may give succor to those fiercely afraid of yellow jackets.
  5. Keep Yellow Jacket Wasps Away Step 5 Version 2.jpg
    Hang up a crumpled brown paper bag. Wasps are territorial so they will not make a nest where one already exist. To give the illusion of a wasp nest crumple up a small brown grocery bag, attach a string, and hang near your doors. They cannot tell if it's truly a nest but they seem to trust what they see. Their instincts will kick in and they will go away.
  6. Keep Yellow Jacket Wasps Away Step 6 Version 2.jpg
    Seal up the sides of your home and shore up your awnings. Awnings and loose siding on your home is a safe, enticing place for yellow jackets to shack up and make a home. Seal these places properly to prevent a yellow jacket infestation from making its way — quite literally — into your home.
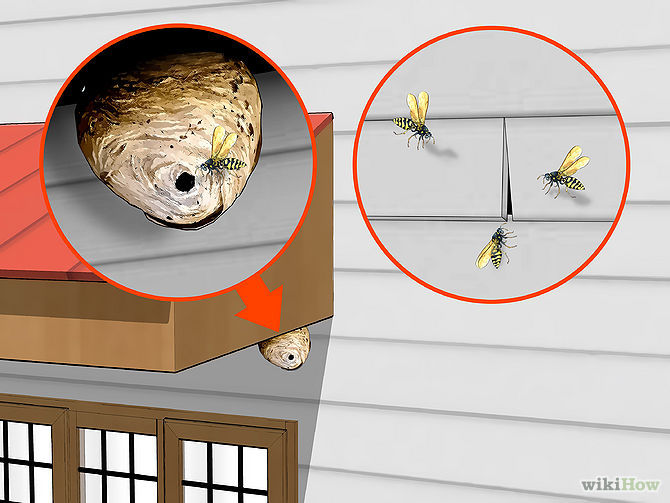
    • Infestations of yellow jackets into your home will most likely require the expertise of a professional exterminator, and will cost you a pretty penny while you're at it. If you're the patient type, wait for winter. Cold enough weather will kill off the entire colony, after which time you can remove the wasp nest and seal up your home properly.
  7. Keep Yellow Jacket Wasps Away Step 7 Version 2.jpg
    Don't do these things. In addition to the advice above, don't do any of the following thing, as they are most likely counterproductive:
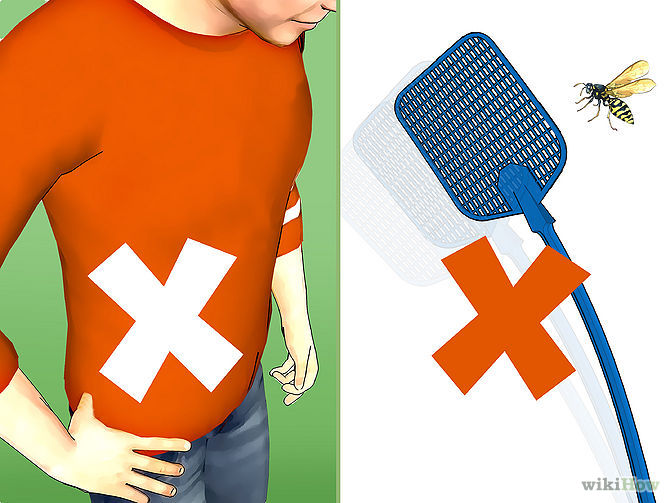
    • Don't wear bright colors. The yellow jackets could think that you're a flower and be attracted to you.
    • Don't swat at yellow jackets. Killing one yellow jacket may be cathartic, but it also causes a pheromone to be released which attracts other wasps. Out of the frying pan and into the fire.
    • Don't wear overly aromatic perfumes. Yellow jackets are attracted to sweet smells.

Method 2 of 2: Kill Yellow Jackets

  1. Keep Yellow Jacket Wasps Away Step 8 Version 2.jpg
    Spray them with soap and water. Old fashioned soap and water is the first natural repellent to use. Spray the soapy mixture on the wasp and their nest. The soap will stick to their wings and weigh them down. Eventually they will suffocate.
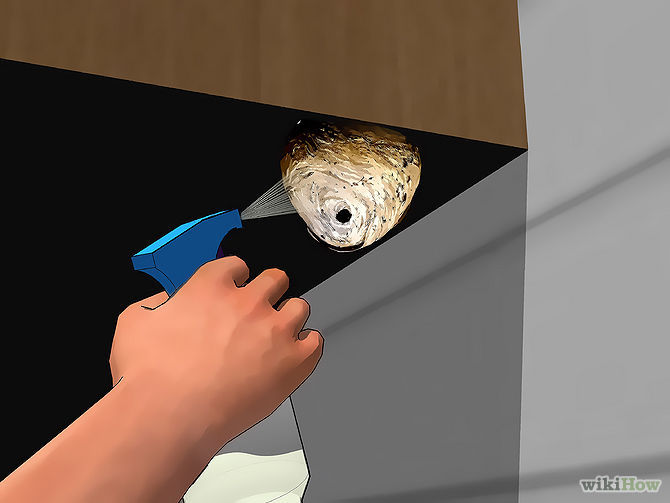
    • Line your doors and windows with soap to keep the wasps away.
    • If the yellow jackets have built a nest in the ground, pour soapy water into the hole at night and preferably during cooler temperature. The entire colony should die. Be sure to wear protective clothing in case the yellow jackets are feeling especially murderous.
  2. Keep Yellow Jacket Wasps Away Step 9 Version 2.jpg
    Get a non-toxic wasp trap and set it out early in the season. Non-toxic wasp traps don't use any chemicals to kill wasps caught inside. Instead, they rely on asphyxiation, drowning, starvation, or exhaustion to kill the yellow jackets. Not exactly the most humane, but this is war, isn't it?
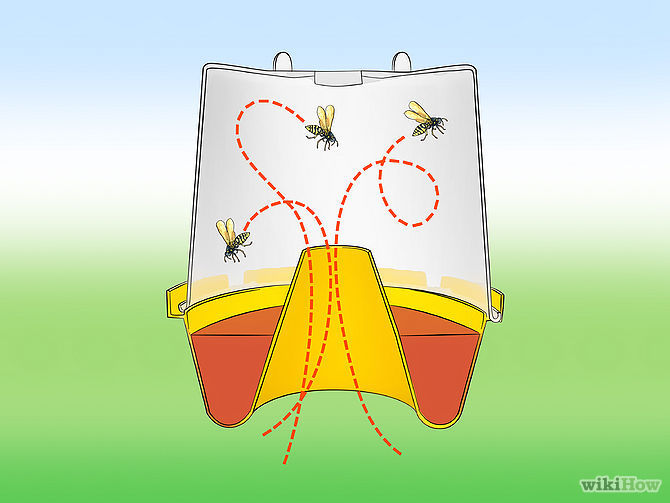
    • Place the trap two to four feet above the ground and as far away from human habitation as possible.[2] This is the ideal scenario.
  3. Keep Yellow Jacket Wasps Away Step 10 Version 2.jpg
    Build a trap of your own using a large soda bottle. Cut off the top 1/3 of a 2-liter soda bottle. Turn the top around (so that it's facing the bottom of the soda bottle instead of the top) and staple it to the remaining soda bottle. You should have a kind of minnow trap with the inverted neck as a funnel.
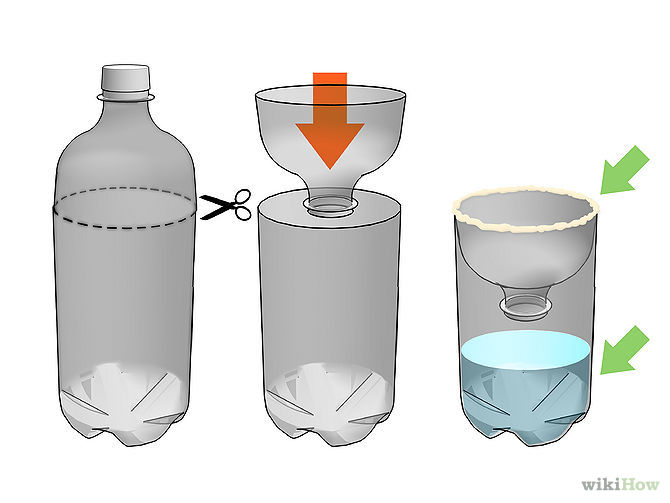
    • Fill the soda bottle about halfway full with soapy water. Coat the neck of the soda bottle with sweet jam. The yellow jackets will try to get to the jam and accidentally fall into the bottle, from which it is very difficult to get out.
    • Empty and refill the soda bottle frequently. Dead yellow jackets can form a barrier that other caught yellow jackets can rest on, possibly escaping. Empty the contents of your homemade trap frequently to cut down on this risk.
  4. Keep Yellow Jacket Wasps Away Step 11 Version 2.jpg
    Cover the entrance and exit of the yellow jackets's nest with a powdered insecticide. The yellow jackets will crawl through the insecticide in order to get into their nest, carrying the insecticide into the nest and infecting the other members of the colony. Coating both the entrance and exit of their nest will increase the likelihood of extermination.
  5. Keep Yellow Jacket Wasps Away Step 12 Version 2.jpg
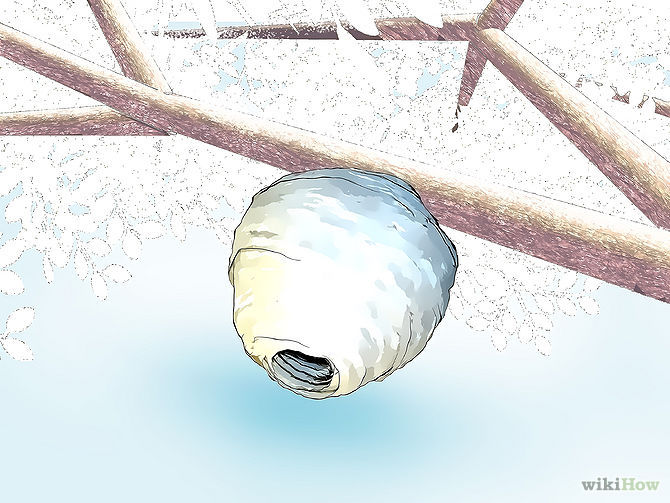
    Dispose of an aerial nest with a big cloth bag. During nighttime, when the yellow jackets are drowsy, sneak up to the aerial nest and quickly envelop it in your cloth bag. Make sure to tie off the bag so that none of the wasps may escape. Break the wasp nest off from its mooring and submerge it completely in water to drown the yellow jackets. Use a couple rocks to help keep the nest submerged.
  6. Keep Yellow Jacket Wasps Away Step 13 Version 2.jpg
    Dispose of an underground nest by sealing off all entry and exit points. Once you are sure you have located all of the possible entry and exit points of the nest, approach them during the nighttime when the wasps are drowsy. Place a large bowl over any entrances and exits, working them into the ground so that they create a kind of seal.
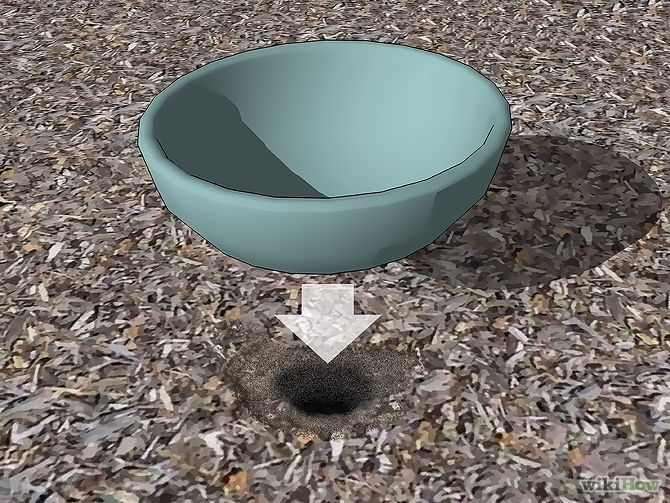
    • Leave the bowls over the entry and exit points for approximately two weeks. The yellow jackets will be disoriented but unable to leave their underground prison. They should die off after the two weeks, if not relocate to another more accessible nest.
  7. Keep Yellow Jacket Wasps Away Step 14 Version 2.jpg
    Wait it out. Wasps cannot survive the harsh winter months, during which time they regularly die off. If you discover a yellow jacket nest during the end of summer/fall, consider waiting for the first frost to kill off your pesky yellow jackets for you. You won't risk getting stung and, if you can stand it, you won't have to worry with the headache of playing exterminator for weeks on end.
Add your own method

Warnings

  • Remember that wasps sting and if you are allergic to them or bees, keep right away from them and let someone else do it.

Related wikiHows


How I Cut My Energy Bill By a Third with Tech and Common Sense
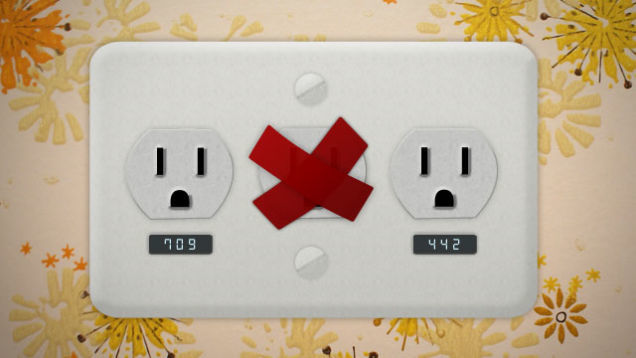

How I Cut My Energy Bill By a Third with Tech and Common Sense

Last month my electric bill was $300. That was ridiculous. Something had to be done. By using gadgets, common sense, and a constant awareness of power consumption, I've made changes that will cut my power bill by at least a third. And that's not just temporarily—that's forever. And, I'm doing it without really sacrificing anything. P

I've always used more power than normal people because 1) I work at home on a 30-inch monitor and a 27-inch iMac, and 2) I have an assload of electronics. The 63-inch Plasma TV (larger TVs use more already, and plasma draws three times as much power as LCD), as well as water coolers, various NASes, and the need to keep some lights on during the day for my rabbits are a constant drain on the grid. But what could I do? Could I still realistically use all my devices when I wanted them, but still draw a lot less power? Yes. Here's how you can do it too. P

I'm going to start with common sense tips that require no extra equipment so anyone can start lowering their power consumption right now. But if you're serious about lowering your electricity usage dramatically, I'll discuss tools like the eMonitor that tell you exactly what's drawing power in your home down to the circuit level. Once you know exactly what's wasting money, I'll point out some advanced tips and equipment you can use to do something about it. P

The common sense stuff you can do right now P

Turn off your lights P

Go around your house and turn off all the lights you're not using, especially if you're using old style incandescent light bulbs (Edison's kind). Bathrooms, closets, and sometimes kitchens use incandescent lights because unlike compact fluorescents, they get up to maximum brightness right away. When all you want to do is take a leak or check the mirror, CFLs won't even be done going through their 5 minute warmup stage up by the time you're washing your hands. Another alternative is LED bulbs, which are dramatically more expensive upfront, but don't have the drawbacks of CFL and behave more like a traditional light. 1 P

Am I Washing My Hands Correctly?

Much like wiping, washing our hands is something that all of us hopefully do, but don't really …Read more

Point is, each 60 watt bulb uses 0.060 kWh (more or less, depending on your wiring) per hour, and you probably have somewhere between 2 to 4 bulbs in each bathroom and kitchen, which makes for 120-240 watts of wasted electricity per hour. In comparison, my 27-inch iMac takes about 130 watts with the screen on and everything powered up. Two (inefficient) lights use the same amount of power as a large computer! A laptop uses about 40 to 60 watts, in comparison, so you could do an hour's work by just shutting off a light. P

Moral: Turn off your lights when you're not using them. Tell your spouse, roommates, parents, pets and goblins to do the same, and show them exactly how much power they're wasting by not doing this. P

Unplug stuff you rarely use P

I have an exercise room with a treadmill and a TV inside. I don't use them nearly as often as I should, which means they could theoretically sit plugged in for weeks for no reason. Stuff like TVs and other stereo equipment still draw power when they're plugged in but off—which is called vampire drain—due to the fact that they have to still power their IR receivers for your remote control to work. You'll need to physically unplug these things from the wall to eliminate any power consumption when not in use. It might take an extra minute to find the cord, plug it in and switch on the electronics when I do use them—and an extra minute to unplug when I'm done—but it's worth it if they're barely used. P

Don't use your AC so damn much P

Your air conditioning power usage is a very nebulous thing, because unless you physically track how long your AC was on (including all the stops and starts), compare it to how much electricity your other electronics are using, then somehow correlate that with your bill at the end of the month, you're really in the dark. But trust me when I say that it's a lot. Depending on the weather, how much you use it and what other electronics you have, you could be paying more for AC than everything else in your house put together. That's insane. P

We've got five alternatives to running your air conditioner all the time, which include ice in front of a fan, turning off your heat-generating electronics, and generating a breeze into your home at night when the air outside is cooler. I'm not telling you to not use the AC at all, but walking around the house with fewer clothes on rarely hurts anybody. P

Five Effective DIY Alternatives to Running an Air Conditioner

If you don't have an air conditioner and can't take the heat (or you just don't feel …Read more

For the curious, I'll cover an actual way to measure your air conditioner's power usage compared to everything else a little later, with the eMonitor. P

Turn off your electronics, especially your computers, when you're not using them P

This point, just like turning off your lights, is a super obvious thing that all of us know, but don't religiously follow, because we're not electricity nazis. Unless you're torrenting at night, or hosting a Minecraft server for your friends, you don't really need to have your computer on when you're asleep. I know it's nice to not have to wait 5 minutes to get started in the day, but are those five minutes really worth keeping your computer on overnight and spending $1.85 a month? Actually, probably. P

But, when you're trying to shave off dollars from your bill, having a computer, a NAS, a couple laptops, and stereo equipment be on all the time can quickly add up to double digits per month for stuff you're not using. I'm not talking about not using these devices when you need them, it's the paying for stuff when it's not actually having any benefit that's the killer. P

Find out exactly what's using so much power 2 P

The basic method P

The cheap way of examining your electronics is to go around with a Killawatt or a Belkin Conserve Insight and plugging all your devices, one by one, into it and seeing how much power they draw. This is easy for something like a computer or a microwave, because you know exactly when they're on and off. But for something intermittent that cycles between drawing a lot of power and very little power, like a refrigerator or a water cooler, this is more difficult. But, using this, you can realize that—holy crap—my hot pot cooker uses 2,000 watts. Or that maybe it's really not a good idea to leave your TV on when you're not using it. P

The Batman method P

If you really want to get serious about knowing exactly how much power use is going on—and I mean the kind of serious you get when you get a $300 bill in the mail, get an eMonitor from Powerhouse Dynamics. P

Traditional smart meter solutions that hook up to your meter—which are difficult or impossible to install if you live in a multi-unit complex or an apartment—can only tell you how much power your entire house is using as a whole. That's better than no information, but it renders it hard to narrow down the energy hog to an appliance level unless you constantly go around with a Killawatt and measure. The eMonitor installs onto the circuit level, so you can get a room-by-room readout. The only way you could get any more detailed is if there were Killawatt type measuring tools on each individual outlet that fed wirelessly into a central place that consolidates all this data. As far as I know, this doesn't exist yet. P
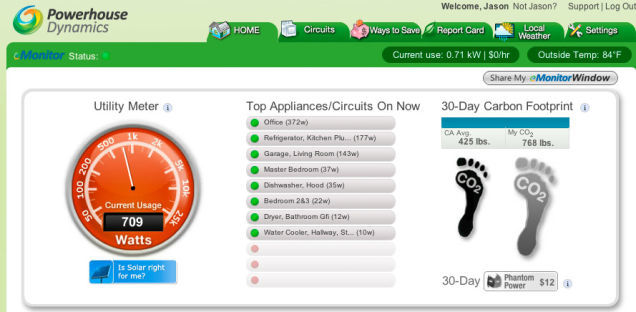
How I Cut My Energy Bill By a Third with Tech and Common SenseSExpand

I'll explain the home screen of the eMonitor webapp. It's hard to make sense of it as a whole, so I'll break it down into pieces. P

You can see that my office is drawing the most right now, because my computers are on, as is my cable modem and wireless router. The refrigerator is in one of its higher power cycles, which explains why it's coming in at second, and there's a computer on in the living room, punching it up to 143 watts. Usually this idles at about 100, which includes a TiVo, another Wi-Fi router and a home automation system. Everything else is effectively unplugged. P

The other rooms have a small, constant power draw for things like clock radios, more Wi-Fi routers, appliances, security systems, and even this eMonitor setup. You could technically classify these as phantom power draws, but you're not going to unplug your clock radio every morning, and stuff like security systems are just things that you need to have on constantly. P

How I Cut My Energy Bill By a Third with Tech and Common SenseSExpand

The second chunk tracks my last 30 days of power consumption. The living room and office are two obvious rooms with giant power usage, because my computers and my television are there, and that's where most of the day is spent. The AC, however, comes in third and fourth, because it's on two circuits. So together, it's used about a third of the total power for the last 30 days. And that's with me not turning on the AC at all for the last ten! I am ashamed of myself. That's the kind of wasteful behavior you can settle into if you stop paying attention. P
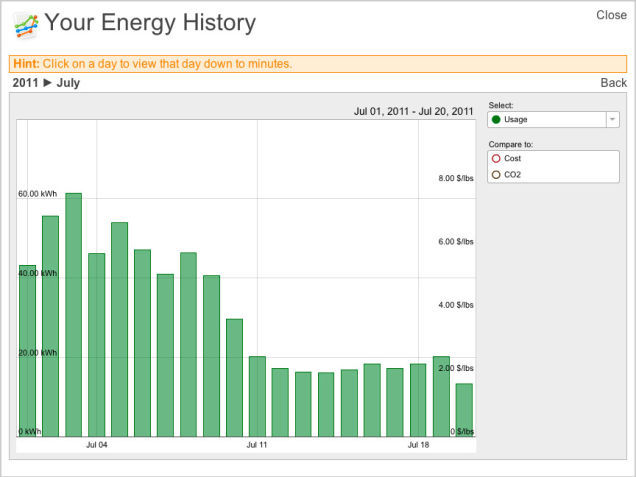
How I Cut My Energy Bill By a Third with Tech and Common SenseSExpand

But the good news is that the bill estimate for this month is already dramatically less than last month, and I've only been trying to save power for about 10 days now. The first 10 days of July are still shameful, but I'm proud of the last 10. Part of that is me not using the AC, but it's also me eliminating useless power consumption. P
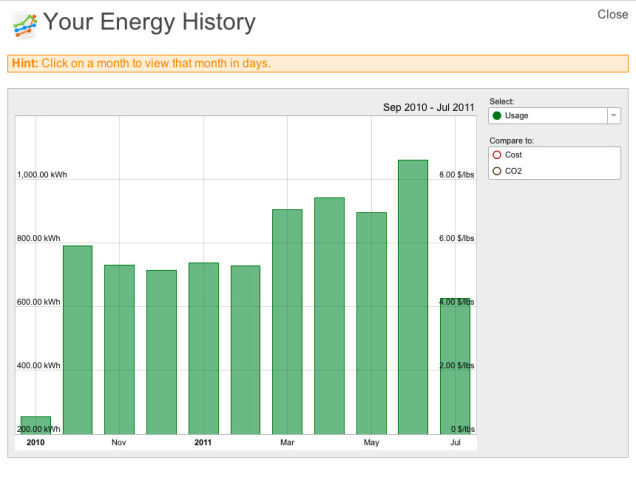
How I Cut My Energy Bill By a Third with Tech and Common SenseSExpand

If I keep on this new low-energy diet, the August month will be the lowest I've ever had since the installation of the eMonitor at the end of September (which doesn't count). P

What's also great are the historical charts, which can also be shown on a circuit by circuit view to help you figure out what's sucking down the most juice. Each circuit can also be clicked on to see a historical view as well, or if you just want to monitor it closely in real time. The chart updates once a minute, but you can bypass that and go directly to your local eMonitor's IP address and see exactly what it's using right now via its tiny web server. P

Although the eMonitor is unbelievably powerful, it's also quite expensive. A 12 circuit monitor (what I have) will cost $688. A 24 circuit monitor, for large houses, costs $948. This is steep, but if you manage to cut down your power by $50 a month—and be able to keep it down, because you can set alerts and monitor when appliances use more than they should—you'll make that back within a couple years. It's also very useful for people who have solar panels, because it can keep track of your power generation as well. P

Trust me, when you're trying to cut your power use down, you'll be religiously monitoring the site throughout the day to keep a constant eye on what's using what. You'll also know exactly when the other people in your household start showering, watching TV, doing laundry or engage in any other electricity-intensive activity (and then yell at them for it). P

What do I do with all this information? P

Once you have the eMonitor installed, the first step is to identify devices in rooms that are using too much power while off. Start unplugging things and see how that affects the power consumption for its circuit. For example, some televisions and receivers and game consoles still draw a considerable load when powered down because they're keeping part of their circuitry on, even in the off state. You'll want to unplug these when you're not using them, or use the lamp timer or smart power strip methods I explain later. P

You can also start turning on electronics and seeing if something is insanely inefficient. Buying a new iron for $15 because your old one uses that much more in electricity in a year would be a good possible outcome. The mentality applies for the rest of the small-ticket appliances like hairdryers, toasters and coffee makers. P

You'll also be able to see how much power your lights are drawing compared to your other electronics, and you'll immediately want to swap out your bulbs for more efficient ones, which I explain next. P

The key is that once you know exactly what's drawing power in your house, you can start doing something about it. P

The technical solutions P

Switch your light bulbs to more efficient ones P

How I Cut My Energy Bill By a Third with Tech and Common SenseSExpand

Like I said earlier, a 60 watt incandescent bulb uses 60 watts, or 0.060 kWh per hour, whereas the a compact fluorescent equivalent uses 13 watts, and a Philips LED bulb uses 12.5 watts. The chart should quickly outline the good and bad of each type of bulb. P

Notes


1 Average life for a GE and a Sylvania CFL bulb on Amazon. Wikipedia lists the average life as somewhere between 6000 to 15000, but the more common bulbs are 8000. And "average" life is the point at which half the bulbs at this age are dead, and half are still functional.

2 Average life for the Philips Ambient LED bulb, the one tested for this post. According to the Energystar website (PDF), most bulbs are coming in at about 25000 hours, with some at 50000 and a handful down at 15000. Like CFL, this is the point where half the bulbs would likely be dead and half would not.

3 There are CFL bulbs that are dimmable, but they are four times as expensive, and do not dim well. Complaints on Amazon say they're maximum brightness, down to about 80%, and then off.

4 Energystar rebates exist for LED lights, and you can search the site with your local zip code to see if your power company has any. Mine did not.

P

For most instances, you're going to want to go with a CFL, because it's cheap, drawing only slightly more power than an LED, and has a reasonably long life. An LED wins out in the cases where you're replacing an incandescent in the bathroom, where you want the lights to come on at max brightness instantly, or when you want to be able to control your brightness from a dimmer. But if you're talking living room lamps or dining/kitchen lights, where you'll physically be there for a while, a CFL works just fine. Those of you lucky enough to rebate the price down from $45 a bulb might find the 3x long lifetime and slightly decreased power consumption worth it for rooms where you want to keep the light on all the time as well. P

Here's a simple calculation that illustrates my point. If you keep a 60 watt bulb on for 12 hours a day, every day of the month, it would cost you about $2.77. A CFL used under the same conditions would cost $0.60. The difference there is already enough to cover the purchase of a new bulb, for just one month's use. P

You should also think about whether you really need 100 watt bulbs everywhere. I, for one, know how satisfying it feels to install one, fill up a room and really blow my retinas out. But unless you're performing delicate visual work all the time or trying to illuminate a large room, you can most likely make do with a 60 watter. Even 75 watt bulbs are plenty bright most of the time. P

Use a lamp timer to keep stuff on only when you need it P

I have two water coolers, one in my office and one in the kitchen so that I can have hot or cold water at any time. But if I think about it, how likely is it that I'm going to be in both places at the same time? Or, that I'm going to need cold water while I'm asleep? P

Take a $10 lamp timer ($6 if you use it for non-grounded, two-prong plug items) and you can specify exactly what times of the day you're likely to be using this. For the office cooler, I'm only really going to need water from it between noon and 5PM. For the kitchen cooler, it's 7AM to 9AM, then 6PM to midnight. By doing this, I've shaved 80% use time off one and 66% off the other. Sure, it takes a little more power to get the water to optimal temperature when they first start up, but that's less than keeping it on the entire day. P

You can extrapolate this lamp timer usage to appliances that you use every day and don't want to unplug all the time, but only need part of the day. Are you going to use your internet connection while you're asleep (if you don't Torrent)? Put your cable modem and router on a lamp timer. Do you ever really watch any shows your TiVo records from 2AM to 9AM? Or need your stereo when you're at work or asleep? Take a look around your house and see what devices you use every day, but only for parts of it, that would be annoying to unplug manually. P

Use a smart power strip that knows when to turn everything off P

If you think about it, there's little reason for your Xbox, PS3, receiver or subwoofer to be on when your TV is off. Likewise, why would your computer speakers, external USB backup drive, and monitor need to be on when your computer is not? Grab a smart power strip, like the Belkin Conserve Smart AV, that kills power going to five other devices when the main device—your TV or computer—is shut off. If you often listen to music with your receiver on and your TV off, you could make that the primary device as well. P

And if you're forgetful, you could combine this with the lamp timer method to make sure that your "main" devices—the ones that kill everything else—are off when you go to bed. P

An alternate method is to get a power strip with a remote, like these two Belkin models, which gives you the plug/unplug functionality without physically going and doing it. P

Use a charger that knows when your devices have had enough P

You could also use a special Conserve Valet that charges four USB things at once. This thing knows when your device has drawn enough power to fill up, and then automatically cuts off the charging to eliminate phantom power drain. P

I've found that the Valet is not that, practically speaking, because when you're charging your phones, iPods and Kindles, you expect them to be charged when you unplug them, whether it's 3 hours later or a day later. But if you're vigilant about charging your devices, this is a decent solution to only draw as much power as absolutely necessary. P

Do I really need to do all these things? P

Installing an eMonitor and knowing exactly how much power each gadget in your house uses may be a little extreme if your electric bill is already reasonable. The eMonitor is expensive, despite its comprehensiveness, and I wouldn't expect many of you to actually install it. But, with a $20 Killawatt and the common sense lessons I learned from lowering my power bill, you should be able to cut at least a few bucks off yours. P

21 247_Reply
Like
1k

Refrigerator-Freezer Cleaning Checklist | Real Simple
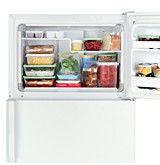


Freezer

Refrigerator and Freezer Cleaning Checklist

You may think you have the technique down cold, but keeping the refrigerator clean requires more than a box of baking soda. Think of this checklist as a refresher course.

See Your Saved Checklists|Cleaning Checklists|All Checklists.

Supercook: recipe search by ingredients you have at home


Do you have?

butter
mayonnaise
beef steak
rice
lemon
banana
eggs
salmon
olive oil
sugar
tomatoe
apple
vegetable oil
pasta
chicken breast
american cheese
canned tuna
ketchup
peanut butter
bread

My Ingredients

Click any ingredient to focus on it

Welcome

Supercook unlocks the potential of your pantry and fridge. Save money and help the environment by fully utilizing the ingredients you already have.


12 Simple Storage Solutions: The Family Handyman


Heavy-duty utility shelves

Big box storage
1 of 2

Big box storage

Build sturdy, simple shelves, custom sized to hold boxes or other storage containers.

« Previous Photo
Next Photo »

Store-bought shelving units are either hard to assemble and flimsy or awfully expensive. Here's a better solution. These shelves are strong and easy to build and don't cost much. We sized this sturdy shelf unit to hold standard records storage boxes. If you want deeper storage, build the shelves 24 in. deep and buy 24-in.-deep boxes. If you prefer to use plastic storage bins, measure the size of the containers and modify the shelf and upright spacing to fit.

Refer to the dimensions below to mark the location of the horizontal 2x2 on the back of four 2x4s. Also mark the position of the 2x4 uprights on the 2x2s. Then simply line up the marks and screw the 2x2s to the 2x4s with pairs of 2-1/2-in. wood screws. Be sure to keep the 2x2s and 2x4s at right angles. Rip a 4 x 8-ft. sheet of 1/2-in. MDF, plywood or OSB into 16-in.-wide strips and screw it to the 2x2s to connect the two frames and form the shelving unit.

If you choose plastic bins rather than cardboard boxes, label the plastic with a wet-erase marker. When it's time to relabel the bin, just wipe away the marks with a damp rag.

Stud-space cabinet

Shallow cabinet
1 of 2

Shallow cabinet

Remove the drywall from between two studs and construct a shallow cabinet to fit the space.

« Previous Photo
Next Photo »

When you can't find a convenient nook for a set of shelves, you can often create one by recessing the shelves into the wall itself. Choose the location before you build the project to make sure it will fit. Start by looking for a space with no obvious obstructions. Locate the studs with a stud finder. Some stud finders can also locate electrical wires and plumbing pipes inside walls. When you've found a promising spot, cut a 6-in.-square inspection hole between the studs. Use a flashlight and a small mirror to inspect the stud cavity for obstructions. You often can modify the size of the cabinet to avoid obstructions.

When you find a good space, mark the perimeter of the opening and use a drywall keyhole saw to cut it out. Measure the opening and subtract 1/4 in. from the height and width to determine the outer dimensions of your cabinet.

For standard 2x4 stud walls with 1/2-in.-thick drywall, build the cabinet frame from 1x4s that measure 3-1/2 in. wide (see illustration). If your walls are different, adjust the depth of the frame accordingly. Then add a 1/4-in. back. We screwed 1/4-in. pegboard to the back so we could hang stuff from pegboard hooks.

Add casing that matches the trim in your house. Drill holes into the sides to accept shelf supports. Shelf supports fit in 3mm, 5mm or 1/4-in. holes depending on the style.

Install the cabinet by slipping it into the opening, leveling it and nailing through the trim into the studs on each side. Use 6d finish nails placed every 12 in. along both sides.

Don't want to cut your walls open? Unfinished wall framing in a basement or garage also makes ideal storage space for narrow items like cleaning supplies or small boxes of nails and screws. Simply cut 2x4s to fit between the studs and toe-screw them in to form shelves.

Behind-the-door shelves

Hidden shelves
1 of 2

Hidden shelves

Build shallow shelves to fit behind the door in your laundry room, utility room or pantry.

« Previous Photo
Next Photo »

The space behind a door is another storage spot that's often overlooked. Build a set of shallow shelves and mount it to the wall. The materials are inexpensive. Measure the distance between the door hinge and the wall and subtract an inch. This is the maximum depth of the shelves. We used 1x4s for the sides, top and shelves. Screw the sides to the top. Then screw three 1x2 hanging strips to the sides: one top and bottom and one centered. Nail metal shelf standards to the sides. Complete the shelves by nailing a 1x2 trim piece to the sides and top. The 1x2 dresses up the shelf unit and keeps the shelves from falling off the shelf clips.

Locate the studs. Drill clearance holes and screw the shelves to the studs with 2-1/2-in. wood screws. Put a rubber bumper on the frame to protect the door.

Joist-space space-saver

Wire shelf
1 of 1

Wire shelf

Joist cavities are the perfect size for plastic storage containers.

Don't waste all that space between joists in a basement or garage. Screw wire shelving to the underside of the joists. Use a standard 8-ft. x 16-in. length of wire shelving and a pack of plastic clips, or have it cut to length at the home center.

Closet nook shelves

Closet cubbies
1 of 1

Closet cubbies

Make the most of the recesses at the ends of your closet with wire shelving.

Salvage the hidden space at the recessed ends of your closets by adding a set of shelves. Wire shelves are available in a variety of widths. Measure the width and depth of the space. Then choose the correct shelving and ask the salesperson to cut the shelves to length for you. Subtract 3/8 in. from the actual width to determine the shelf length. Buy a pair of end mounting brackets and a pair of plastic clips for each shelf.

Shoe-storage booster stool

Double-duty storage
1 of 2

Double-duty storage

Use this small cabinet for storage and for a step up to a high shelf.

« Previous Photo
Next Photo »

Build this handy stool in one hour and park it in your closet. You can also use it as a step to reach the high shelf. All you need is a 4x4 sheet of 3/4-in. plywood, wood glue and a handful of 8d finish nails. Cut the plywood pieces according to the illustration. Spread wood glue on the joints, then nail them together with 8d finish nails. First nail through the sides into the back. Then nail through the top into the sides and back. Finally, mark the location of the two shelves and nail through the sides into the shelves.

Stacked recycling tower

Recycling solution
1 of 2

Recycling solution

Keep recycling neatly separated and off the ground with this vertical storage unit.

« Previous Photo
Next Photo »

Five plastic containers, six 2x2s and screws, and one hour's work are all it takes to put together this space-saving recycling storage rack. Our frame fits containers that have a top that measures 14-1/2 in. x 10 in. and are 15 in. tall.

If you use different-size containers, adjust the distance between the uprights so the 2x2s will catch the lip of the container. Then adjust the spacing of the horizontal rungs for a snug fit when the container is angled as shown.

Start by cutting the 2x2s to length according to the illustration. Then mark the position of the rungs on the uprights. Drill two 5/32-in. holes through the uprights at each crosspiece position. Drill from the outside to the inside and angle the holes inward slightly to prevent the screws from breaking out the side of the rungs.

Drive 2-1/2-in. screws through the uprights into the rungs. Assemble the front and back frames. Then connect them with the side crosspieces.

Sandwich-bag parts organizer

Small parts storage
1 of 2

Small parts storage

Cut slots in a piece of plywood with a jigsaw. Fill resealable bags with small parts, hardware or craft items and hang them from the slotted plywood.

« Previous Photo
Next Photo »

Keep screws, connectors, nails and other small parts in sight and handy with this resealable bag holder. You can build it out of a 3/4-in.-thick scrap of plywood. Start by cutting two pieces of plywood as shown. Draw lines 1 in. apart across the shorter piece with a square, stopping 1 in. from the edge. Now cut along the lines with a jigsaw. Screw the two pieces of plywood together and screw the unit to the wall. Fill resealable bags and slip them into the slots.

Two-story closet shelves

Two-story shelf
1 of 2

Two-story shelf

Double the shelf space in your closet by adding a second shelf above the existing one.

« Previous Photo
Next Photo »

There's a lot of space above the shelf in most closets. Even though it's a little hard to reach, it's a great place to store seldom-used items. Make use of this wasted space by adding a second shelf above the existing one. Buy enough closet shelving material to match the length of the existing shelf plus enough for two end supports and middle supports over each bracket. Twelve-inch-wide shelving is available in various lengths and finishes at home centers and lumberyards. We cut the supports 16 in. long, but you can place the second shelf at whatever height you like. Screw the end supports to the walls at each end. Use drywall anchors if you can't hit a stud. Then mark the position of the middle supports onto the top and bottom shelves with a square and drill 5/32-in. clearance holes through the shelves. Drive 1-5/8-in. screws through the shelf into the supports.

Back-of-door organizer

Full door nailer
1 of 1

Full door nailer

Screw 3/4-in. plywood to the back of a door to provide a solid mounting base for screw hooks, baskets or other storage accessories.

The back of a door that opens into a utility room or closet makes a handy hanging space. The trouble is that most doors don't offer a good mounting surface for hardware. The solution is to screw a piece of 3/4-in. plywood to the back of the door. Add construction adhesive for hollow-core doors. Cut the plywood 3 or 4 in. shy of the door edges to avoid conflicts with the doorknob or hinges. Now you can mount as many hooks, magnets and other storage gizmos as you like.

Double-decker closet rod

Closet rod extender
1 of 1

Closet rod extender

Add a lower closet rod to gain extra hanging space in your closet.

All you need to gain a lot of hanging space in your closet is two metal closet brackets and a length of closet rod. If your existing closet rod is at least 66 in. from the floor, there's enough space to add a second rod below it and still hang shirts and slacks. We placed the top of the rod 35 in. from the floor, which allowed just enough room to hang two levels of pants.

Locate studs on the back wall of the closet with a stud finder. Then attach metal brackets to the studs. Use a level to align the brackets along the top. Space the brackets no more than 32 in. apart.

Glass shower shelf

Overhead shelf
1 of 1

Overhead shelf

Mount a shelf above your tub to store towels, shampoo and conditioner.

Tired of the clutter of shampoo and conditioner bottles along the rim of your tub? This tempered safety glass shelf on a cable shelf bracket is an easy solution. The cable shelf bracket requires only two screws for support. If studs aren't located in the right positions, use toggle bolts to anchor the shelf brackets. The glass hangs on the cables. The cable shelf brackets are available online from expodesigninc.com. Order a tempered glass shelf from a local glass company. We used a 3/8-in.-thick, 12-in.-deep shelf.

Back to Top

Small camp security by Gary Lewis

Will any of this work for the house?

Small camp security

By Gary Lewis


Issue #148 • July/August, 2014

It might be a sleeping bag in a lean-to with a small warming fire at the entrance. It could be a wall tent with five or six hunters high in the backcountry. It might be a recreational vehicle parked at the end of a road, a hiker's bivouac on the shore of an alpine lake, or a place to run to in the event of a natural disaster or unrest in the big city. Whatever the reason for the camp, chances are the camper or campers will have to leave, to hunt, to fish, to hike, to go for supplies. Camp is left unguarded, with no doors or locks — nothing between a thief and the potential loot.

After dark, the camp and campers are also vulnerable to the creatures (four-legged and two-legged) that roam the night.

Backcountry camps, both in and outside of established campgrounds, are vulnerable to theft and invasion. Camping equipment is hard to trace to its original owners and is easily converted to cash.

No area of the country is immune. Homelessness and illegal drug use is rampant in the Northwest. Illegal aliens slip across the border all across the Southwest. All over North America, drug lords use backwoods camps for the manufacture of methamphetamines and marijuana grows. When we camp in the country, our nearest neighbors might be a family on their annual fishing trip, or felons on the run.

Build a fire and they will come. Wild animals are fearful of fire, but humans are drawn to it.

Strengths, weaknesses, opportunities, & threats

At home we usually have some sort of early warning system that can alert us to a threat before the threat reaches the threshold of the bedroom. It might be a dog in the yard or the sound of the doorknob opening. In a tent or a shelter, that door is the door of your tent and by then the intruder is inside your personal space.

Examine each campsite with a view to strengths, weaknesses, opportunities, and threats. Is the site defensible? Is cell service available? Where is the closest cell signal connection? What paths lead into and out of camp? Is water close by? What distances must be traveled to find food or go for supplies? Are there wild animals that might make midnight raids on the camp kitchen?

A camp within a day's walk of a town is likely to have at least a few individuals that make their homes in the woods nearby. How likely would the camp be found by a homeless wanderer or the criminally insane?

To set up the Camp Alert Perimeter Security System, string a trip wire made of fishing line from a fixed object attached to the bead chain pull. When the trip line pulls the pin loose, a high-pitched alarm sounds.

Deterrence

Security is about deterrence. A four-legged predator is likely to stay outside the circle of firelight or a ring of lights. But a two-legged predator may be attracted by illumination. A one-tent camp is more likely to attract thieves than a camp with more than one shelter. The reason? A burglar that chances on an encampment will have to turn his back on one tent to enter the other. One tent may be empty, but the other might be occupied by a camper with a 12-gauge.

For security from theft in recreational camps, pitch your tent near other campers and take the time to introduce yourself to neighbors. Fellow campers tend to watch for each other.

When camped away from others, establish the illusion of more people in camp. One good way to do that is to put out extra chairs around the fire.

Use a decoy tent in such situations. A larger tent might serve as food and gear storage, and another tent nearby, perhaps camouflaged, might be used for sleeping.

Set up camp with a thought to where and how the food will be stored, prepared, and disposed of. Garbage is the main attractant for most predators. A bear can smell bacon grease up to three miles away. It might be spooked off by the human smell and it might not. Coyotes are prone to prowl the perimeter of the camp. If the smell of food is overwhelming, coyotes become a nuisance. Young children are vulnerable to attacks, as evidenced by recent news reports. Raccoons and skunks are even more likely unwanted guests. Neutralize food smells by burying garbage or removing it from camp.

One way to keep a bear out of your food is to protect it. YETI coolers are certified bear-proof by USDA's Interagency Grizzly Bear Committee. In both controlled bear simulations and wild grizzly encounters, the YETI, with locks in the integrated padlock ports, protects the food inside. And the bear goes looking for protein elsewhere.

A bear can smell bacon grease up to three miles away. A holistic approach to camp security can alert a camper to danger beyond the perimeter.

Distant early warning

One of the best early warning systems is a dog that catches the scent or sound of the intruder. Some dogs are better than others, but the fact is that the camper may not be accompanied by a dog or may not own one. How then can a campsite be secured?

Establish a safety zone in which any prowler might be considered a threat. One hundred yards from the fire might be too far, but a radius of 40 to 60 yards might be appropriate. A perimeter system can be as elaborate as a solar-powered electric fence with a battery backup or as simple as a taut fishing line with empty beer or soda can rattles employed on likely ingress and egress paths.

One 360-degree perimeter system uses a spin-cast fishing reel with six- to ten-pound fishing line. Run the line around camp, then secure the reel in the sleeping area with the drag set low. If the perimeter line is hit by an intruder, the reel will begin to click as the line pulls out.

Another option is a battery-powered motion sensor, but such systems are likely to be tripped by bats, squirrels, and other small varmints and might cause more annoyance than they are worth.

From Brite-Strike Technologies comes the Camp Alert Perimeter Security System (CAPSS), a 135dB audible alarm unit with red lens flashlight and blue flashing LEDs. The CAPSS comes with two rolls of trip wire, two nylon zip ties, eight inches of adhesive mounting tape, and two blue all-purpose adhesive light strips (APALS). Contained in a box the size of a bar of soap, the CAPSS takes up little room in a pack and retails for about $35.

To put the CAPSS to work, identify the expected intrusion path. Attach the alarm module to a fixed object (tree, boulder, parked car, etc.) with the supplied zip ties or adhesive or duct tape. Attach one end of the monofilament trip line to the audible alarm trigger bead chain. Connect the other end of the line to a fixed object on the other side of the intrusion path. When the trip line is tripped, the male post is pulled from the unit and the alarm is triggered — 135 earsplitting dB and blue light. An APAL may be used to identify the location of the CAPSS from inside the perimeter.

The components of a small camp security system: a trail cam, a perimeter alert system, an inexpensive LED camp light, an LED flasher, and a handheld light.

Available light

Since most attacks come out of the dark, light can be a deterrent to almost any attacker, whether four-legged or two-legged. In the event of an attack, light up the night with a strobe and an intruder is likely to be disoriented.

The more lumens you put on the subject the better. Lumens is the standard by which light output is judged. LED lights come in a thousand configurations, but for combat, for addressing a threat in low light and ,no-light situations, 100 lumens is the minimum. Better to have 150 or 200 lumens.

Equipment security

If you must leave vehicles or other heavy equipment unattended, there is a simple way to protect them. Harbor Freight sells vibration alarms and door/window alarms for $2 to $4 apiece. When the connection is broken or vibration sets it off, a loud siren is triggered. With on/off switches, they are easily disarmed.

Both alarms are mounted via adhesive tape. Find an unobtrusive spot to mount the device out of the elements. Set the switch on "chime" or "alarm." Then remember to arm the device before leaving camp.

Signals

Trail cam tips

Here are five simple rules for setting up a scouting camera.

1. Set the frequency of exposures to keep from filling the memory card prematurely.

2. Position the camera at a 45-degree angle to the trail and 24 to 36 inches above the ground, oriented parallel to the grade.

3. Point the camera north. Any other direction and you are likely to have it faced directly into the sun at some point in the day.

4. Clear the area between the lens and the potential target, so that the movement of bushes on a windy day won't trigger false pictures or cause flashback.

5. Keep a "possibles" kit. Every time you check your trail cam, bring a camera or a viewer, fresh batteries, extra media cards, a lens cloth, and straps in case the squirrels have chewed them through.

If the camp is being used by more than one person that might return from various errands at all hours of the day or night, a set of signals might be agreed upon to include colors of light or number of flashes.

The Energizer LED Safety Flasher (retail $9.75) is a self-contained unit that can be stored in the bottom of a pack and switched on in an emergency situation. With a cyclic rate of 80 flashes per minute, it is an attention getter in an emergency situation or a subtle signaling unit when clicked on for two seconds then clicked off. In a long-term camp, it would be prudent to change the signals from time to time.

The camera eye

Know who and what is watching. Trail camera technology has become so popular that the units are widely available, affordable, and easy to put to work.

Rugged, waterproof, battery-powered and self-operated trail cameras can take photos or record video at any time of night or day. They can be strapped to a tree and left to operate for days or weeks at a time.

Utilizing digital camera technology with motion detection, night vision, and timed recording, the controls are hidden inside a waterproof enclosure. Powered by batteries, the content is written to a removable memory card. Check the card supplied with the unit to determine if there is sufficient memory to record the number of days that the camera will be in use between check intervals. In my cameras, I run cards with 2GB of memory and then set the images at about 3MG resolution.

The cameras are easy to use with switch settings or menu screens. Set the unit to record movies or stills and to the resolution that allows for the optimum memory usage.

At night, some cameras are more useful than others. Most use infrared to see in the dark, which means images will appear in black and white rather than color.

Camera theft is common. One of the main reasons is that the person photographed does not want it to be known that they were in the area. Position the camera in less obvious locations and take care to camouflage it.

Set up a camera on the trail on each side of camp beyond the perimeter, and check the images every couple of days. If someone or something is sniffing around, you will know about it.

Resources

Brite-Strike CAPSS

11 Raffaele Road

Camelot Industrial Park

Plymouth, MA 02360

508-746-8701

www.brite-strike.com

Coast lights, knives, multi-tools

www.coastportland.com

877-704-4545

Energizer LED Safety Flasher

Customer Support

Energizer Headquarters

533 Maryville University Drive

St. Louis, MO 63141

800-383-7323

www.energizer.com

Bunker Hill Security alarms

Harbor Freight

800-423-2567

www.harborfreight.com

Yeti Coolers

512-394-9384

www.yeticoolers.com

Stealth Cam

PO Box 535189

Grand Prairie, TX 75053-5189

877-269-8490

www.stealthcam.com

Bushnell HD Torch

800-423-3537

www.bushnell.com

SOGfari machete

6521 212th Street Southwest

Lynnwood, WA 98036

425-771-6230

www.sogknives.com

To order a signed copy of Gary Lewis' new Hunting Oregon, send $24.95 (includes S&H) to GLO, PO Box 1364, Bend, OR 97709 or visit his website: www.GaryLewisOutdoors.com


Read More Self Reliance Articles


      Please address comments regarding this page to editor[at]backwoodshome.com. Comments may appear in the "Letters" section of Backwoods Home Magazine. Although every email is read, busy schedules generally do not permit personal responses.
Click Here for A Widow's Walk Off-Grid to Self-Reliance

Pole Shift Survival Information


  The information on this site is for those who wish to improve their

  chances for survival after the coming pending pole shift. 


4001 Files, 14.1 GB 

Last Updated 21 Jul 2013 


PSSurvival.com (Primary site - AZ)

PS-Survival.com (Backup site - IL)